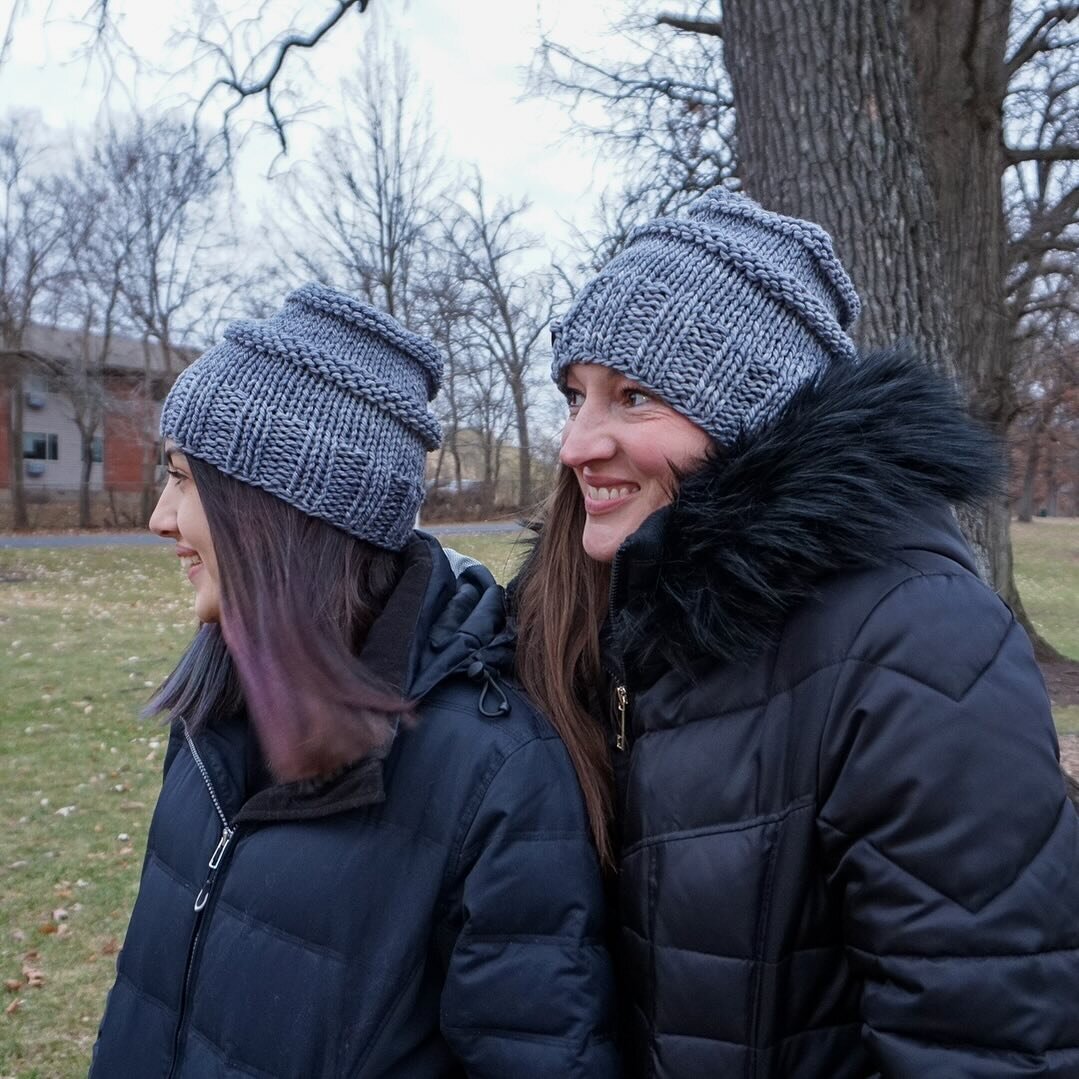
Back It Up Reversible Hat Free Knitting Pattern
/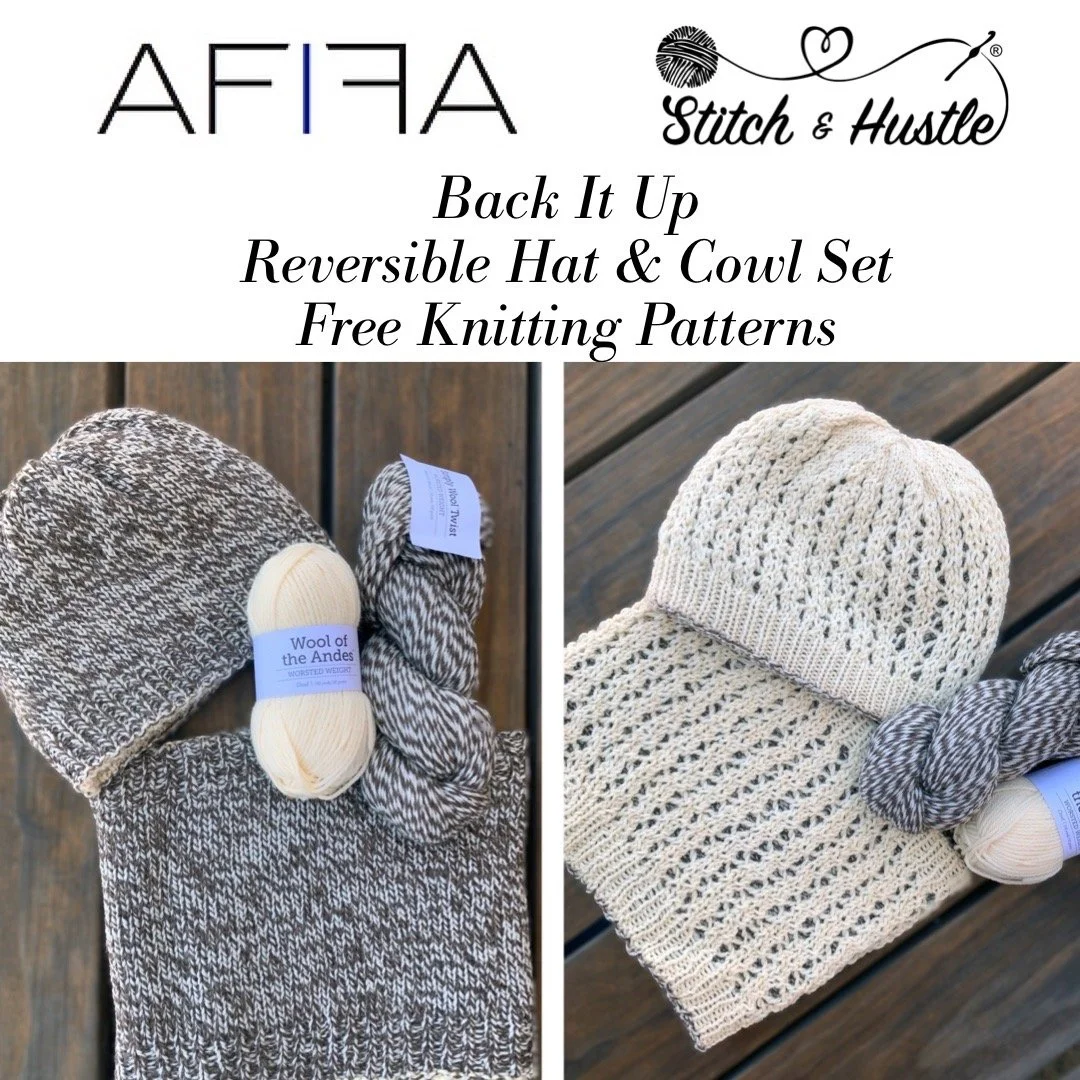
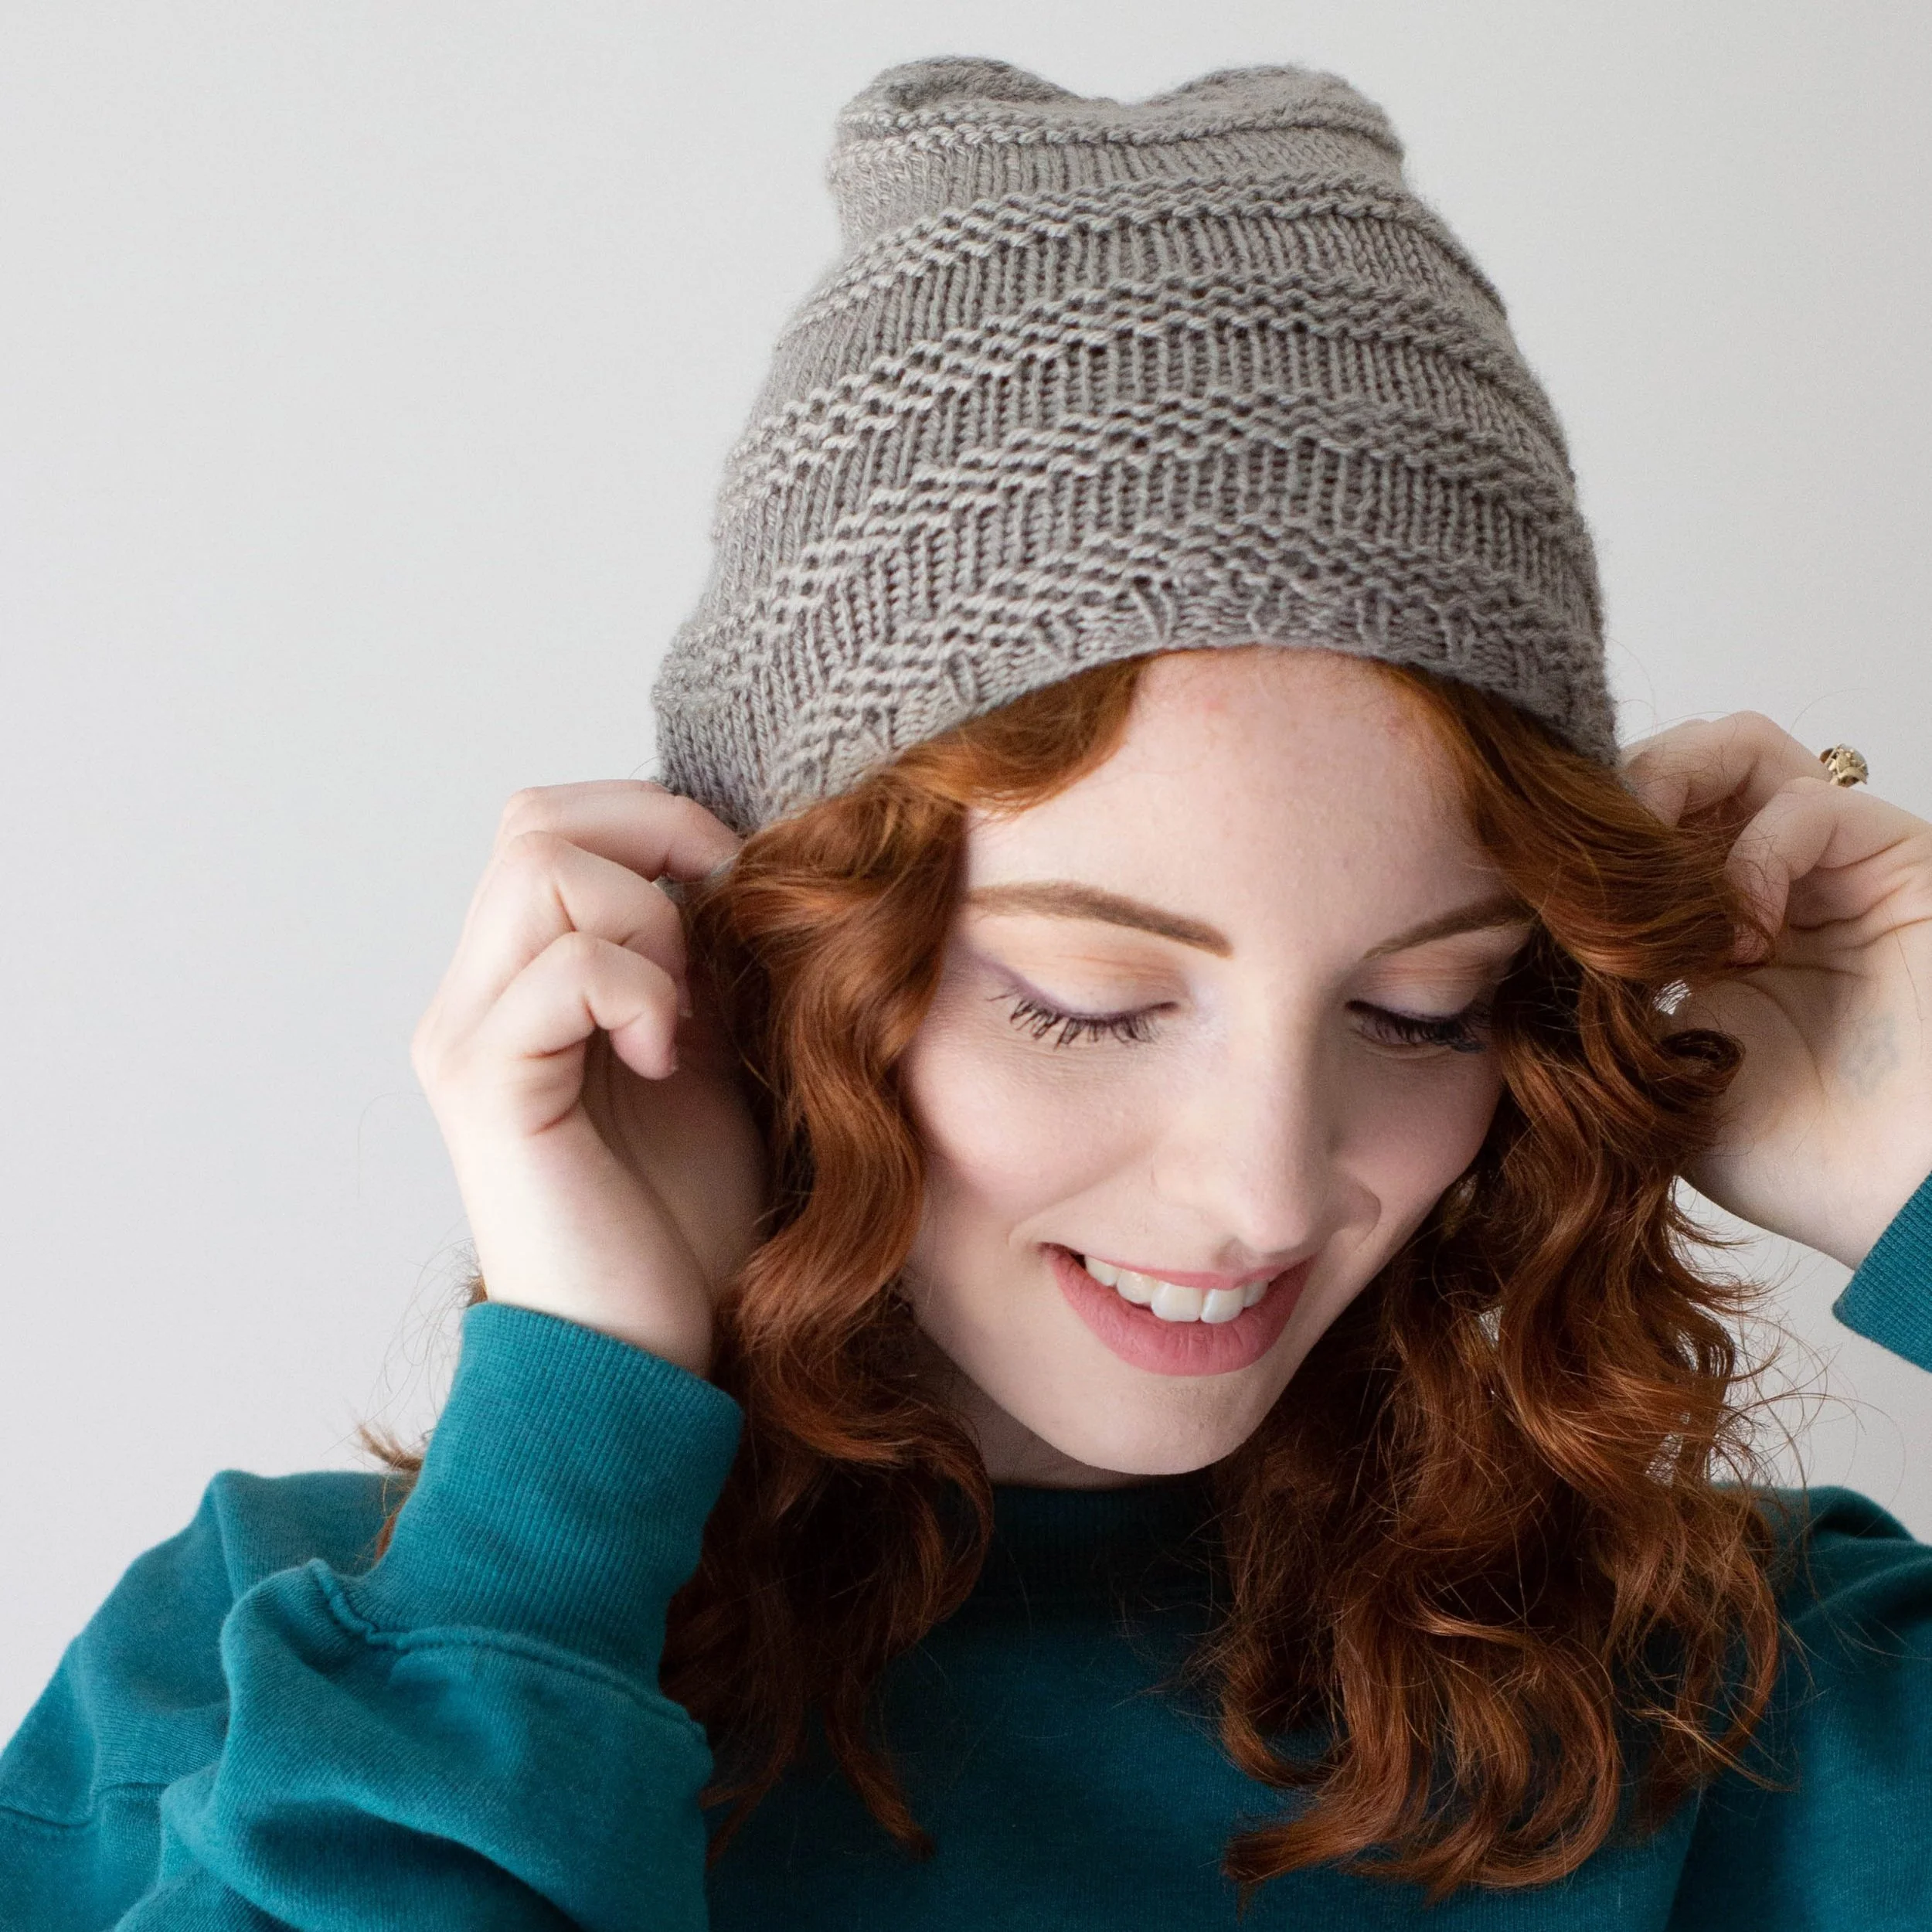
This is the Beanie of The Back It Up Hat & Cowl Set and it will bring you all the stylish cozy warmth you could ever need.
Read MoreThis is the Beanie of The Back It Up Hat & Cowl Set and it will bring you all the stylish cozy warmth you could ever need.
Read MoreI love a good classic beanie with a bit of texture and style and the Ledge Beanie delivers!
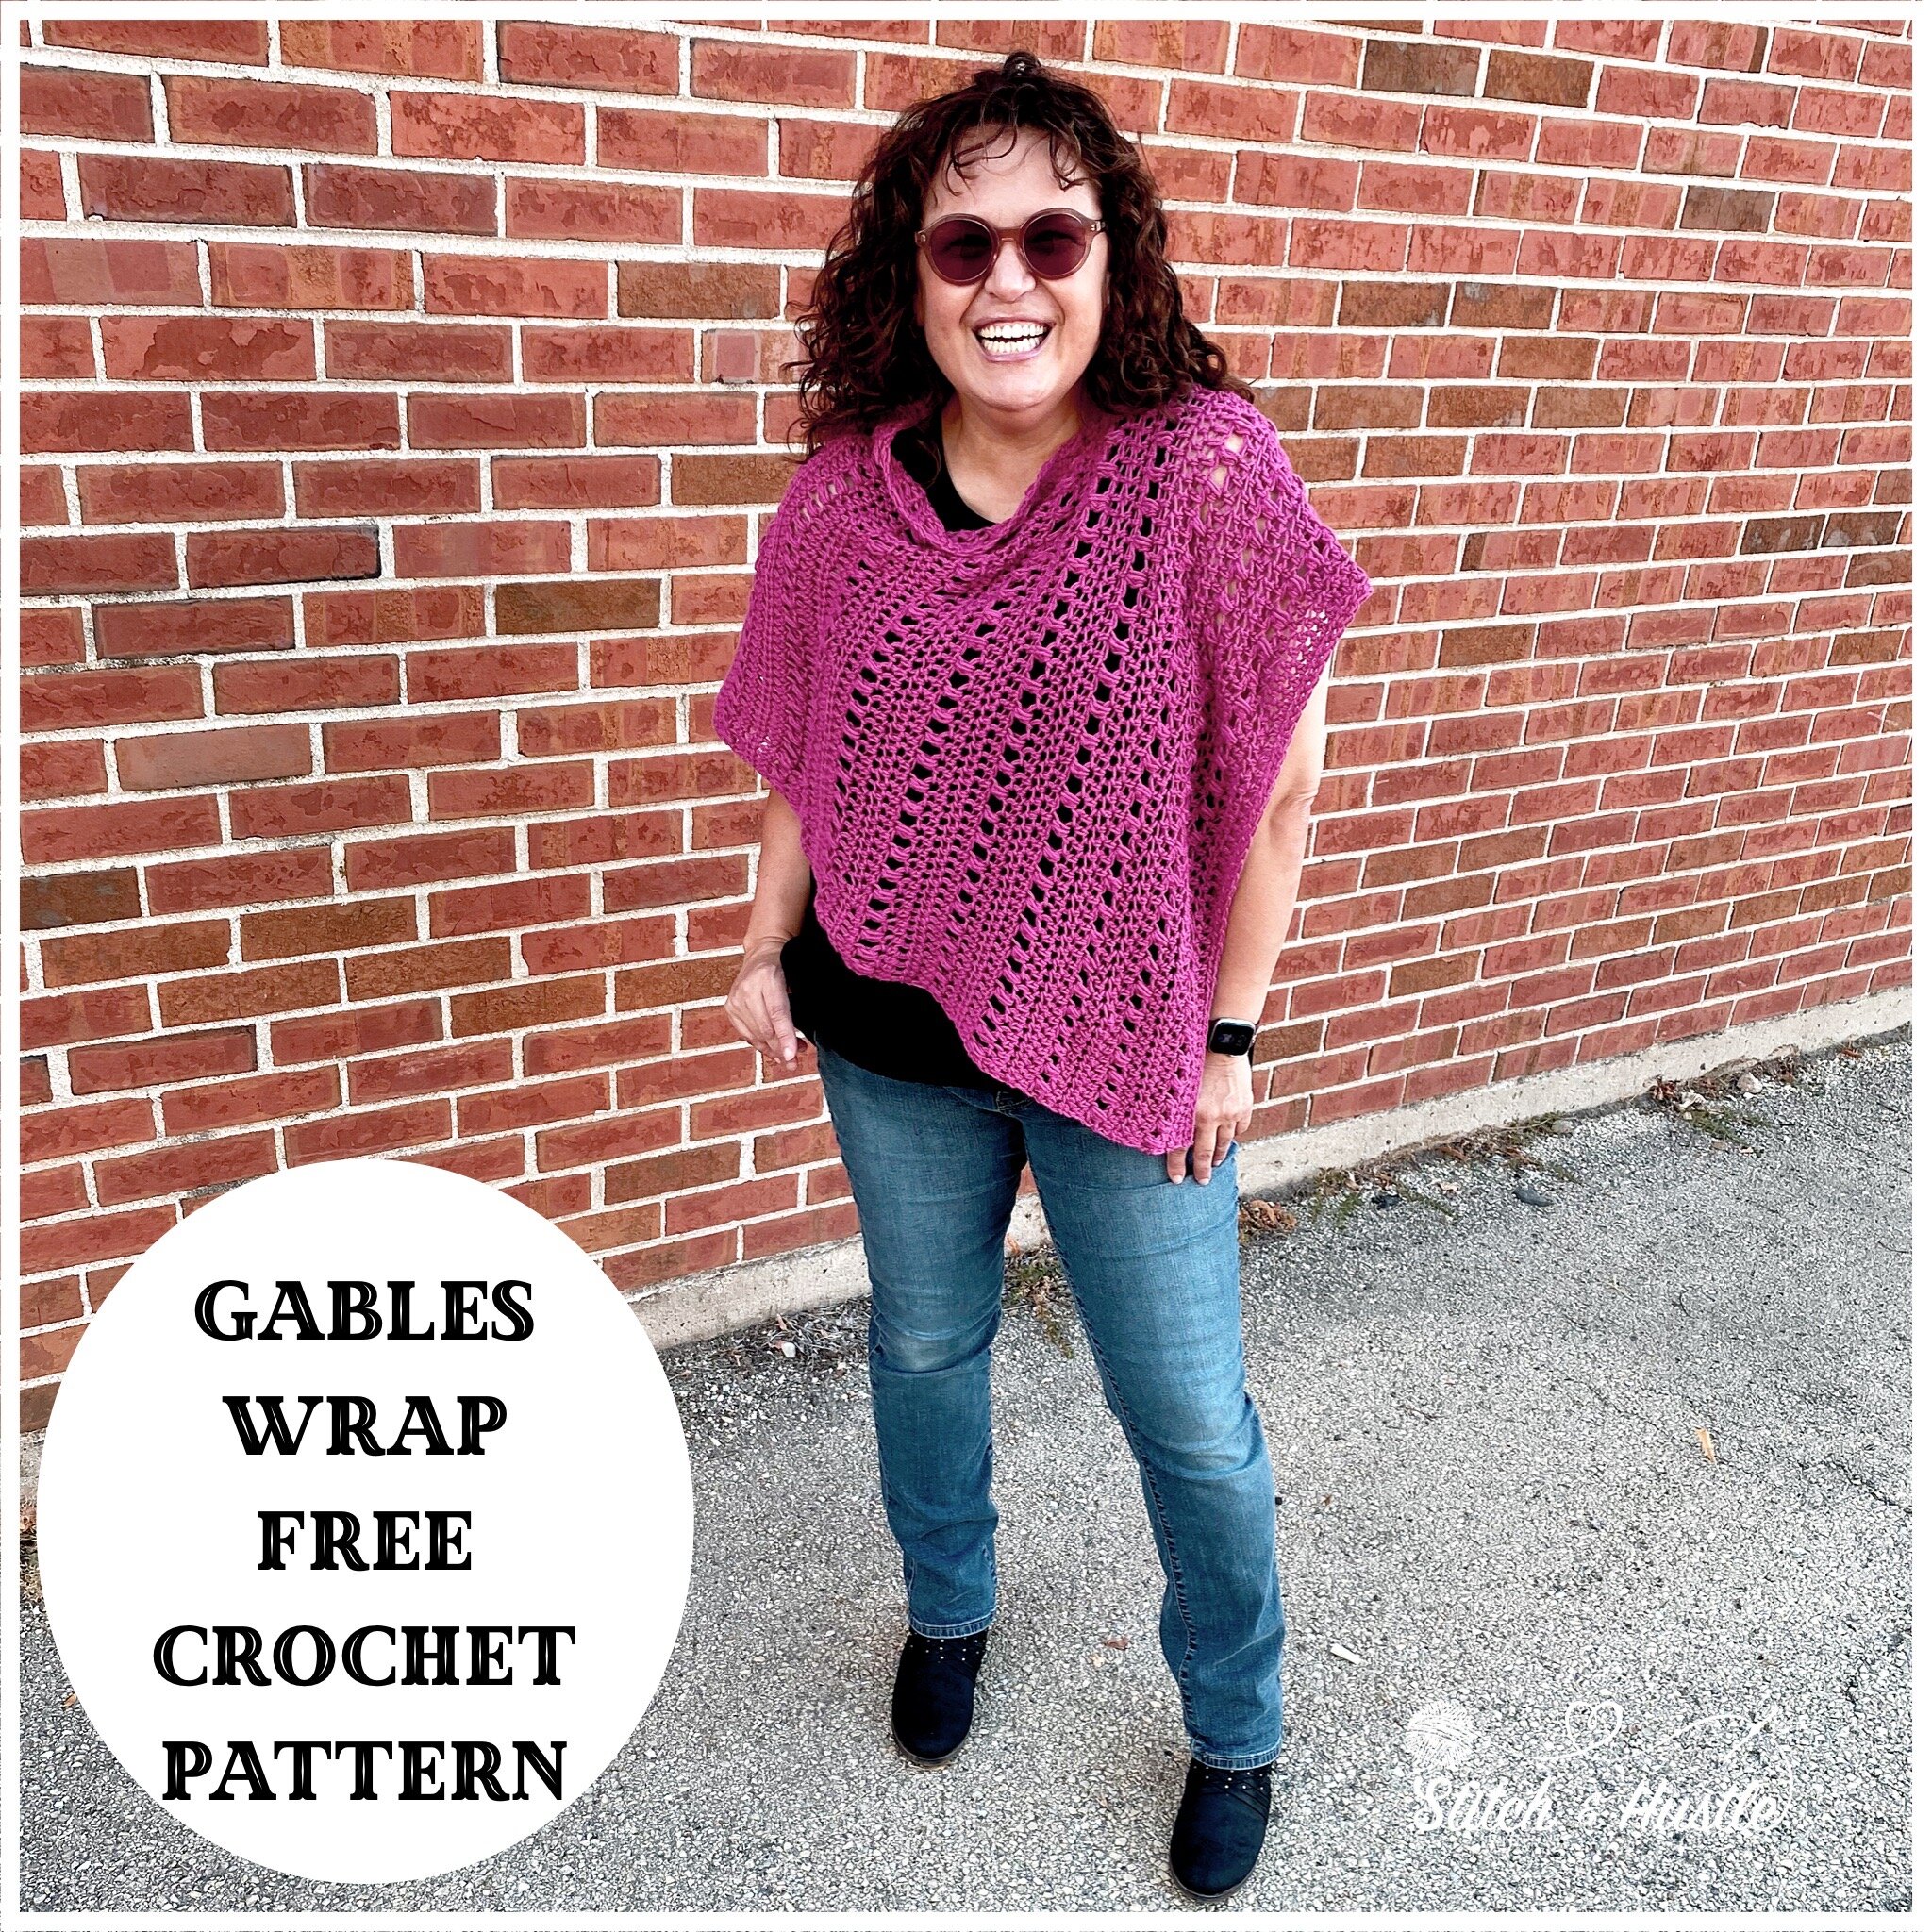
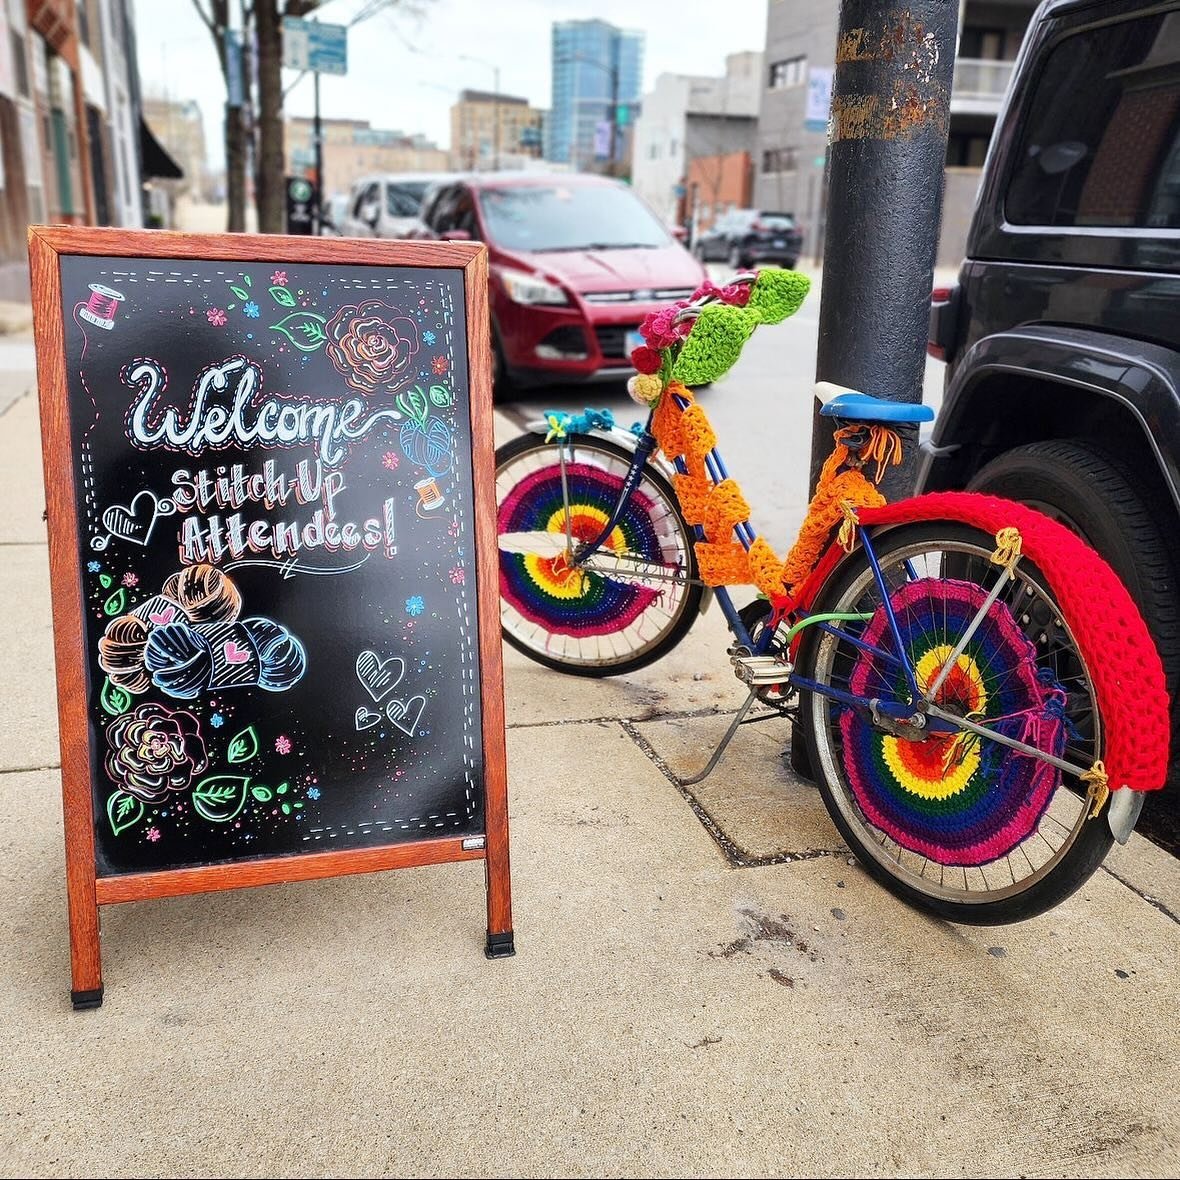
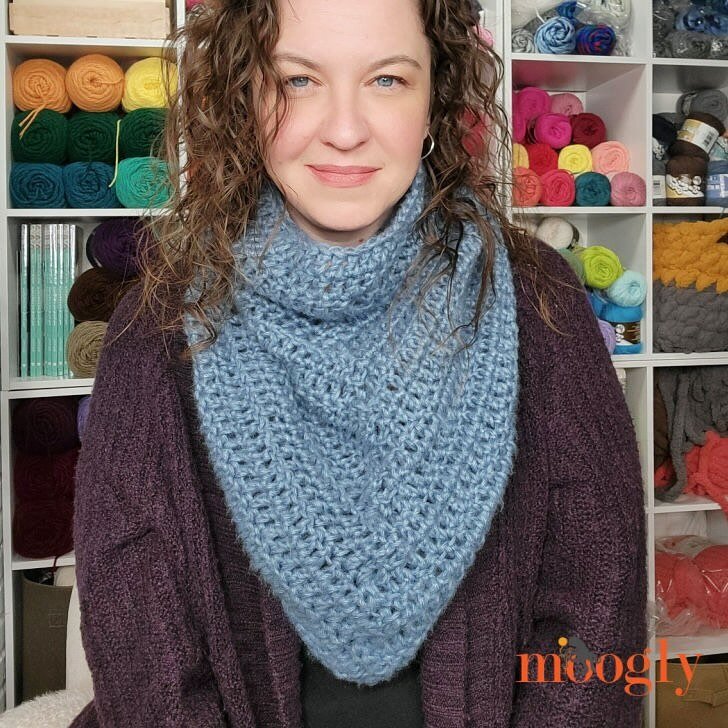
Read MoreI am thrilled about this design of the Gables Wrap Free Crochet Pattern for the Puff The Magic Stitch Blog Hop. The Gables Wrap is perfect for transitional weather and adding a pop of color to your every day look.
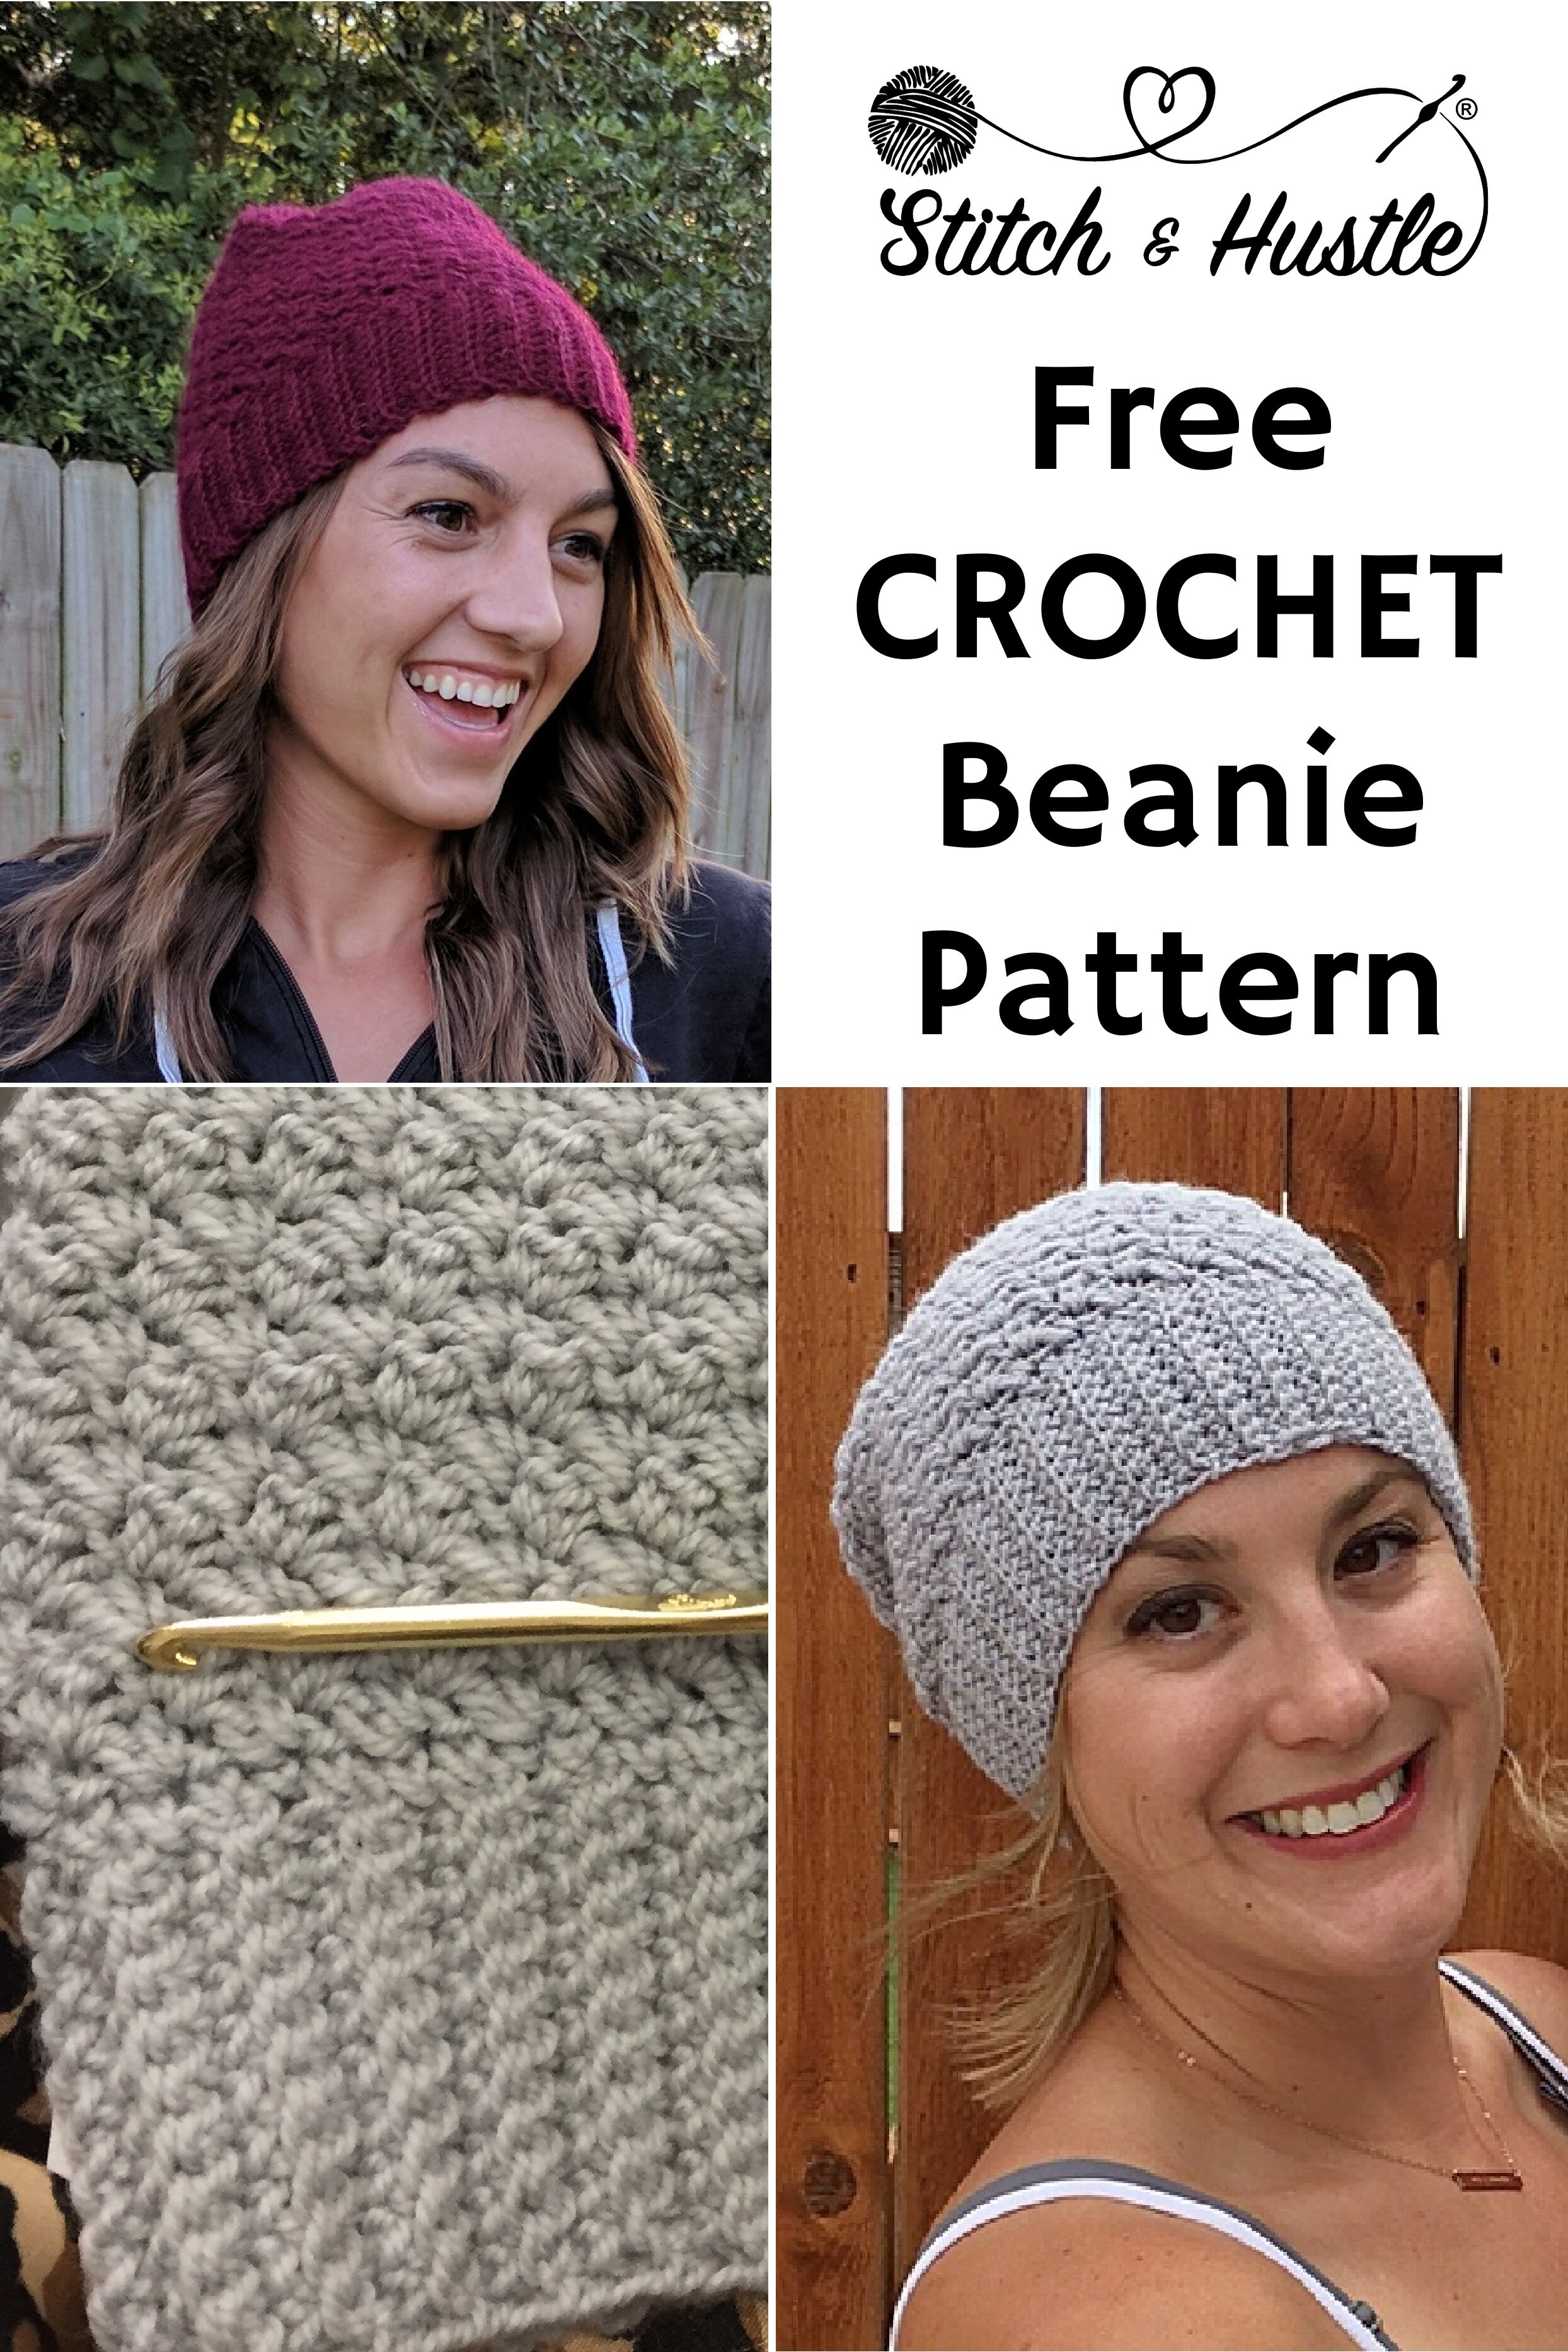
Read MoreWhether it is for markets or for gifts or for myself, I truly love making hats. One of my favorites is the Nepal Textured Beanie Free Crochet Pattern because with a few simple tricks there is incredible texture!
The Nepal Textured Beanie Free Crochet Pattern is beginner friendly and always super popular when I do markets and events. Working from the bottom up, the Nepal Textured Beanie Free Crochet Pattern lets you decide the width of the band before you even get to the body so it is easily sized for children or adults.
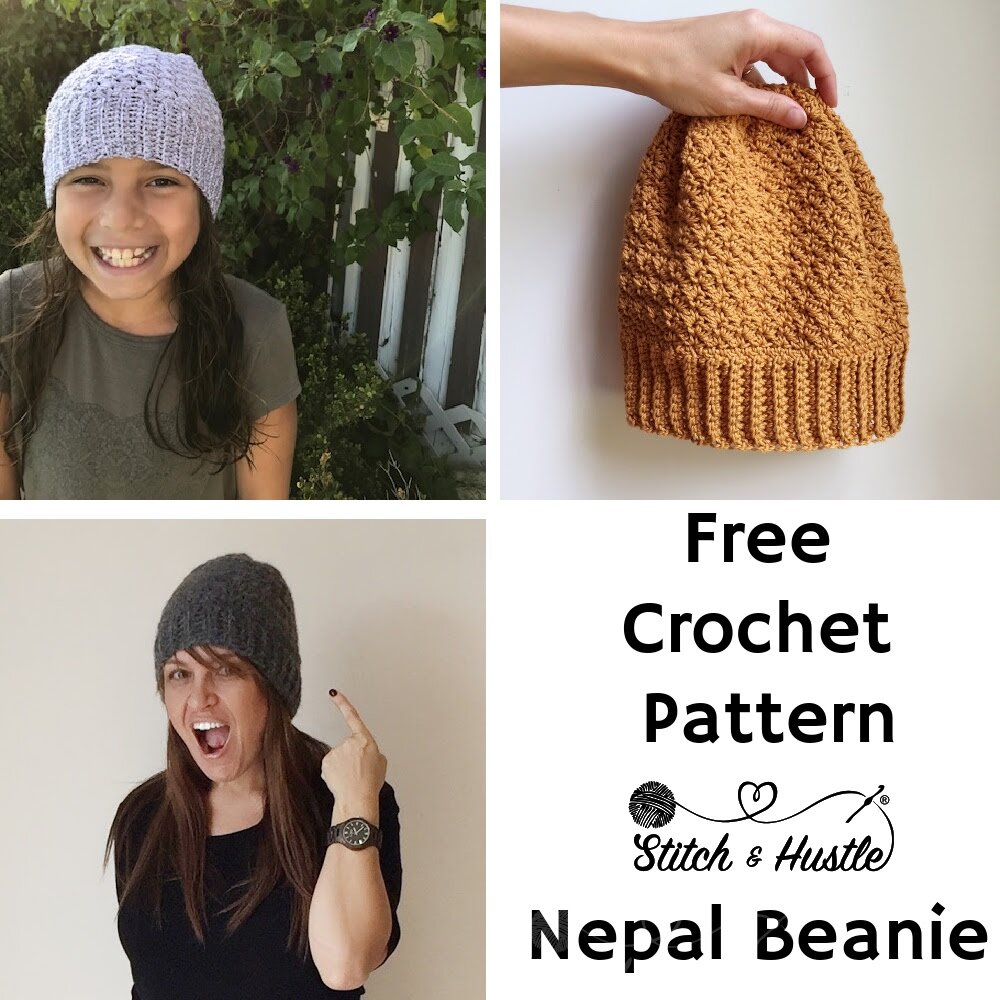
One of the best things about the Nepal Textured Beanie Free Crochet Pattern is that you can easily adapt this pattern for any yarn weight by simply keeping the main body in the pattern multiples.
This little trick to customize the Nepal Textured Crochet Beanie Pattern is excellent if you decide to change up and use different weight yarns and different size hooks. Then this becomes more of a roadmap than exact pattern.
Supply List:
Category 3 DK weight yarn – approx. 165 yrds
Crochet Hook Size H-8 / 5 mm
Stitch Marker
Large needle to weave ends
Stitches Used / Abbreviations:
fsc- Foundation Single Crochet
ch - Chain
sc - Single Crochet
hdc- Half Double Crochet
dc – Double Crochet
sp – Space
sl st – Slip Stitch
sc2tog – Single Crochet 2 Together

Pattern Notes:
Pattern has joined rows. You will ch 1 & turn for the main body of the hat
Hat Size:
Completed measures: 19” band circumference / Height 9” when following pattern
Fits Average Adult Size Head 21” – 23” using these pattern directions.
To adjust for smaller or larger size: make band to desired circumference – must be even number, multiple of 2, plus 1 for band rows.
SUPPORT THIS BLOG & GET THE AD FREE PDF PATTERN HERE ON ETSY

BAND:
Row 1: fsc x12 *** (alternate: ch 12, turn, ch 1 (acts as first sc), 11x sc across for total 12 sc incl ch 1) ***
Row 2 and on: turn, ch 1, 11x sc in back loop only
Rows 3 – 64: Repeat row 2 for average adult size head of 19” (or desired width)
Then, when band is at desired width:
Sl st to top of initial fsc from first row, then 10 sl across to attach the whole band to become a circle
DO NOT CUT YARN // Turn to now work the body

HAT BODY:
Round 1: ch 1, sc all way around band for total 64 sc, then sl st to ch 1
(If you adjust for smaller or larger band, this will increase – must be multiple of 2 for pattern)
Round 2: ch 1, dc in same sp as ch 1, *skip one sc, [1sc, 1 dc] in next sc *; repeat * to * all the way around to end leaving 1 sc left; skip last sc , sl st to ch 1 to complete Round. Ch 1 and turn.
Round 3: DC in same sp as ch 1, *skip next dc, [1sc, 1 dc] in next sc *; repeat * to * all the way around, sl st to ch 1 to complete Round. Then ch 1 and turn.
Rounds 4 – 22: Repeat Round 3 *** for slouchy style add rows here before going on ***
Round 23: DC in same sp as ch 1, *skip next dc, [1sc, 1 dc] in next sc *; repeat * to * around, sl st to ch 1 to complete Round. DO NOT TURN WHEN ROUND COMPLETE
Round 24: Ch 2 (acts as hdc), hdc around, sl st tp top of ch 1 to complete Round. Total of 64 hdc (incl ch 2)
Round 25: ch 1, sc in next hdc, [sc2tog] around and sl st to top of ch 1 to complete Round.
Total for Round 30 sc incl. ch 1 **this round should be stitched loosely**
Round 26: ch 1, sc loosely in each st around, sl st to top of Ch 1 to complete Round.
Total for Round 31 sc incl. ch 1
Cut yarn leaving approx. 8” tail to use for closing up the hat.

FINISHING:
Turn hat inside out.
Using tapestry needle, weave tail in and out of final round using diagram as a guide and creating a star shape. Pull taut, gathering together.
Turn hat right side out.
Using tail, seam up the hat peak.
See my hat closing tutorial and tips here
Fasten off and weave in ends
I am so excited that Stitch & Hustle is once again part of the Moogly CAL! A free crochet pattern for this wonderful transformative square that creates a beautiful texture and pattern on BOTH SIDES!
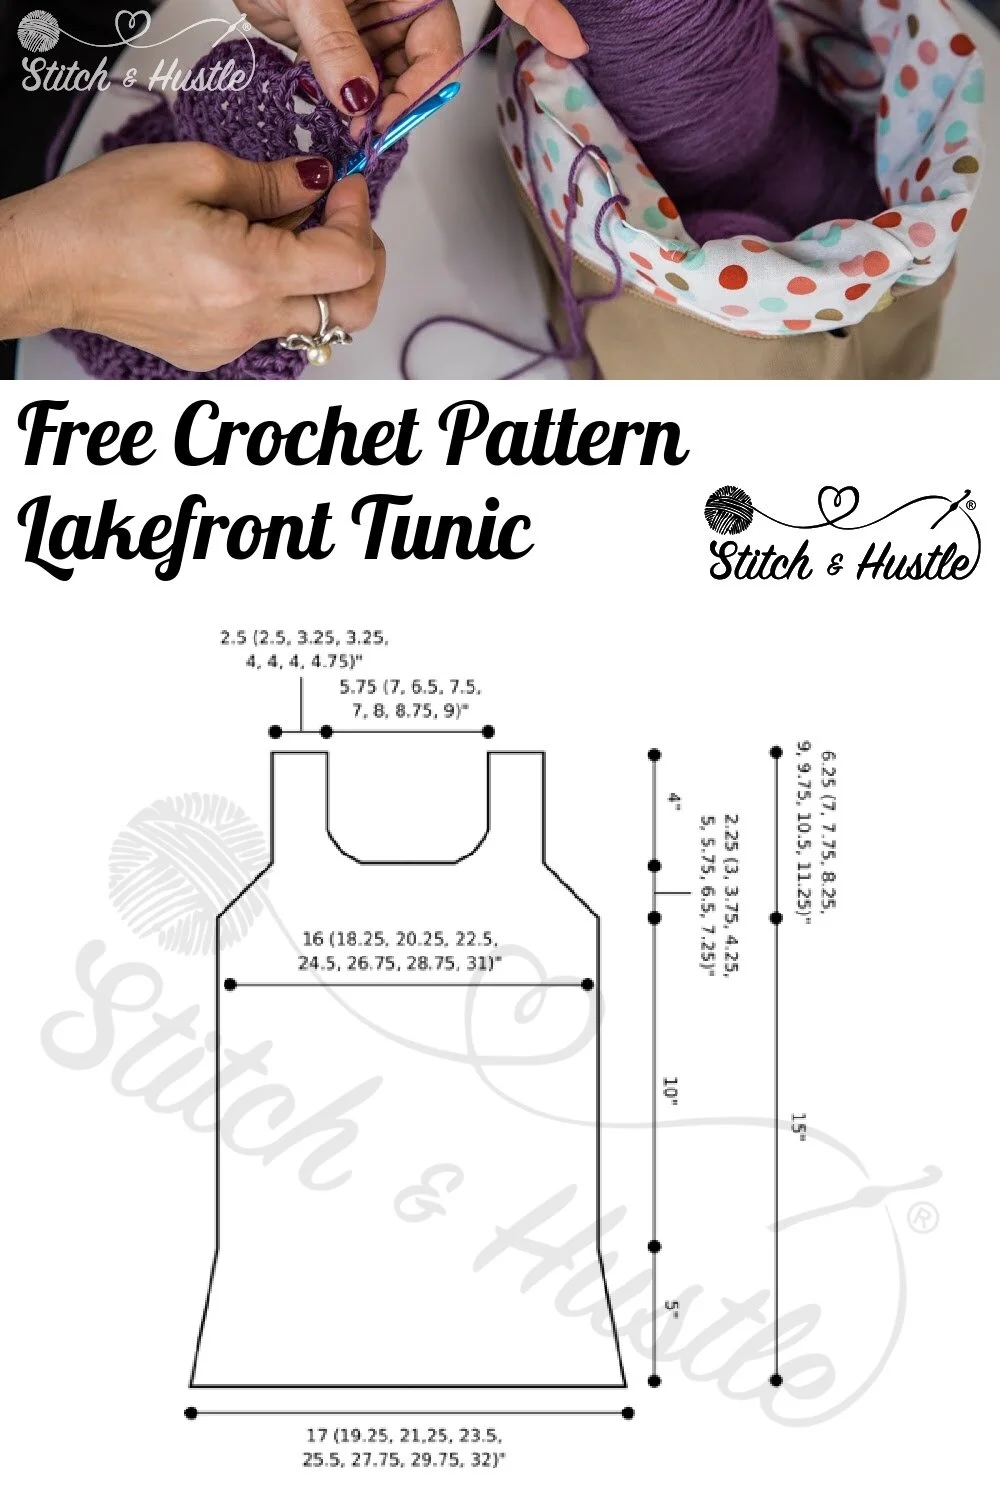
Read MoreWe are so excited to bring you the Lakefront Peplum Top Free Crochet Pattern just in time for warm weather and summer outing! The Lakefront Peplum Top Free Crochet Pattern is a wonderful pattern for adventurous beginners looking to make shapely garments. The Peplum bottom has a subtle flair and you can easily modify the straps to suit any length.
Like the In The Loop Top Free Crochet Pattern, Lakefront Peplum Top Pattern was originally part of the 2019 Knitcrate Bonanza of Patterns and I am so excited to now be bringing it to you for free. Make the Lakefront Peplum Top Free Crochet Pattern with your favorite DK weight yarn.

You can always get the ad free pattern pdf here with full schematics too.
Sizes: Extra Small (Small, Medium, Large, 1X, 2X, 3X, 4X)
Finished Measurements
Bust: 32 (36.25, 40.5, 44.75, 49, 53.25, 57.5, 61.75)"
Supply List:
Category #3 DK yarn - 490 (580, 650, 730, 830, 910, 1150, 1270) yards
Crochet Hook Size H/ 5mm
Tapestry needle to weave ends
Tape Measure
Fasteners or safety pins
GAUGE: 4” sq = 15 sts x 11 rows in hdc stitch
Stitches Used / Abbreviations:
fhdc – foundation half double crochet
ch – chain loop
dc – double crochet
hdc – half double crochet
sl st – slip stitch
dc2tog – dc 2 together
sp – space
(RS) – Right Side
(WS) – Wrong Side
NOTES:
This pattern is written for Adult Woman Extra Small. (Sizes Small, Medium, Large, 1X, 2X, 3X, 4X in parentheses)
This top is intended to fit with up to two inches of positive ease.
This pattern is made in two panels, front & back.
Front and back pieces are worked from the bottom up.
Each panel has a Right Side & Wrong Side
Assembly calls for Mattress Stitch Method, if you do not know this you can whip stitch instead.
Block BEFORE assembly. See Stitch & Hustle Blog for my blocking tips
FRONT PANEL:
Row 1: Fhdc x 64 (72, 80, 88, 96, 104, 112, 120)) turn.
Row 2: Ch 2 (as first dc), 63 (71, 79, 87, 95, 103, 111, 119)x dc across for total 64 (72, 80, 88, 96, 104, 112, 120)) dc incl ch 2. (RS)
Row 3: Ch 1 (as first sc), 63 (71, 79, 87, 95, 103, 111, 119)x sc across for total 64 (72, 80, 88, 96, 104, 112, 120)) sc incl ch 1. (WS)
Rows 4 – 13: Repeat rows 2 & 3 alternating (ending with WS)
SHAPE WAIST:
Row 14: Ch 2 (as first dc), [dc2tog] 2 times, 54 (62, 70, 78, 86, 94, 102, 110) x dc across 2x dc2tog, dc in last for total 60 (68, 76, 84, 92, 100, 108, 116) dc incl ch 2. (RS)
Row 15: Ch 1 (as first sc), 59 (67, 75, 83, 91, 99, 107, 115)x sc across for total 60 (68, 76, 84, 92, 100, 108, 116) sc incl ch 1. (WS)
Row 16: Ch 2 (as first dc), [dc2tog] 2 times, 46 (58, 66, 74, 82, 90, 98, 106) x dc across 2x dc2tog, dc in last for total 56 (64, 72, 80, 88, 96, 104, 112) dc incl ch 2. (RS)

CONTINUE TO BODICE:
Row 17: Ch 1 (as first sc), 55 (63, 71, 79, 87, 95, 103, 111)x sc across for total 56 (64, 72, 80, 88, 96, 104, 112) sc incl ch 1. (WS)
Row 18: Ch 2 (as first dc), 55 (63, 71, 79, 87, 95, 103, 111)x dc across for total 56 (64, 72, 80, 88, 96, 104, 112)dc incl ch 2. (RS)
Row 19: Ch 1 (as first sc), 55 (63, 71, 79, 87, 95, 103, 111)x sc across for total 56 (64, 72, 80, 88, 96, 104, 112) sc incl ch 1. (WS)
Rows 20 – 43: Repeat rows 18 & 19 alternating (ending with WS).
SHAPE ARMHOLE:
Row 1: Ch 2 (as first dc), [dc2tog] 2 times, dc across to last 5 stitches then [dc2tog] 2 times, dc in last; 4 stitches decreased, 52 (60, 68, 76, 84, 92, 100, 108) stitches remain (RS)
Row 2: Ch 1 (does NOT act as first sc), 52 (60, 68, 76, 84, 92, 100, 108)x sc across for total , 52 (60, 68, 76, 84, 92, 100, 108) sc
Repeat Rows 1-2: 2 (3, 4, 5, 6, 7, 8, 9) more times for total of 44 (48, 52, 56, 60, 64, 68, 72) stitches remaining
SHAPE NECK / MAKE FIRST STRAP:
Rows 1-2: Ch 1 (does NOT act as first sc), 44 (48, 52, 56, 60, 64, 68, 72) x sc across for total 44 (48, 52, 56, 60, 64, 68, 72) sc
Row 3: Ch 2 (acts as first hdc), 6 (6, 7, 7, 8, 8, 9, 9) hdc, 30 (34, 36, 40, 42, 46, 48, 52) sc across, 7 (7, 8, 8, 9, 9, 10, 10) hdc, turn.
Row 4: Ch 2 (acts as first hdc), 5 (5, 6, 6, 7, 7, 8, 8) hdc, hdc2tog, hdc, TURN.
Row 5: Ch 2 (acts as first hdc), 4 (4, 5, 5, 6, 6, 7, 7) hdc, hdc2tog TURN.
Rows 6 - 12 (12, 14, 16, 18, 18, 21, 24) *** OR TO DESIRED LENGTH*** : Ch 2 (acts as first hdc), 5 (5, 6, 6, 7, 7, 8, 8)x hdc across, TURN.
Fasten, leaving long tail for assembly (approx. 6 inches)
CONTINUE SHAPING NECK / SECOND STRAP
Rejoin yarn at other side corner and work Rows 3-12 (12, 14, 16, 18, 18, 21, 24) *** OR TO DESIRED LENGTH***: as for First Strap.
BACK PANEL:
Work as for Front Panel through Row 2 of SHAPE NECK / MAKE STRAPS.
Fasten off back panel.
ASSEMBLY
Marry your two panels with RS facing each other. This is now inside out.
Using your stitch marker or fastener, pin sides of panels together at Row 1 beginning armhole shaping. Using mattress stitch method, attach the sides working from the bottom to the fastener on each side. After top is assembled
TURN RIGHT SIDE OUT then
Using mattress stitch method, connect the straps on each side.
Weave in all ends.

The Aplomb Peplum Top Free Crochet Pattern is brilliant in construction as it works up FLAT but you would never know it with Natalie’s magic seaming style and it is a great way to enter the world of making garments. Sized inclusively, the Aplomb Peplum Top Free Crochet Pattern literally flatters EVERY shape and figure style.
Read MoreThe Mallory Tank Top Free Crochet Pattern is great for beach days, city adventures and even wearing to the office! Styling this tank top is lots of fun and you can make several in your favorite colors because the Mallory Tank Top Free Crochet Pattern works up super fast.
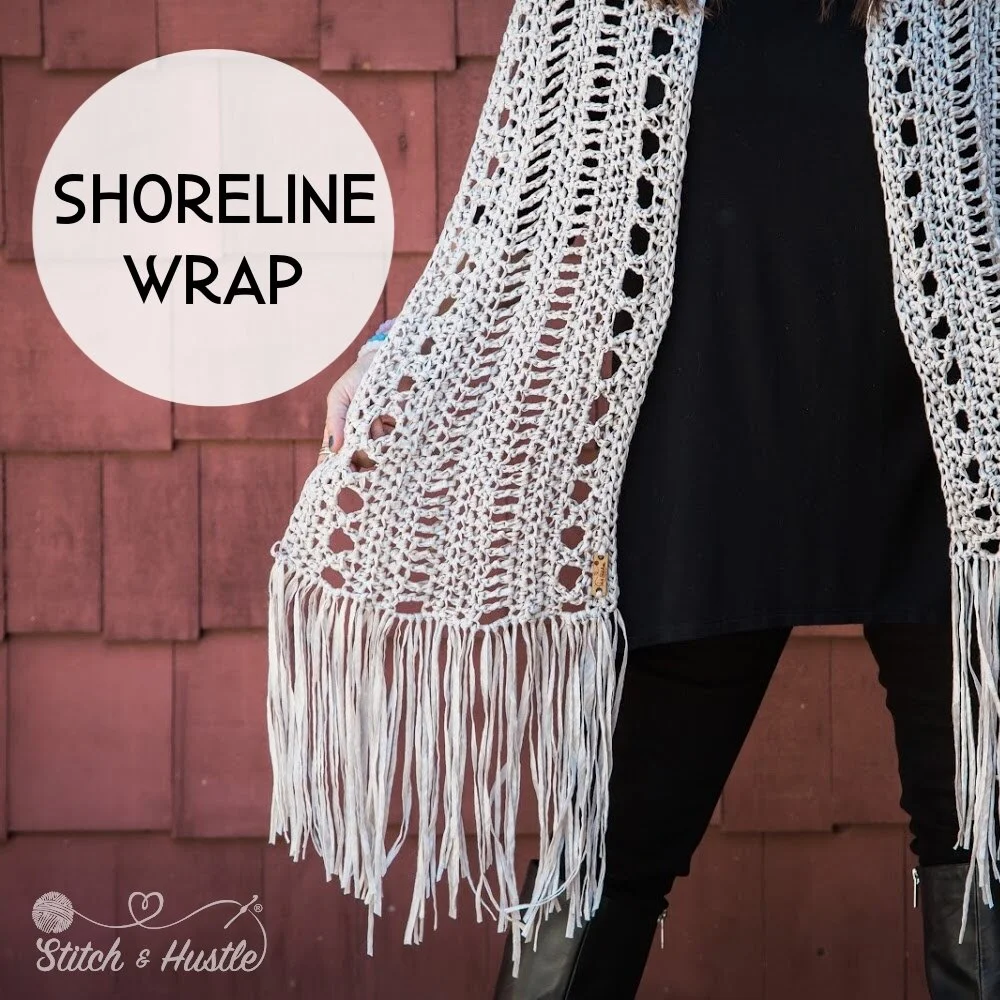
Read MoreThe Shoreline Wrap Free Crochet Pattern features a fun new twist on wraps, lots of fringe and a “Treble X” stitch giving it lots of flare. It is perfect for adventurous beginners or any crocheter looking for a new twist and fun stitch.
Read MoreThe In The Loop Top Free Crochet Pattern was originally part of the 2019 Knitcrate Bonanza of Patterns and I am so excited to now be bringing it to you for free.
Read MoreThe Sky Deck Cascading Vest Free Knitting Pattern is a wonderful beginner friendly pattern that can be made in any size to suit every style. The Sky Deck Cascading Vest Free Knitting Pattern was originally part of the 2019 Knitcrate Bonanza of Patterns and I am so excited to now be bringing it to you for free.
It features an incredibly soft DK yarn that was part of the 2019 September Knitcrate but you can use any DK you have on hand. Just be sure to block using wet blocking and I personally block this vest aggressively to get the most out of the drape and shape.

You can add a shawl pin to the front of The Sky Deck Cascading Vest to create a closed capelet look as well.
The Sky Deck Cascading Vest Free Knitting Pattern will give you a magnificent layer as the season change and is the knit sister to the Signal Cascading Vest Free Crochet Pattern.
Supply List:
Category #3 DK weight yarn, 600 (900, 1200, 1500, 1800) yd
US 8 / 5 mm circular needles 40”
Place markers
Tapestry needle to weave ends
Stitch holder
Fasteners or safety pins
Stitches Used / Abbreviations:
K – knit
P – purl
BO – Bind Off
CO – cast on
st(s)- stitch (es)
sm – slip marker
RS – Right Side
WS – wrong side

Sizes: XS - M (L-XXL, 1X-2X, 3X-4X, 5X-6X)
To Fit Bust: 32-38 (40-44, 46-50, 52-56, 58-60)”
Finished Measurements:
Width: 43 (47, 52, 58, 62)”
Length: 18 (19, 19, 20, 20)”
GAUGE BLOCKED: 4” sq = 20 sts x 18 rows in stockinette stitch
NOTES:
This pattern is meant to be stitched loosely creating an “open” fabric for drape
It is suggested to use a circular needle - but this is stitched flat back & forth, do not join.
PATTERN
CO 90 (95, 95, 100, 100) sts.

Set up Row (RS): K20 sts, pm, k28 (30, 32, 34, 36) sts, pm, knit to end.
Begin working in Stockinette St, and work until piece measures 14 (15, 17, 19.5, 21)” from CO edge, ending with a WS row.
Right Armhole
Next Row (RS): Knit to marker, sm, BO 28 (30, 32, 34, 36) sts, sm, knit to end.
Next Row (WS): Purl to marker, sm, CO 28 (30, 32, 34, 36) sts, sm, purl to end.
Back
Continue in Stockinette St until piece measures 15 (17, 18, 19, 20)” from Right Armhole, ending with a WS row.
Left Armhole
Next Row (RS): Knit to marker, sm, BO 28 (30, 32, 34, 36) sts, sm, knit to end.
Next Row (WS): Purl to marker, sm, CO 28 (30, 32, 34, 36) sts, sm, purl to end.
Front Left Panel
Continue in Stockinette St until piece measures 14 (15, 17, 19.5, 21)” from Left Armhole, or 43 (47, 52, 58, 62)” from CO.
BO all sts. Block and weave in all ends.

Bringing designers and dyers and artisans together is what Stitch & Hustle is all about and this collaboration for the PiPiRit tunisian crochet free pattern arrives just in time for warmer weather too!
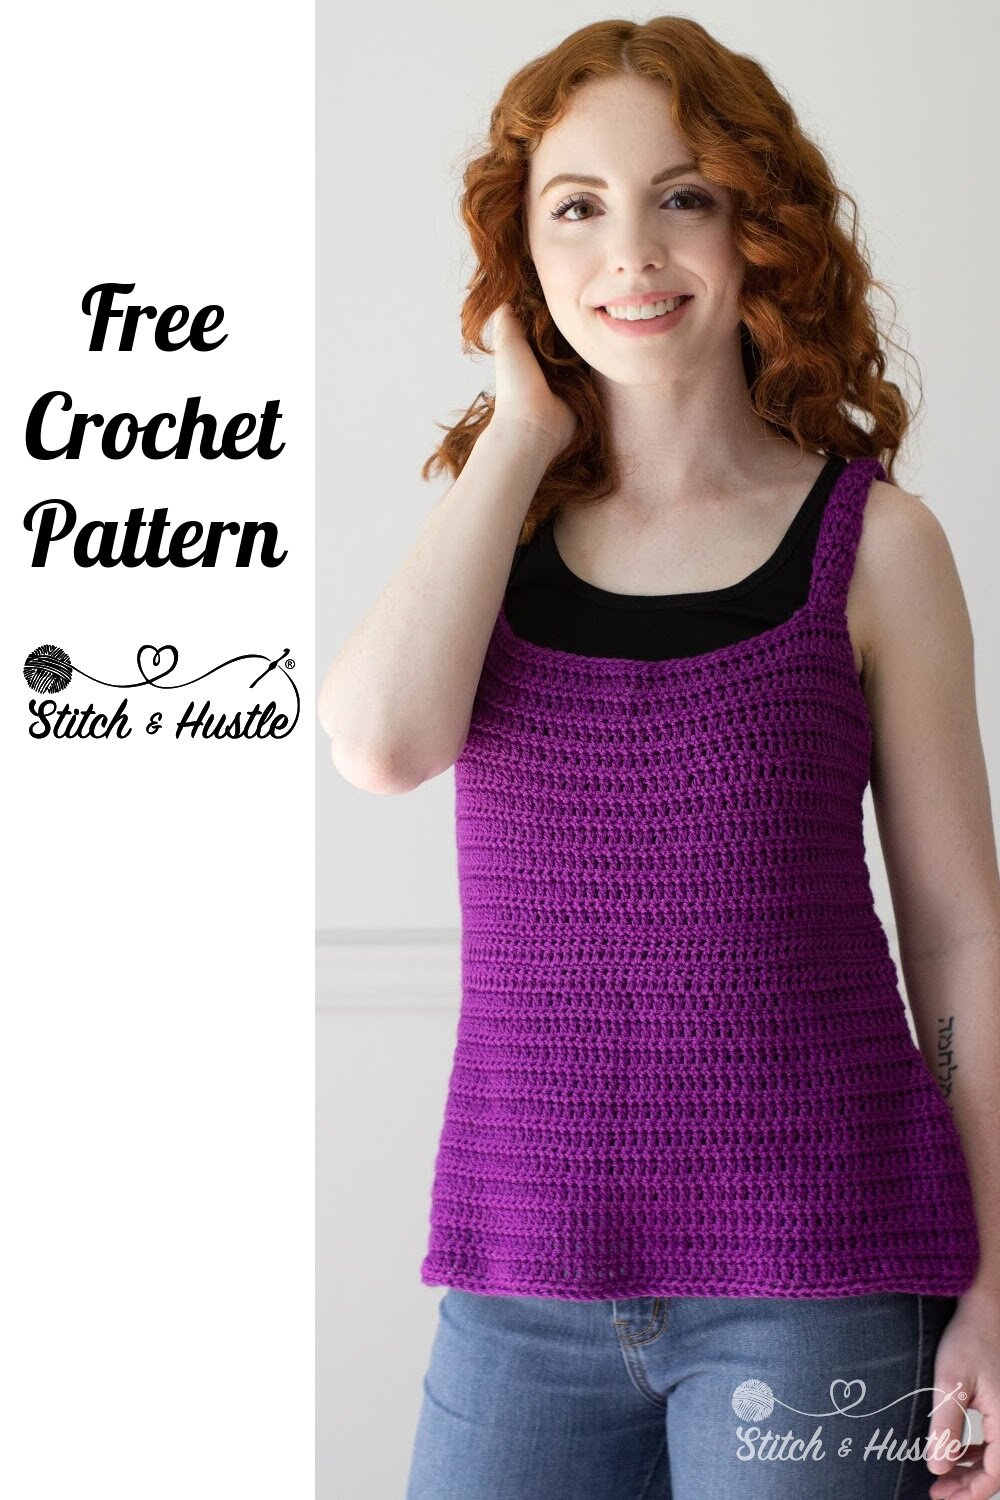
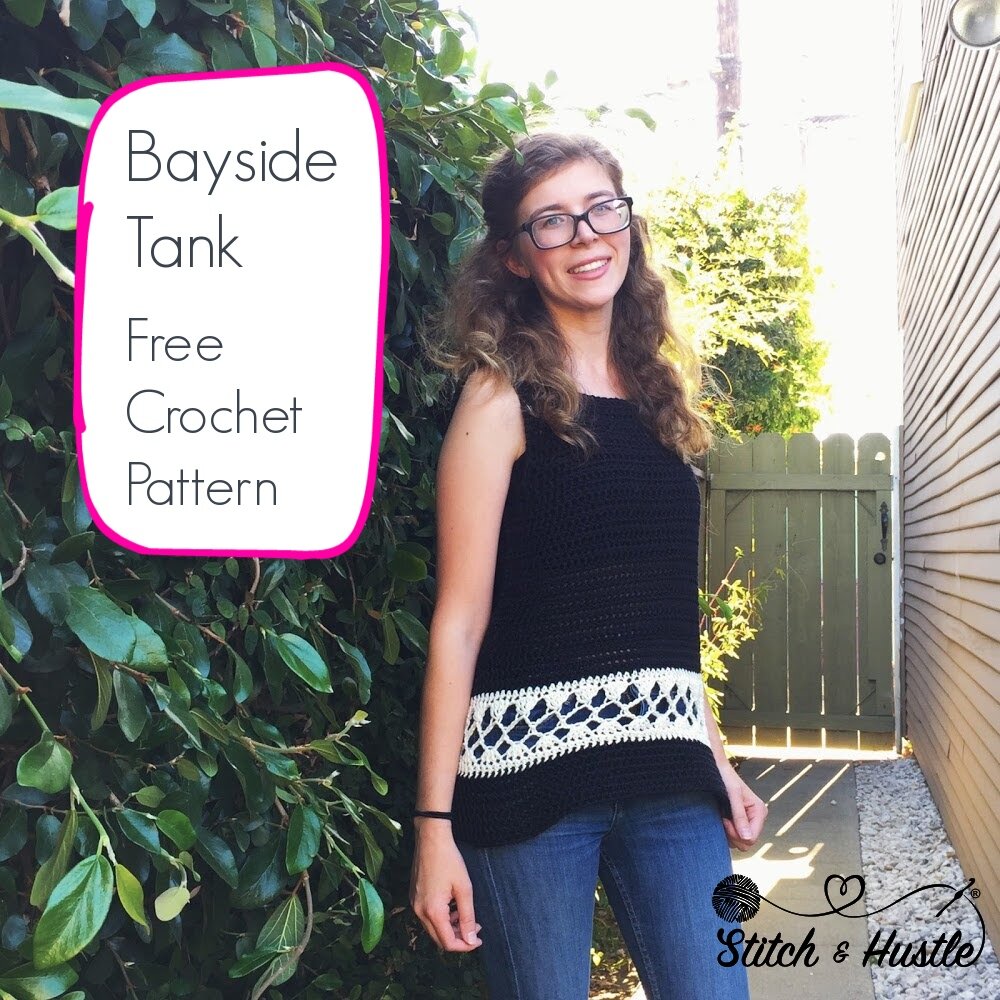
Read MoreThe Bayside Tank Top Free Crochet Pattern may be one of my favorites ever. It is the kind of pattern that works up quickly, is great for all levels and creates the kind of garment I will wear over and over again. I have made several of these in a few colors.
The Bayside Tank Top Free Crochet Pattern has a hint of detail at the waist that magically creates the shape without having to do much shaping work in the stitching. This is the the beauty of the design and makes it a very beginner friendly pattern.
Supply List:
Category #4 worsted weight cotton
Main Color 350 (375, 400, 425, 450, 475, 500, 525) yds
Contrast Color 75 (85, 95, 110, 125, 150, 175, 200) yds
Wool And The Gang Shiny Happy Cotton shown here in Size Small
Crochet Hook Size I-9 / 5.5 mm
Tapestry needle to weave ends
Tape Measure
Fasteners or safety pins
Stitches Used / Abbreviations:
fhdc – foundation half double crochet
ch – chain loop
sc – single crochet
hdc – half double crochet
dc – double crochet
sl st – slip stitch
hdc2tog – hdc 2 together
dc4tog – dc 4 together
dc3tog – dc 3 together
sp - space
Sizes: Extra Small (Small, Medium, Large, 1X, 2X, 3X, 4X)
Finished Measurements Bust: 36.5 (39.5, 42, 45, 48, 51, 54, 56.5)”
GAUGE: 4” square = 11 sts x 10 rows in hdc stitch
NOTES:
This pattern is written for Adult Woman Extra Small. (Size Small, Med, Large,1X, 2X, 3X, 4X in parentheses).
This top is intended to fit with up to several inches of positive ease.
This pattern is made in two panels, front & back and then the bottom “skirt” is added after bust assembly
Assembly calls for Mattress Stitch Method, if you do not know this you can whip stitch instead.
READ THROUGH PATTERN BEFORE BEGINNING
Block BEFORE assembly.

MAKE 2 PANELS IN MAIN COLOR:
Row 1: Fhdc x 50 (54, 58, 62, 66, 70, 74, 78), turn.
Rows 2 - 16: Ch 2 (acts as first hdc), 49 (53, 57, 61, 65, 69, 73, 77)x hdc across for total 50 (54, 58, 62, 66, 70, 74, 78) hdc incl ch 2.
Begin Shaping Armhole:
Row 17: Ch 2 (acts as first hdc), [hdc2tog] 2 times, hdc across to last 4 stitches then [hdc2tog] 2 times, 4 stitches decreased, 46 (50, 54, 58, 62, 66, 70, 74) stitches remain.
Rows 18 - 19: Repeat Row 17, 38 (42, 46, 50, 54, 58, 62, 66) stitches remain.
Rows 20 – 27 (28, 29, 30, 31, 32, 33, 34): Ch 2 (acts as first hdc), hdc across for total 38 (42, 46, 50, 54, 58, 62, 66) hdc incl ch 2.
Shape Neck & Make First Strap:
Row 28 (29, 30, 31, 32, 33, 34, 35): Ch 2 (acts as first hdc), 5 (6, 7, 10, 11, 13, 14, 16)x hdc, hdc2tog, hdc, TURN. Total 8 (9, 10, 13, 14, 16, 17, 19) hdc - incl ch 2.
Row 29 (30, 31, 32, 33, 34, 35, 36): Ch 2 (acts as first hdc), 7 (8, 9, 12, 13, 15, 16, 18)x hdc across, TURN. Total 8 (9, 10, 13, 14, 16, 17, 19) hdc - incl ch 2.
Row 30 (31, 32, 33, 34, 35, 36, 37): Ch 2 (acts as first hdc), 5 (6, 7, 10, 11, 13, 14, 16)x hdc, hdc2tog TURN. Total 7 (8, 9, 12, 13, 15, 16, 18) hdc - incl ch 2.
Row 31 (32, 33, 34, 35, 36, 37, 38): Ch 2 (acts as first hdc), hdc2tog, 4 (5, 6, 9, 10, 12, 13, 15)x hdc, TURN. Total 6 (7, 8, 11, 12, 14, 15, 17) hdc - incl ch 2.
Rows 32 (33, 34, 35, 36, 37, 38, 39) – 34 (35, 36, 37, 38, 39, 40, 41): Ch 2 (acts as first hdc), 5 (6, 7, 10, 11, 13, 14, 16)x hdc across, TURN. Total 6 (7, 8, 11, 12, 14, 15, 17) hdc - incl ch 2. each row.
Fasten, leaving long tail for assembly (approx. 6 inches)
Continue Shaping Neck & Make Second Strap:
Rejoin yarn at other side and work as for First Strap.
ASSEMBLY
Marry your two panels with one strap on each side and this will now be INSIDE OUT.
Using your stitch marker or fastener, pin sides of panels together at Row 17 beginning armhole shaping on each side.
Using long tail from bottom, and using mattress stitch method, join sides working from the bottom to the fastener on each side.
Again, using mattress stitch, connect the straps on each side.
After top is assembled TURN RIGHT SIDE OUT then:
CONTINUE WITH MAIN COLOR:
Rounds 1 -3 : Ch 2 (acts as first hdc), 99 (107, 115, 123, 131, 139, 147, 155)x hdc around, sl st to top of ch 2, total 100 (108, 116, 124, 132, 140, 148, 156) incl ch 2.
Large, 1X, 2X, 3X, 4X Sizes only:
Rounds 4-6: Rounds 4-6: Ch 2 (acts as first hdc), 99 (107, 115, 123, 131, 139, 147, 155)x hdc around, sl st to top of ch 2, total 100 (108, 116, 124, 132, 140, 148, 156) hdc incl ch 2.
Size 3X, 4X only:
Round 7: Ch 2 (acts as first hdc), 99 (107, 115, 123, 131, 139, 147, 155)x hdc around, sl st to top of ch 2, total 100 (108, 116, 124, 132, 140, 148, 156) hdc incl ch 2.

WAIST:
NOTE: There is no decrease because the pattern will naturally “cinch” by design
CHANGE TO CONTRAST COLOR
Round 1: : Ch 2 (acts as first hdc), 99 (107, 115, 123, 131, 139, 147, 155) hdc around, sl st to top of ch 2, total 100 (108, 116, 124, 132, 140, 148, 156) hdc incl ch 2.
Round 2: Ch 3 (acts as first dc), dc3tog in next 3 sts, Ch 5 *dc4tog in next 4 sts, ch 5* repeat * to * around to first ch 3, then end with ch 2, dc into dc4tog where the row began.
Round 3: * Ch 5, sc into third ch of next ch 5 group * repeat * to * around then end with ch 3 then dc into ch 1 that began round.
Round 4: Ch 2 (acts as dc), dc in same, [4x dc into third ch of next ch 5 group] all the way around then 2x dc into same sp as starting ch 2, sl st to ch 2 to complete round.
Round 5: Ch 2 (acts as first hdc), 99 (107, 115, 123, 131, 139, 147, 155)x hdc in each dc around, sl st to top of ch 2, total 100 (108, 116, 124, 132, 140, 148, 155) hdc incl ch 2.
BOTTOM / HIP INCREASE:
CHANGE TO MAIN COLOR AND BEGIN HIP INCREASE:
Round 1: : Ch 2 (acts as first hdc), 99 (107, 115, 123, 131, 139, 147, 155)x hdc around, sl st to top of ch 2, total 100 (108, 116, 124, 132, 140, 148, 156) hdc incl ch 2
Round 2: Ch 2 (acts as first hdc), 48 (52, 56, 60, 64, 68, 72, 76)x hdc, 2 hdc in next 2 hdc, 48 (52, 56, 60, 64, 68, 72, 76)x hdc, 2 hdc in last hdc, sl st to top of ch 2, total 104 (112, 120, 128, 136, 144, 152, 160) hdc incl ch 2.
Round 3: Ch 2 (acts as first hdc), 50 (54, 58, 62, 66, 70, 74, 78)x hdc, 2 hdc in each of next 2 hdc, 50 (54, 58, 62, 66, 70, 74, 78)x hdc, 2 hdc in last hdc, sl st to top of ch 2, total 108 (116, 124, 132, 140, 148, 156, 164) hdc incl ch 2.
Round 4-10 Ch 2 (acts as first hdc), 107 (115, 123, 131, 139, 147, 155, 163)x hdc around, sl st to join to ch 2 for total 108 (116, 124, 132, 140, 148, 156, 164) hdc incl ch 2.

FINISHING & TRIM:
NECK EDGING:
Attach MAIN color at back center of neckline , Then:
Ch 1, sc across working 1 sc in each hdc and 2 sc in each ch-2, sc in each hdc across the front neckline, sc in each hdc up the second strap and 2 sc in each ch-2, sc in each hdc across back neckline, sl st to beg ch 1.
CHANGE TO CONTRAST COLOR
Ch 1, sc around neckline and sl st to ch 1 to join and complete.
Fasten off.
ARM EDGING:
Attach MAIN color at back where strap begins , Then:
Ch 1, sc up the strap and around each armhole placing 1 sc in each hdc and 2 sc in each ch-2.
CHANGE TO CONTRAST COLOR
Ch 1, sc around armhole and sl st to ch 1 to join and complete.
Fasten off.
Repeat on other side.
Weave in all ends.

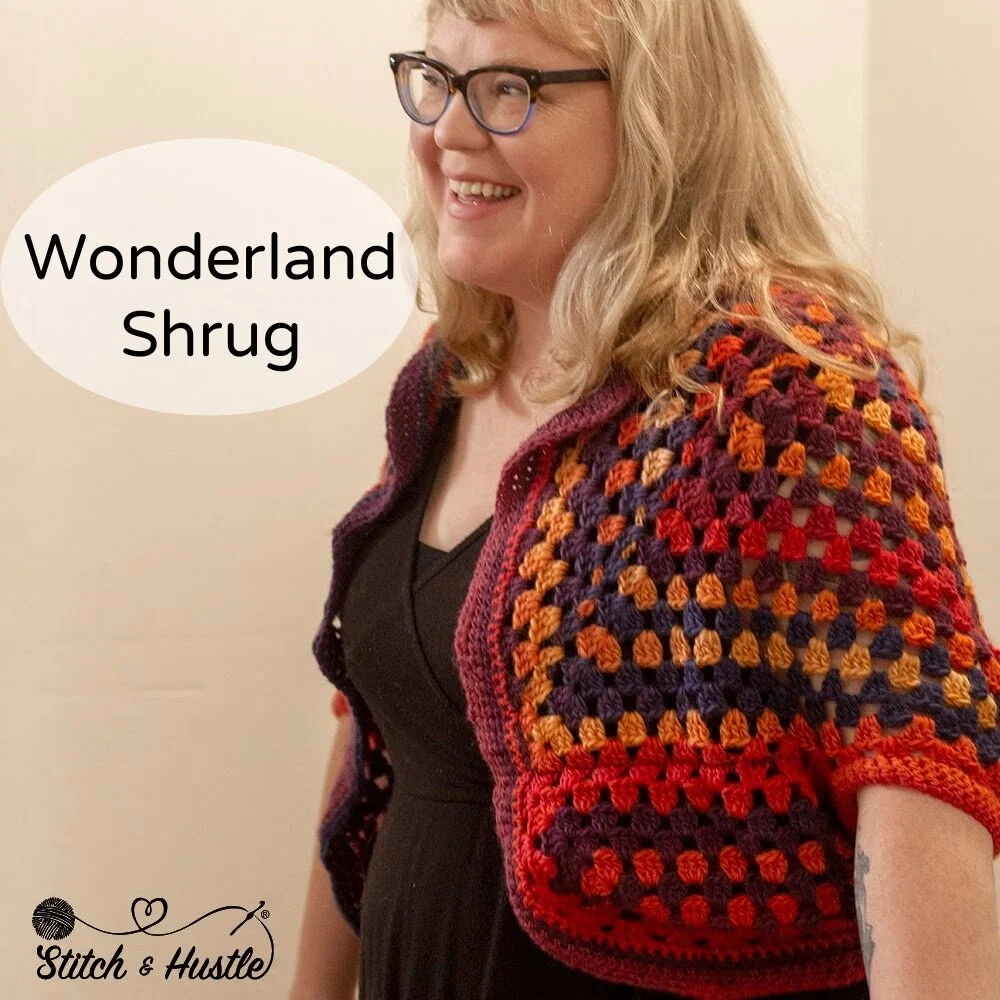
I am so excited about sharing the Wonderland Shrug Free Crochet Pattern with you! It is the kind of pattern that has a wonderful repeat, is beginner friendly and the yarn does the heavy lifting for you. Who could ask for more? The great thing about the Wonderland Shrug Free Crochet Pattern is that you can easily size it for anyone from child to plus sized adult and you can make it in any weight yarn you like! It is like magic!
Read MoreThere is SO MUCH in this pattern. From detailed process photographs to a chart to fill in for your own unique color scheme, it really is something you can sink your hook into and it perfect for every level of crocheter - even adventurous beginners!
Read MoreThe Danbury Tote Bag Free Beginner Crochet Pattern is really more than a beach bag and is a great market tote for shopping or even can be a project bag for your latest makes!
Read MoreWhat makes the Promenade Shawl Free Crochet Pattern special is that it’s a beginner friendly semi-circle shawl that mixes the fine delicateness of mohair in with the beauty and contrast of dk weight yarn to create a beautiful flow shawl.
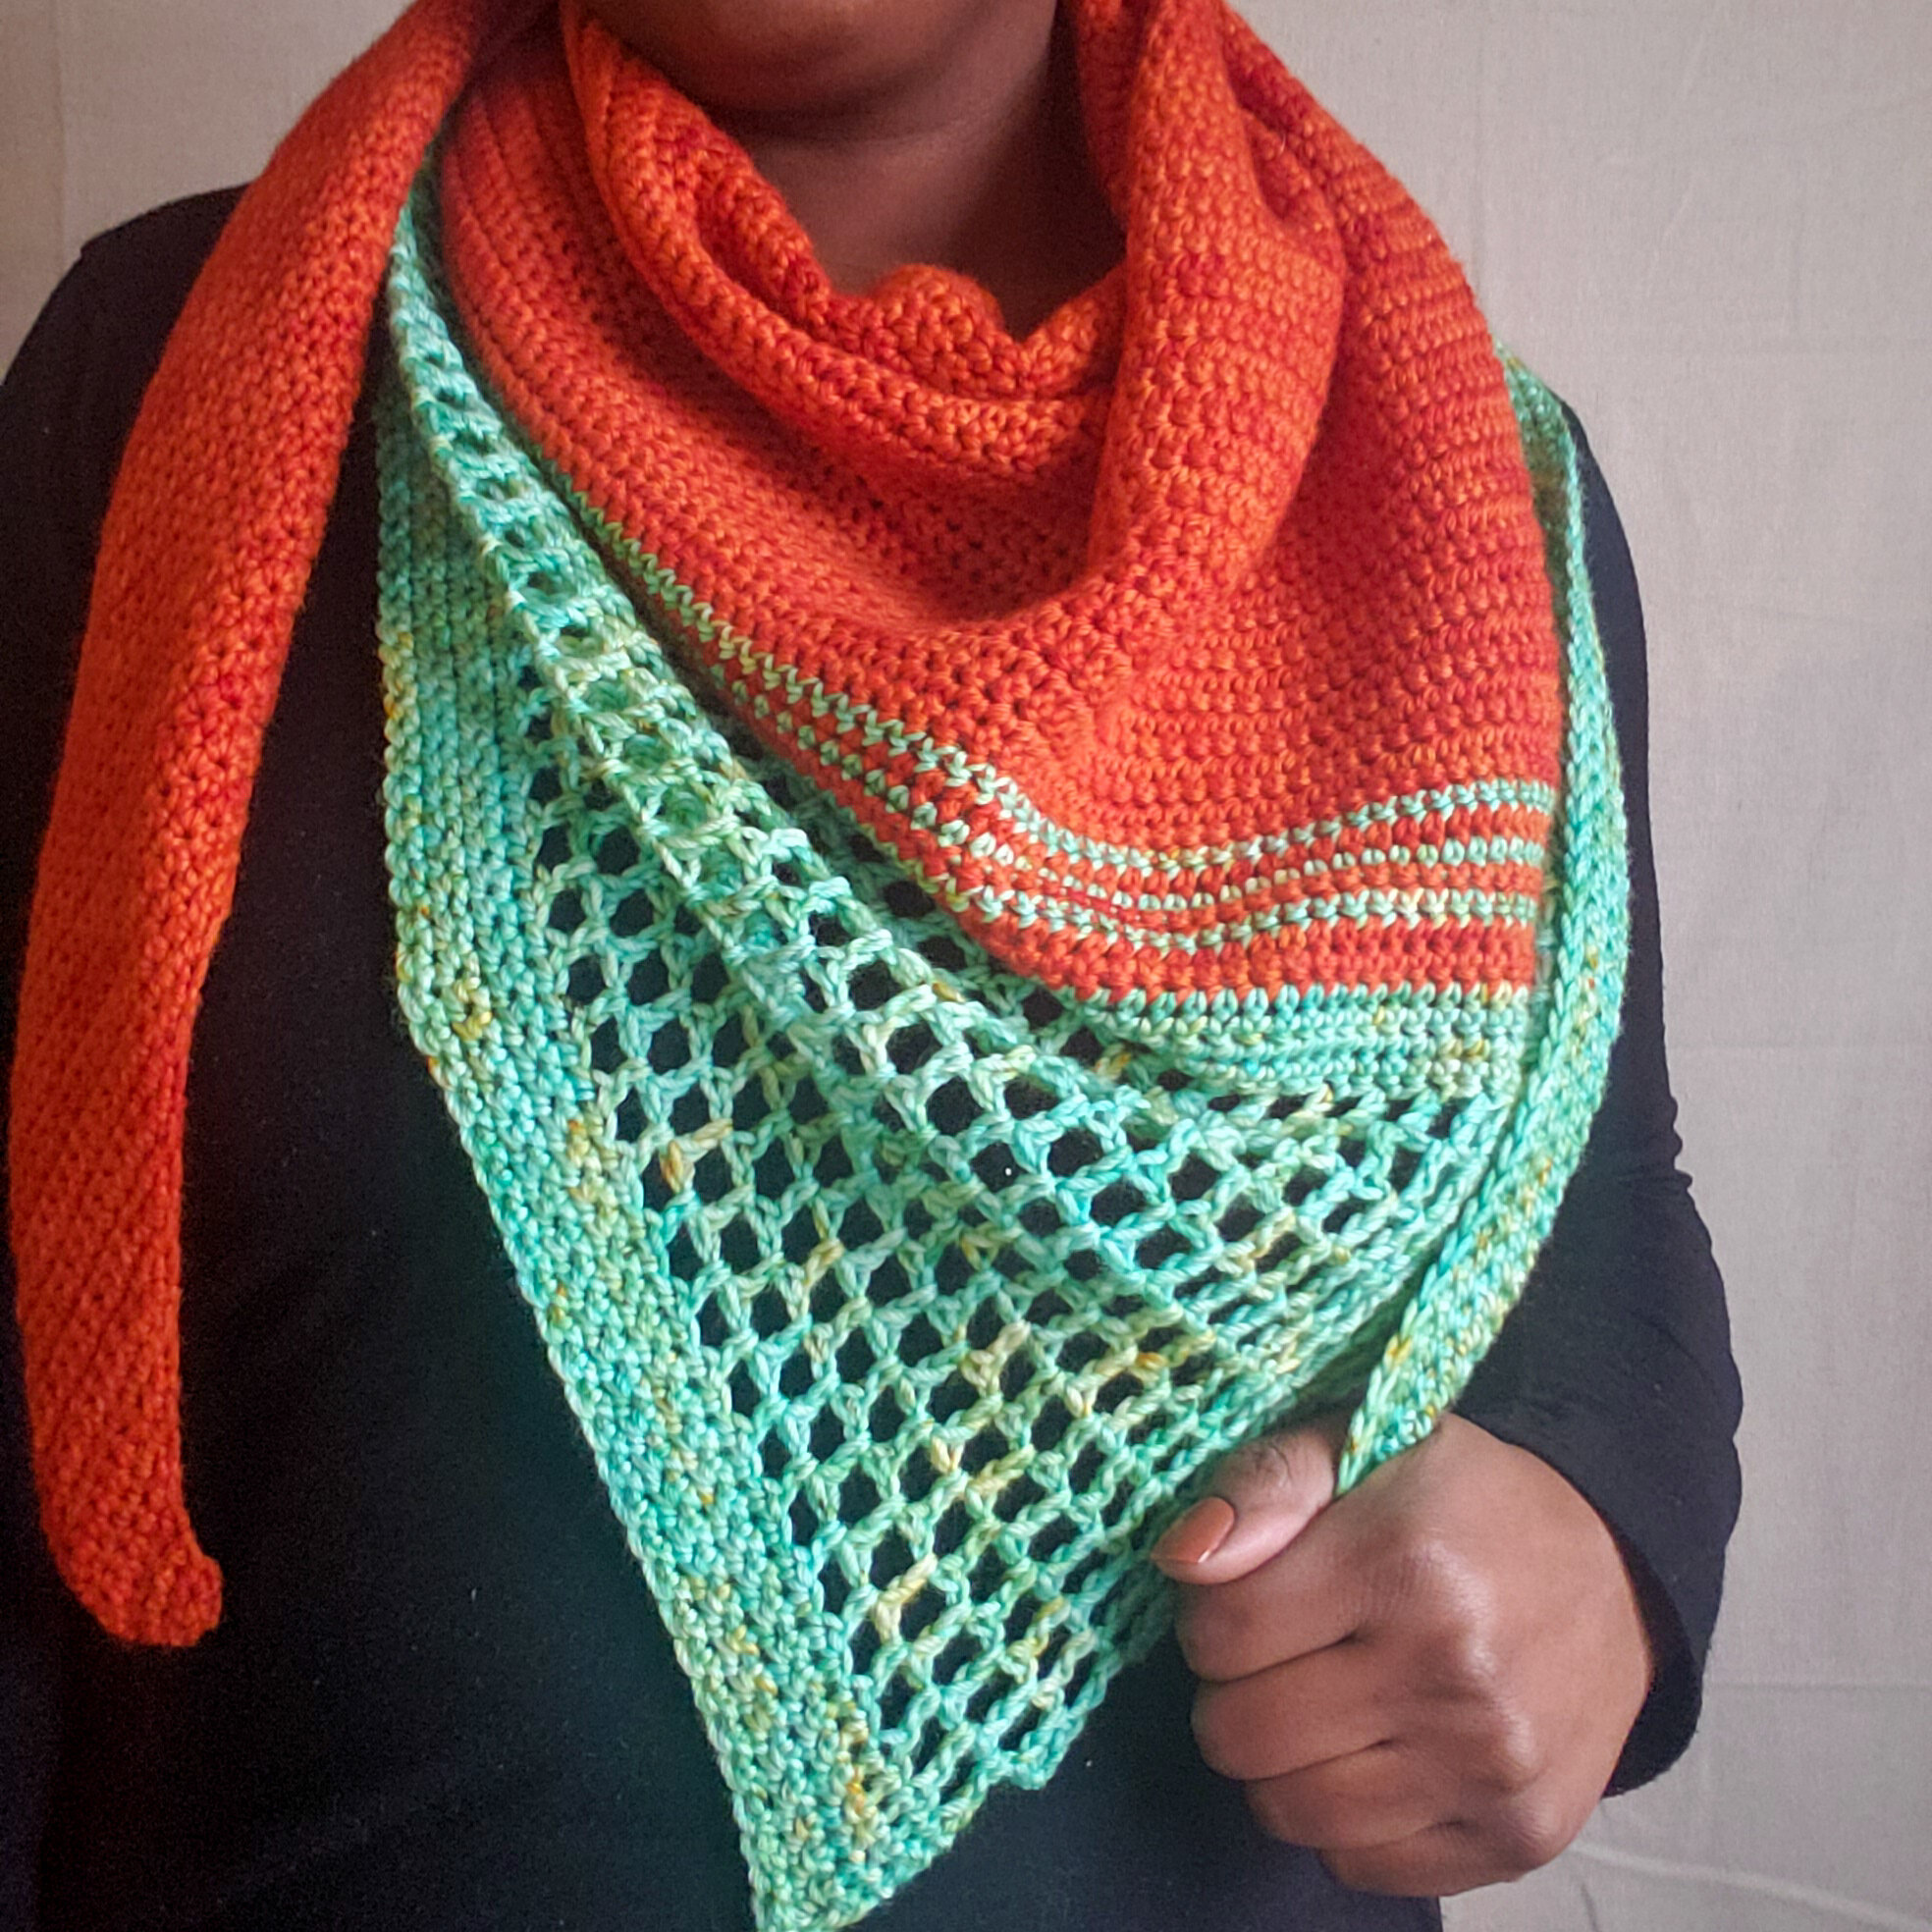
Read MoreThe Serenity Triangle Shawl Free Crochet Pattern was designed with Manos Del Uruguay Milo Yarn and features just two simple beginner crochet stitches and a wonderfully rhythmic repeat so you can zen out, pop on your favorite current binge show and stitch away.
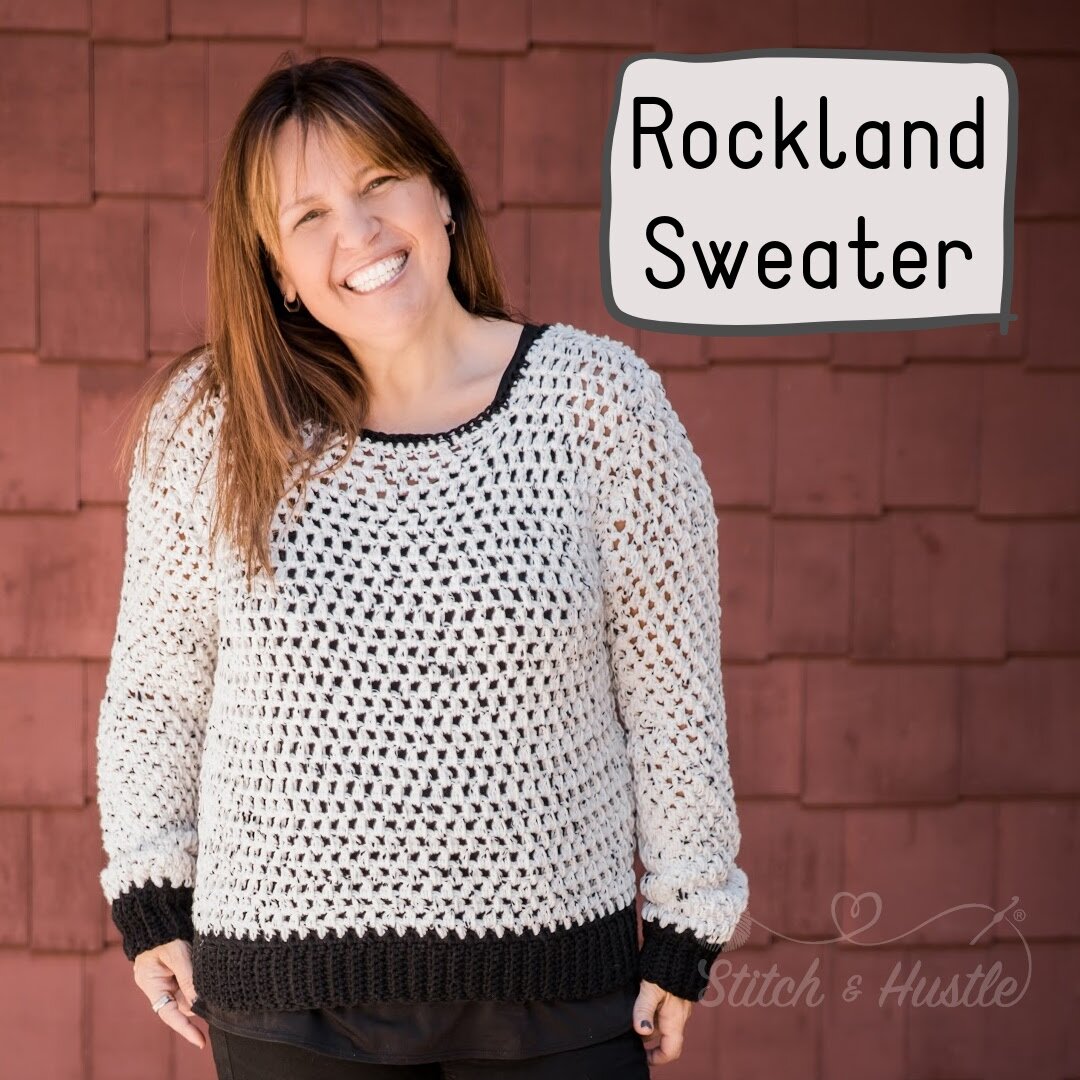
Read MoreThe Rockland Sweater Free Crochet Pattern is great for beginners looking to start making garments or experienced crocheters looking for a new adventure in sweaters. Make the Rockland Sweater Free Crochet Pattern in your favorite cotton and wear it all through spring! It is a great transitional piece and perfect for layering too.
Read MoreThe Lenox Crochet Shawl Free Crochet Pattern is a wonderful asymmetrical shawl that grows and grows and you can make as big as you like. The Lenox Crochet Shawl Free Crochet Pattern is great for beginners and has a lace panel for a bit of an unexpected but lovely style.
Read MoreDISCLOSURES: As an Amazon Associate I earn from qualifying purchases. Posts may includes affiliate links. Read full blog disclosure here.


BACK TO THE TOP TERMS & PRIVACY ABOUT US MEDIA KIT SUBMISSIONS
All photos, designs, and patterns are copyright of Stitch & Hustle unless otherwise noted. Please do not repost or claim my content as your own. This site displays third party ads and contains affiliate links. Michele of Stitch & Hustle is a participant in the Amazon Services LLC Associates Program, an affiliate advertising program designed to provide a means for sites to earn advertising fees by advertising & linking to amazon.com. Read policies & disclosures here.
Thank you for visiting!
Stitch & Hustle © 2017 - 2023 ALL RIGHTS RESERVED.