
Obi Cardigan Free Crochet Pattern
/It’s here - one of my favorite cotton patterns - the Obi Cardigan. It’s perfect for those in-between weather days when it’s not quite cold but still a little chilly. PLUS, it’s super quick and easy to make! It pairs with any tank top well.
Let me tell you all about it!

Why You’ll Love the Obi Cardigan
-It’s Fast & Easy: Whether you’re a crochet pro or just starting out, this cardigan comes together super quickly.
-Fits All Shapes & Sizes: The Obi Cardigan is written for SIX sizes, so there can be one for everyone. It’s got a relaxed, comfy fit that’s just perfect for layering, no matter your shape.
-Cotton Yarn Magic: I used soft cotton yarn for this pattern - it’s lightweight, breathable, and works great for transitional weather. Not too heavy, not too light, just right!
-Simple Yet Stylish: The design is straightforward, but the puff stitch gives it a little extra texture and charm. It’s a versatile piece you can wear on casual days or dress it up when you need to.
This cardigan is just what you need when the weather can’t make up its mind. It’s warm enough to take the chill off in the mornings, but light enough to wear when the sun starts shining. Trust me, it’ll quickly become your go-to layering piece!
AND, the Obi Cardigan has a fantastic texture - the puff stitch! The puff stitch is one of those little things that adds a lot of punch to a project. It’s textured, squishy, and just looks so pretty! I love this stitch so much (check out the Townsville Top, Gables Wrap, Manko Puff Stitch Infinity Scarf, Helix Puff Stitch Beanie) and am so excited to share it with you in a cardigan!
Supply List:
Category #4 light worsted weight yarn (Wool And The Gang Shiny Happy Cotton in sample.)
Main Color: 1100 (1200, 1330, 1490, 1600, 1880) yds / 1006 (1098, 1217, 1363, 1464, 1720) m
Contrast Color: 135 (150, 170, 190, 210, 235) yds / 124 (138, 156, 174, 193, 215) m
Crochet Hook Size I / 5.5 mm
Tapestry needle to weave ends
Tape Measure
Fasteners or safety pins
Button of Choice

GAUGE: 4” sq = 7 sts x 8 rows in *PS stitch, ch1*
Size: Extra Small (Small, Medium, Large, 1X, 2X)
Finished Measurements:
Bust: 31.5 (34.5, 37.5, 41, 44.5, 48.5)" / 80 (87.63, 95.25, 104.14, 113.03, 123.19) cm
Stitches Used / Abbreviations:
fsc – foundation single crochet
sc - single crochet
dc – double crochet
PS – Puff Stitch
Puff Stitch (PS):
Wrap yarn over hook; insert hook into ch sp, wrap yarn over hook & pull through leaving 3 loops on hook
Wrap yarn over hook; insert hook into same ch sp, wrap yarn over hook & pull through leaving 5 loops on hook
Wrap yarn over hook and pull through ALL 5 loops to create the “puff” stitch
NOTES:
This pattern is written for Adult Woman Extra Small (Sizes Small, Medium, Large, 1X & 2X in parenthesis)
I used a button that fits the spacing between stitches. You can use any size button you like and may need to add a button loop.
This pattern is made in two panels for front, 1 back panel and two sleeves. 5 separate pieces.
BLOCK ALL PIECES BEFORE ASSEMBLY.

PATTERN
BACK PANEL – BEGIN WITH MAIN COLOR:
Band
Row 1: Fsc x 10 (alternate: ch 9, turn, ch 1, 9 sc across), turn.
Row 2: Ch 1, 9 x sc in back loop only.
Rows 3- 55 (61, 67, 73, 79, 85): Repeat Row 2
Do not cut yarn – you will go directly to work the body.
Body
Row 1: Ch 1 (acts as first sc), sc across placing 1 sc in the side of each row of band for a total of 55 (61, 67, 73, 79, 85) sc, turn.
Row 2: Ch 2 (acts as dc), *PS in next sc, ch 1, sk next sc,* Repeat from * to * to last 2 sc, PS, in next sc, dc in last sc, turn. 27 (30, 33, 36, 39, 42) PS.
Row 3: Ch 3 (acts as dc + ch 1), * PS in ch-1 sp, ch 1, skip PS* Repeat from * to* to last dc, dc in dc, turn. 26 (29, 32, 35, 38, 41) PS.
Rows 4-11: Repeat Rows 2-3, alternating.

Change to Contrast Color
Rows 12-16: Repeat Rows 2-3, alternating.
Change BACK to MAIN Color
Rows 17 - 22: Repeat Rows 3-2, alternating.
Shape Armholes
Row 23: Ch 3, skip next PS, * PS in ch-1 sp, ch 1, skip PS* Repeat from * to* to last ch 1 and PS, PS in ch-1, skip PS, dc in ch-3, turn. 26 (29, 32, 35, 38, 41) PS remain.
Rows 24-26 (26, 26, 28, 30, 30): Ch 3, skip next PS, * PS in ch-1 sp, ch 1, skip PS* Repeat from * to* to last ch 1 and PS, PS in ch-1, skip PS, dc in dc, turn. 23 (26, 29, 30, 31, 34) PS remain, 48 (54, 60, 62, 64, 70) total sts.
4 (4, 4, 6, 8, 8) sts decreased at each armhole.
Rows 27 (27, 27, 29, 31, 31)-36 (37, 38, 38, 39, 40): Repeat Rows 2-3 of Body (Work even in PS pattern)
Fasten off.

FRONT - MAKE TWO PANELS:
Band – Begin with Main Color
Row 1: Fsc x 10 (alternate: ch 9, turn, ch 1, 9 sc across), turn.
Row 2: Ch 1, 9 x sc in back loop only.
Rows 3 - 29 (31, 35, 37, 41, 43): Repeat Repeat Row 2
Do not cut yarn – you will go directly to work the body.
Body
Row 1: Ch 1 (acts as first sc), sc across placing 1 sc in the side of each row of band for a total of 29 (31, 35, 37, 41, 43) sc, turn.
Row 2: Ch 2 (acts as dc), skip first sc, *PS in next sc, ch 1, sk next sc,* Repeat from * to * to last sc, dc in last sc, turn. 14 (15, 17, 18, 20, 21) PS.
Row 3: Ch 2 (acts as dc), * PS in ch-1 sp, ch 1, skip PS* Repeat from * to* to last dc, dc in dc, turn. 13 (14, 16, 17, 19, 20) PS.
Rows 4-11: Repeat Rows 2-3, alternating.

Change to Contrast Color
Rows 12-16: Repeat Rows 2-3, alternating.
Change BACK to Main Color
Rows 17 - 22: Repeat Rows 3-2, alternating.
Shape Armholes & Begin Shape Neck:
Row 23: Ch 3, skip next PS, * PS in ch-1 sp, ch 1, skip PS* Repeat from * to* to last ch 1 and PS, PS in ch-1, skip PS, dc in ch-3, turn. 13 (14, 16, 17, 19, 20) PS
Rows 24-26 (26, 26, 28, 30, 30): Ch 3, skip next PS, * PS in ch-1 sp, ch 1, skip PS* Repeat from * to* to last ch 1 and PS, PS in ch-1, skip PS, dc in dc, turn. 4 (4, 4, 6, 8, 8) sts decreased at both armhole and neck edges.
Armhole Shaping is complete; continue Shaping Neck.
Row 27 (27, 27, 29, 31, 31): Ch 3, sk next PS, * PS in ch-1 sp, ch 1, skip PS* Repeat from * to * to ch-3, dc in ch-3, turn. 1 st decreased at neck edge.
Row 28 (28, 28, 30, 32, 32): Ch 2, * PS in ch-1 sp, ch 1, skip PS * Repeat from * to * to last ch-1 and PS, PS in ch-1 sp, skip last PS, dc in ch-3, turn. 1 st decreased at neck edge.
Rows 29 (29, 29, 31, 33, 33) - 32 (32, 32, 34, 36, 36): Repeat last 2 rows, alternating.
Rows 33 (33, 33, 33, 37, 37) - 36 (37, 38, 38, 39, 40): Repeat Rows 2-3 of Body (Work even in PS pattern)
Fasten off.

SLEEVE – MAKE TWO
SLEEVE NOTES:
You will begin working in the round and NOT turning but joining your rows
At ROW 21 you will NOT join and begin to decrease and turn after each row. Pattern written for 3⁄4 sleeve length with note for full length.
Cuff
Row 1: Fsc x 10 (alternate: ch 9, turn, ch 1, 9 sc across), turn.
Row 2: Ch 1, 9 x sc in back loop only.
Rows 3-30 (30, 32, 34, 34, 36): Repeat Row 2.
Do not cut yarn – you will go directly to work the body.
Sleeve Body
Round 1: Ch 1 (acts as first sc), sc across placing 1 sc in the side of each row of band for a total of 30 (30, 32, 34, 34, 36) sc,
Round 2: Ch 2, PS in same, ch 1, skip first sc, *PS in next sc, ch 1, skip next sc,* Repeat from * to * to end sl st to top of first PS. 15 (15, 16, 17, 17, 18) PS.
Round 3: Sl St over to ch 1, [PS, ch 1, PS] in same * PS in ch-1 sp, ch 1, skip PS* Repeat from * to* to end then PS, ch in last. 17 (17, 18, 19, 19, 20) PS.
Rounds 4-5: Rep Round 2.
Round 6: Rep Round 3 increase. 19 (19, 20, 21, 21, 22) PS.
Rounds 7-8: Rep Round 2.
Round 9: Rep Round 3 increase. 21 (21, 22, 23, 23, 24) PS.
Large (1X, 2X) Sizes Only:
Rounds 10-12: Repeat Rounds 4-6. 25 (25, 26) PS.
1X (2X) Size Only:
Rounds 13-15: Repeat Rounds 4-6. 27 (28) PS.

All Sizes:
21 (21, 22, 25, 27, 28) PS.
Rounds 10 (10, 10, 13, 16, 16)-20: Repeat Round 2.
*NOTE: This pattern is written for 3⁄4 sleeves. For full sleeve, continue to repeat Round 2 here 8 more times or to desired length before shaping cap*
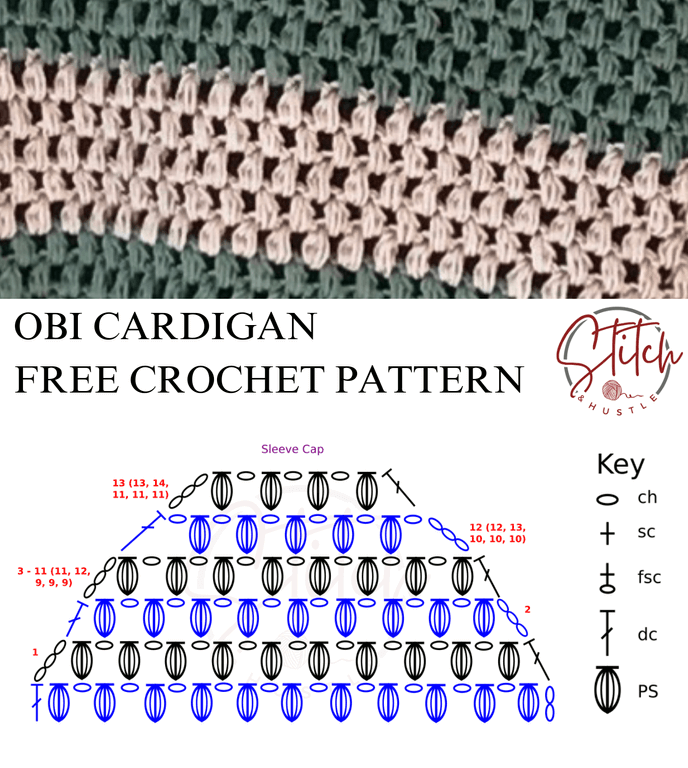
Shape Sleeve Cap
Row 1: Ch 3, sk next PS, * PS in ch-1 sp, ch 1, skip PS* Repeat from * to* to last ch 1 and PS, PS in ch-1, sk PS, dc in last, turn. 20 (20, 21, 24, 26, 27) PS remain, 2 sts decreased.
Row 2: Ch 3, skip next PS, * PS in ch-1 sp, ch 1, skip PS* Repeat from * to* to last ch 1 and PS, PS in ch-1, skip PS, dc in dc, turn. 19 (19, 20, 23, 25, 26) PS remain, 2 sts decreased.
Rows 3-11 (11, 12, 9, 9, 9): Repeat row 22 (decreasing 1 PS/2 sts each row). 10 (10, 10, 16, 18, 19) PS remain.
Row 12 (12, 13, 10, 10, 10): Ch 4, skip [PS, ch 1, PS], * PS in ch-1 sp, ch 1, skip PS * Repeat from * to * to last 2 PS, skip [PS, ch 1, PS], dc in ch-3, turn. 7 (7, 7, 13, 15, 16) PS remain, 4 sts decreased.
Row 13 (13, 14, 11, 11, 11): Ch 3, skip ch 1 and PS, * PS in ch-1 sp, ch 1, skip PS * Repeat from * to * to last PS, skip last PS and ch 1 sp, dc in ch-3, turn. 4 sts decreased.
Rows 14 (14, 15, 12, 12, 12) – 14 (15, 16, 16, 17, 18): Repeat last 2 rounds until 5 sts remain.
Fasten off.
BLOCK ALL OF YOUR PIECES BEFORE ASSEMBLY
ASSEMBLY: ***Same for ALL sizes***
BODY ASSEMBLY:
Marry your back panel to front panels INSIDE OUT
Using your stitch marker or fastener, pin the panels together at Row 1 of Armhole Shaping Beginning at bottom ribbing, connect the panels with either mattress stitch or sc up the seam When you get to fastener, fasten off.


SLEEVES ASSEMBLY:
Using your fasteners, attach your sleeve on the RIGHT SIDE to the body.
Working on the inside of the garment, beginning at bottom center of armhole, attach sleeve by either whip stitch or sc around
Turn right side out and affix your button of choice to the top of the front panel just before the neck decrease.


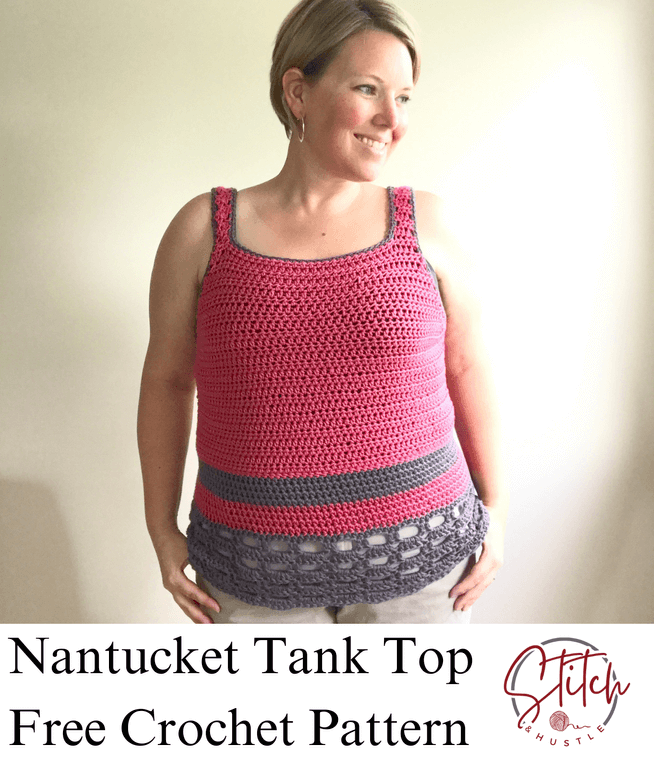


Get ready for summer fun with our newest free crochet pattern - the Nantucket Tank Top! With fun color details and a sweet lace panel, you’ll meet the season in style.