
Nantucket Tank Top Free Crochet Pattern
/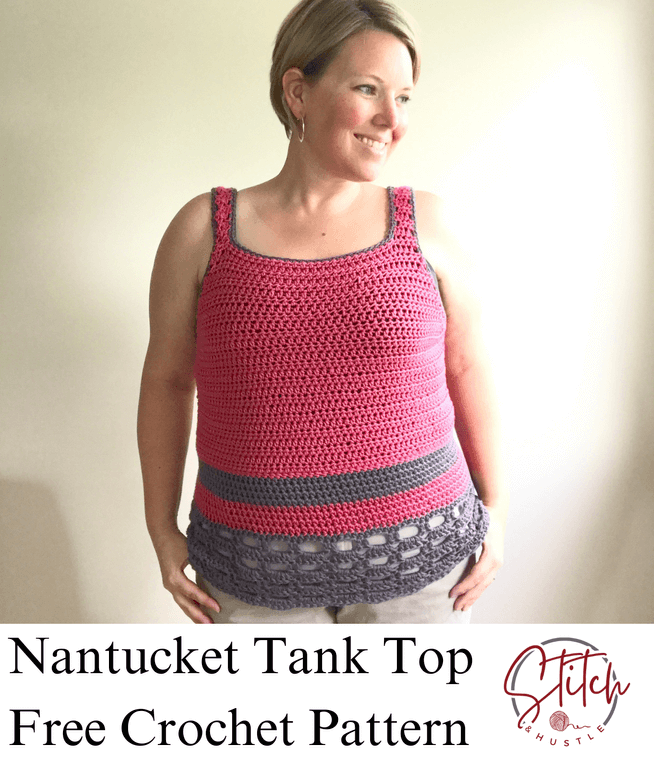
Get ready for summer fun with our newest free crochet pattern - the Nantucket Tank Top! With fun color details and a sweet lace panel, you’ll meet the season in style.
Read MoreGet ready for summer fun with our newest free crochet pattern - the Nantucket Tank Top! With fun color details and a sweet lace panel, you’ll meet the season in style.
Read MoreIf you’ve been on the hunt for the perfect summer crochet project, let me introduce you to the Lisbon Sun Dress Free Crochet Pattern! It’s our newest free crochet pattern that’s super cute, easy to wear, and just breezy enough for those hot summer days.
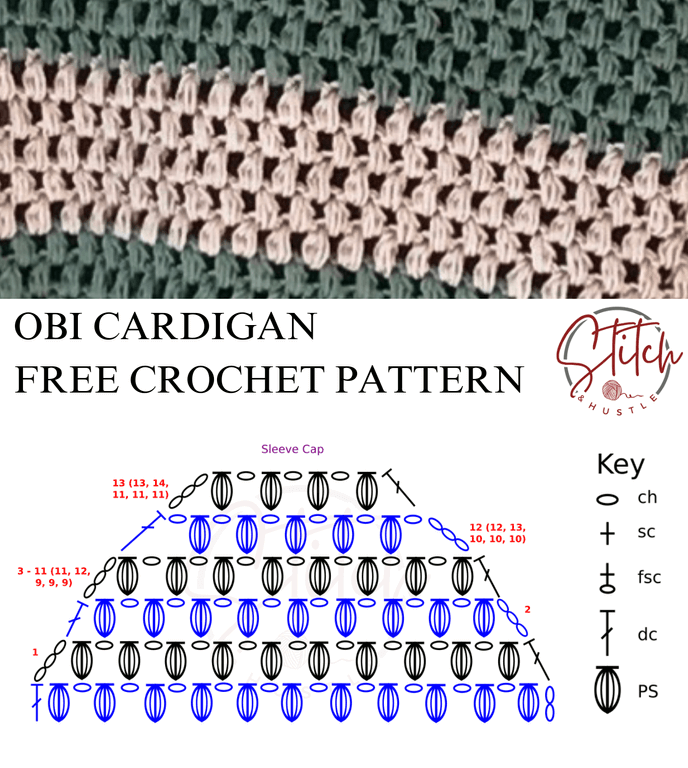
Read MoreIt’s here - one of my favorite cotton patterns - the Obi Cardigan. It’s perfect for those in-between weather days when it’s not quite cold but still a little chilly. PLUS, it’s super quick and easy to make! It pairs with any tank top well.
Let me tell you all about it!

Why You’ll Love the Obi Cardigan
-It’s Fast & Easy: Whether you’re a crochet pro or just starting out, this cardigan comes together super quickly.
-Fits All Shapes & Sizes: The Obi Cardigan is written for SIX sizes, so there can be one for everyone. It’s got a relaxed, comfy fit that’s just perfect for layering, no matter your shape.
-Cotton Yarn Magic: I used soft cotton yarn for this pattern - it’s lightweight, breathable, and works great for transitional weather. Not too heavy, not too light, just right!
-Simple Yet Stylish: The design is straightforward, but the puff stitch gives it a little extra texture and charm. It’s a versatile piece you can wear on casual days or dress it up when you need to.
This cardigan is just what you need when the weather can’t make up its mind. It’s warm enough to take the chill off in the mornings, but light enough to wear when the sun starts shining. Trust me, it’ll quickly become your go-to layering piece!
AND, the Obi Cardigan has a fantastic texture - the puff stitch! The puff stitch is one of those little things that adds a lot of punch to a project. It’s textured, squishy, and just looks so pretty! I love this stitch so much (check out the Townsville Top, Gables Wrap, Manko Puff Stitch Infinity Scarf, Helix Puff Stitch Beanie) and am so excited to share it with you in a cardigan!
Supply List:
Category #4 light worsted weight yarn (Wool And The Gang Shiny Happy Cotton in sample.)
Main Color: 1100 (1200, 1330, 1490, 1600, 1880) yds / 1006 (1098, 1217, 1363, 1464, 1720) m
Contrast Color: 135 (150, 170, 190, 210, 235) yds / 124 (138, 156, 174, 193, 215) m
Crochet Hook Size I / 5.5 mm
Tapestry needle to weave ends
Tape Measure
Fasteners or safety pins
Button of Choice

GAUGE: 4” sq = 7 sts x 8 rows in *PS stitch, ch1*
Size: Extra Small (Small, Medium, Large, 1X, 2X)
Finished Measurements:
Bust: 31.5 (34.5, 37.5, 41, 44.5, 48.5)" / 80 (87.63, 95.25, 104.14, 113.03, 123.19) cm
Stitches Used / Abbreviations:
fsc – foundation single crochet
sc - single crochet
dc – double crochet
PS – Puff Stitch
Puff Stitch (PS):
Wrap yarn over hook; insert hook into ch sp, wrap yarn over hook & pull through leaving 3 loops on hook
Wrap yarn over hook; insert hook into same ch sp, wrap yarn over hook & pull through leaving 5 loops on hook
Wrap yarn over hook and pull through ALL 5 loops to create the “puff” stitch
NOTES:
This pattern is written for Adult Woman Extra Small (Sizes Small, Medium, Large, 1X & 2X in parenthesis)
I used a button that fits the spacing between stitches. You can use any size button you like and may need to add a button loop.
This pattern is made in two panels for front, 1 back panel and two sleeves. 5 separate pieces.
BLOCK ALL PIECES BEFORE ASSEMBLY.

PATTERN
BACK PANEL – BEGIN WITH MAIN COLOR:
Band
Row 1: Fsc x 10 (alternate: ch 9, turn, ch 1, 9 sc across), turn.
Row 2: Ch 1, 9 x sc in back loop only.
Rows 3- 55 (61, 67, 73, 79, 85): Repeat Row 2
Do not cut yarn – you will go directly to work the body.
Body
Row 1: Ch 1 (acts as first sc), sc across placing 1 sc in the side of each row of band for a total of 55 (61, 67, 73, 79, 85) sc, turn.
Row 2: Ch 2 (acts as dc), *PS in next sc, ch 1, sk next sc,* Repeat from * to * to last 2 sc, PS, in next sc, dc in last sc, turn. 27 (30, 33, 36, 39, 42) PS.
Row 3: Ch 3 (acts as dc + ch 1), * PS in ch-1 sp, ch 1, skip PS* Repeat from * to* to last dc, dc in dc, turn. 26 (29, 32, 35, 38, 41) PS.
Rows 4-11: Repeat Rows 2-3, alternating.

Change to Contrast Color
Rows 12-16: Repeat Rows 2-3, alternating.
Change BACK to MAIN Color
Rows 17 - 22: Repeat Rows 3-2, alternating.
Shape Armholes
Row 23: Ch 3, skip next PS, * PS in ch-1 sp, ch 1, skip PS* Repeat from * to* to last ch 1 and PS, PS in ch-1, skip PS, dc in ch-3, turn. 26 (29, 32, 35, 38, 41) PS remain.
Rows 24-26 (26, 26, 28, 30, 30): Ch 3, skip next PS, * PS in ch-1 sp, ch 1, skip PS* Repeat from * to* to last ch 1 and PS, PS in ch-1, skip PS, dc in dc, turn. 23 (26, 29, 30, 31, 34) PS remain, 48 (54, 60, 62, 64, 70) total sts.
4 (4, 4, 6, 8, 8) sts decreased at each armhole.
Rows 27 (27, 27, 29, 31, 31)-36 (37, 38, 38, 39, 40): Repeat Rows 2-3 of Body (Work even in PS pattern)
Fasten off.

FRONT - MAKE TWO PANELS:
Band – Begin with Main Color
Row 1: Fsc x 10 (alternate: ch 9, turn, ch 1, 9 sc across), turn.
Row 2: Ch 1, 9 x sc in back loop only.
Rows 3 - 29 (31, 35, 37, 41, 43): Repeat Repeat Row 2
Do not cut yarn – you will go directly to work the body.
Body
Row 1: Ch 1 (acts as first sc), sc across placing 1 sc in the side of each row of band for a total of 29 (31, 35, 37, 41, 43) sc, turn.
Row 2: Ch 2 (acts as dc), skip first sc, *PS in next sc, ch 1, sk next sc,* Repeat from * to * to last sc, dc in last sc, turn. 14 (15, 17, 18, 20, 21) PS.
Row 3: Ch 2 (acts as dc), * PS in ch-1 sp, ch 1, skip PS* Repeat from * to* to last dc, dc in dc, turn. 13 (14, 16, 17, 19, 20) PS.
Rows 4-11: Repeat Rows 2-3, alternating.

Change to Contrast Color
Rows 12-16: Repeat Rows 2-3, alternating.
Change BACK to Main Color
Rows 17 - 22: Repeat Rows 3-2, alternating.
Shape Armholes & Begin Shape Neck:
Row 23: Ch 3, skip next PS, * PS in ch-1 sp, ch 1, skip PS* Repeat from * to* to last ch 1 and PS, PS in ch-1, skip PS, dc in ch-3, turn. 13 (14, 16, 17, 19, 20) PS
Rows 24-26 (26, 26, 28, 30, 30): Ch 3, skip next PS, * PS in ch-1 sp, ch 1, skip PS* Repeat from * to* to last ch 1 and PS, PS in ch-1, skip PS, dc in dc, turn. 4 (4, 4, 6, 8, 8) sts decreased at both armhole and neck edges.
Armhole Shaping is complete; continue Shaping Neck.
Row 27 (27, 27, 29, 31, 31): Ch 3, sk next PS, * PS in ch-1 sp, ch 1, skip PS* Repeat from * to * to ch-3, dc in ch-3, turn. 1 st decreased at neck edge.
Row 28 (28, 28, 30, 32, 32): Ch 2, * PS in ch-1 sp, ch 1, skip PS * Repeat from * to * to last ch-1 and PS, PS in ch-1 sp, skip last PS, dc in ch-3, turn. 1 st decreased at neck edge.
Rows 29 (29, 29, 31, 33, 33) - 32 (32, 32, 34, 36, 36): Repeat last 2 rows, alternating.
Rows 33 (33, 33, 33, 37, 37) - 36 (37, 38, 38, 39, 40): Repeat Rows 2-3 of Body (Work even in PS pattern)
Fasten off.

SLEEVE – MAKE TWO
SLEEVE NOTES:
You will begin working in the round and NOT turning but joining your rows
At ROW 21 you will NOT join and begin to decrease and turn after each row. Pattern written for 3⁄4 sleeve length with note for full length.
Cuff
Row 1: Fsc x 10 (alternate: ch 9, turn, ch 1, 9 sc across), turn.
Row 2: Ch 1, 9 x sc in back loop only.
Rows 3-30 (30, 32, 34, 34, 36): Repeat Row 2.
Do not cut yarn – you will go directly to work the body.
Sleeve Body
Round 1: Ch 1 (acts as first sc), sc across placing 1 sc in the side of each row of band for a total of 30 (30, 32, 34, 34, 36) sc,
Round 2: Ch 2, PS in same, ch 1, skip first sc, *PS in next sc, ch 1, skip next sc,* Repeat from * to * to end sl st to top of first PS. 15 (15, 16, 17, 17, 18) PS.
Round 3: Sl St over to ch 1, [PS, ch 1, PS] in same * PS in ch-1 sp, ch 1, skip PS* Repeat from * to* to end then PS, ch in last. 17 (17, 18, 19, 19, 20) PS.
Rounds 4-5: Rep Round 2.
Round 6: Rep Round 3 increase. 19 (19, 20, 21, 21, 22) PS.
Rounds 7-8: Rep Round 2.
Round 9: Rep Round 3 increase. 21 (21, 22, 23, 23, 24) PS.
Large (1X, 2X) Sizes Only:
Rounds 10-12: Repeat Rounds 4-6. 25 (25, 26) PS.
1X (2X) Size Only:
Rounds 13-15: Repeat Rounds 4-6. 27 (28) PS.

All Sizes:
21 (21, 22, 25, 27, 28) PS.
Rounds 10 (10, 10, 13, 16, 16)-20: Repeat Round 2.
*NOTE: This pattern is written for 3⁄4 sleeves. For full sleeve, continue to repeat Round 2 here 8 more times or to desired length before shaping cap*
Shape Sleeve Cap
Row 1: Ch 3, sk next PS, * PS in ch-1 sp, ch 1, skip PS* Repeat from * to* to last ch 1 and PS, PS in ch-1, sk PS, dc in last, turn. 20 (20, 21, 24, 26, 27) PS remain, 2 sts decreased.
Row 2: Ch 3, skip next PS, * PS in ch-1 sp, ch 1, skip PS* Repeat from * to* to last ch 1 and PS, PS in ch-1, skip PS, dc in dc, turn. 19 (19, 20, 23, 25, 26) PS remain, 2 sts decreased.
Rows 3-11 (11, 12, 9, 9, 9): Repeat row 22 (decreasing 1 PS/2 sts each row). 10 (10, 10, 16, 18, 19) PS remain.
Row 12 (12, 13, 10, 10, 10): Ch 4, skip [PS, ch 1, PS], * PS in ch-1 sp, ch 1, skip PS * Repeat from * to * to last 2 PS, skip [PS, ch 1, PS], dc in ch-3, turn. 7 (7, 7, 13, 15, 16) PS remain, 4 sts decreased.
Row 13 (13, 14, 11, 11, 11): Ch 3, skip ch 1 and PS, * PS in ch-1 sp, ch 1, skip PS * Repeat from * to * to last PS, skip last PS and ch 1 sp, dc in ch-3, turn. 4 sts decreased.
Rows 14 (14, 15, 12, 12, 12) – 14 (15, 16, 16, 17, 18): Repeat last 2 rounds until 5 sts remain.
Fasten off.
BLOCK ALL OF YOUR PIECES BEFORE ASSEMBLY
ASSEMBLY: ***Same for ALL sizes***
BODY ASSEMBLY:
Marry your back panel to front panels INSIDE OUT
Using your stitch marker or fastener, pin the panels together at Row 1 of Armhole Shaping Beginning at bottom ribbing, connect the panels with either mattress stitch or sc up the seam When you get to fastener, fasten off.


SLEEVES ASSEMBLY:
Using your fasteners, attach your sleeve on the RIGHT SIDE to the body.
Working on the inside of the garment, beginning at bottom center of armhole, attach sleeve by either whip stitch or sc around
Turn right side out and affix your button of choice to the top of the front panel just before the neck decrease.
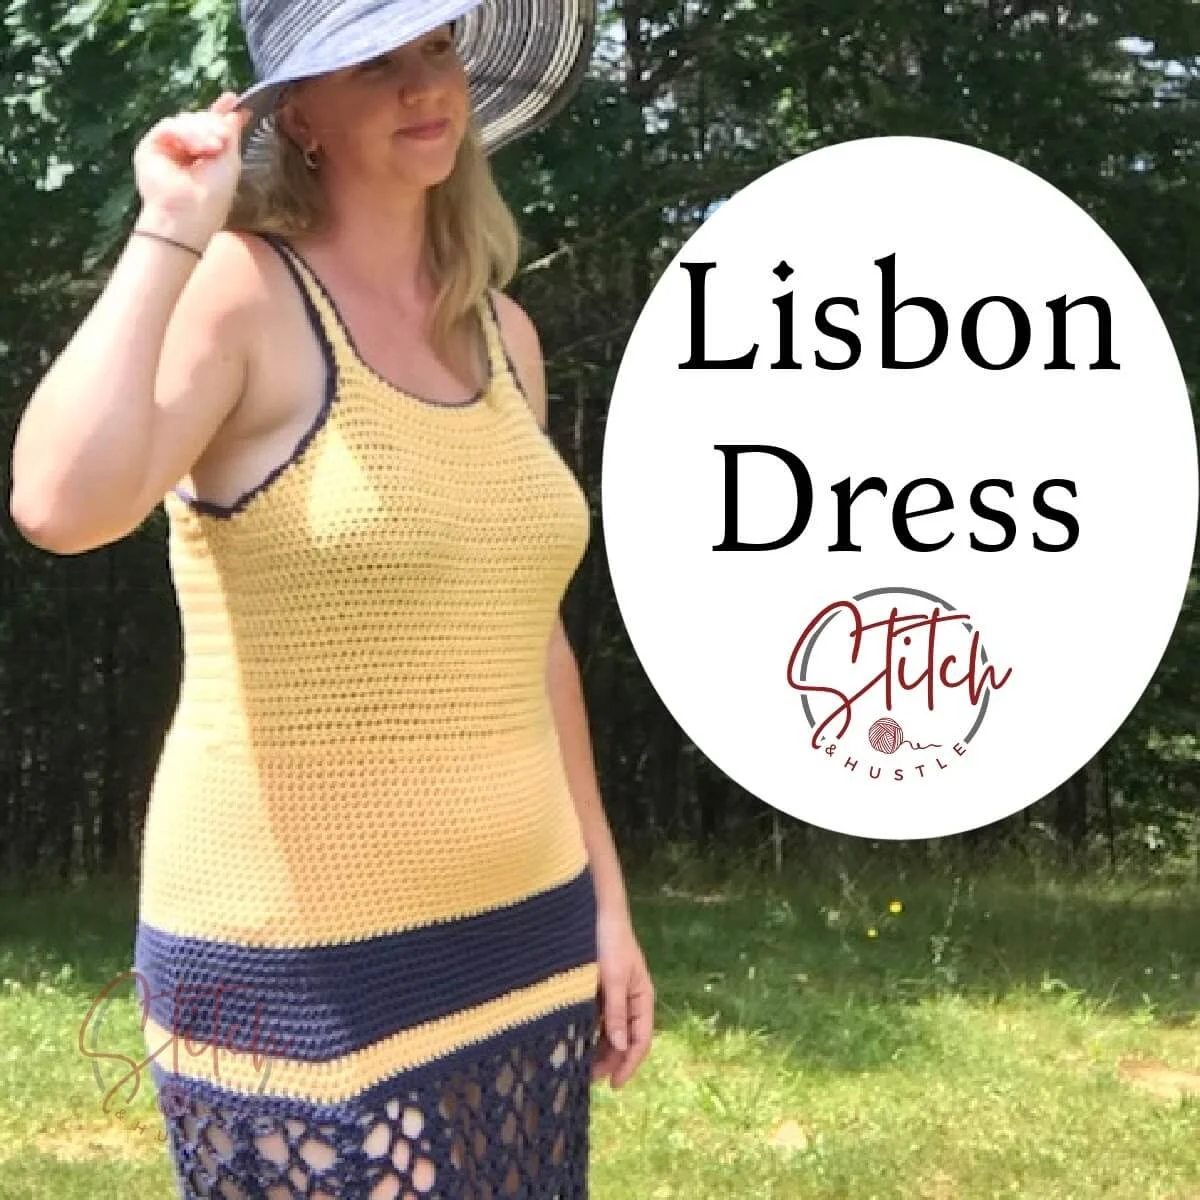
If you’ve been on the hunt for the perfect summer crochet project, let me introduce you to the Lisbon Sun Dress Free Crochet Pattern! It’s our newest free crochet pattern that’s super cute, easy to wear, and just breezy enough for those hot summer days.
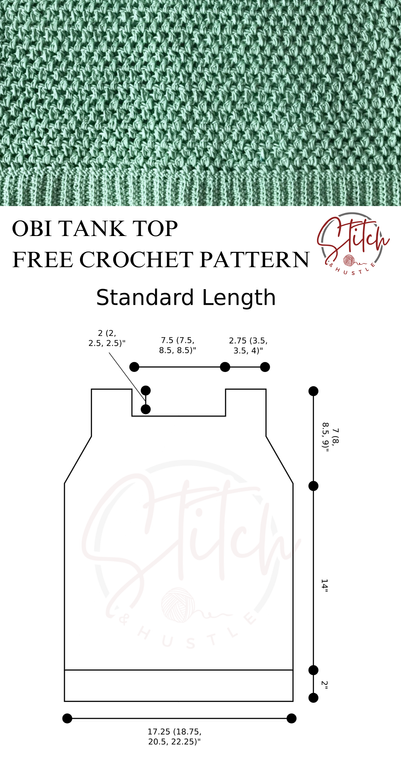
Hey, crochet friends! I’ve got something exciting to share today just as we head into warmer weather - the Obi Tank Top pattern! It’s a super cute, super quick project that’s perfect for the warmer months. If you’re looking for a comfy, stylish piece to add to your spring and summer wardrobe, this one’s for you!

- It works up fast: This is a great pattern if you want a finished make in a flash. We’re using DK weight yarn, which is lightweight and works up quickly and gives you great drape. Before you know it, you’ll have a brand-new tank ready to wear!
- Wide Straps (Goodbye, Bra Strap Woes!): One of the things I love most about this top is the wide straps. Not only do they give the tank a flattering, comfy fit but they also hide your bra straps! (No more tugging at your top to make sure your straps aren’t showing.)
- Perfect for Spring & Summer: Made with breathable cotton yarn, this tank is ideal for the warmer weather. Whether you’re out running errands, hanging out with friends, or just enjoying the sunshine, this tank will keep you cool and cute.
- Free Pattern, Y’all!: I want everyone to be able to make this, so I’m offering the Obi Tank Top pattern for free! It’s beginner-friendly, and I’ve made sure the instructions are clear and easy to follow, so even if you’re new to crochet, you’ll have no problem.
AND, the Obi Tank Top has a fantastic texture - the puff stitch! The puff stitch is one of those little things that adds a lot of punch to a project. It’s textured, squishy, and just looks so pretty! I love this stitch so much (check out the Townsville Top, Gables Wrap, Manko Puff Stitch Infinity Scarf, Helix Puff Stitch Beanie).
AND the pattern is written for two lengths, cropped and standard. So you can make the Obi Tank Top into the perfect warm-weather closet staple for YOU!
Supply List:
Category #3 DK weight Yarn (Wool And The Gang Shiny Happy Cotton in Sample. KnitPicks CotLin also recommended.)
Crop length: 700 (775, 870, 970) yds / 640 (709, 796, 887) m
Standard length: 880 (970, 1090, 1210) yds / 805 (887, 997, 1107) m
Crochet Hook Size I / 5.5 mm
Tapestry needle to weave ends
Tape Measure
Fasteners or safety pins
GAUGE: 4”sq = 7 sts x 8 rows in *PS stitch, ch1*
Sizes: Small (Medium, Large, 1X)
Finished Measurements: Bust: 34.5 (37.5, 41, 44.5)” / 87.63 (95.25, 104.14, 113.03) cm
Stitches Used / Abbreviations:
fsc – foundation single crochet
sc - single crochet
dc – double crochet
PS – Puff Stitch
Puff Stitch (PS):
Wrap yarn over hook; insert hook into ch sp, wrap yarn over hook & pull through leaving 3 loops on hook
Wrap yarn over hook; insert hook into same ch sp, wrap yarn over hook & pull through leaving 5 loops on hook
Wrap yarn over hook and pull through ALL 5 loops to create the “puff” stitch
NOTES:
This pattern is written for Adult Woman Small. (Sizes Medium, Large &1X in parenthesis)
This pattern is written for “cropped” style. Standard version option noted.
To make this for a specific “fitted” size you will want to measure the width you want for the waist then make your initial ribbing to be one inch LESS than that measurement. You may require more yarn.
This pattern is made in two panels, front & back.
Block BEFORE assembly

PATTERN
MAKE TWO PANELS:
Band
Row 1: Fsc x 10 (alternate: ch 9, turn, ch 1, 9 sc across), turn.
Row 2: Ch 1, 9 x sc in back loop only.
Rows 3-60 (66, 72, 78): Repeat Row 2.
Do not cut yarn – you will go directly to work the body.
Body
Row 1: Ch 1 (acts as first sc), sc across placing 1 sc in the side of each row of band for a total of 60 (66, 72, 78) sc, turn.
Row 2: Ch 2 (acts as dc), skip first sc, *PS in next sc, ch 1, sk next sc,* Repeat from * to * to last sc, dc in last sc, turn. 29 (32, 35, 38) PS.
Row 3: Ch 2 (acts as dc), * PS in ch-1 sp, ch 1, skip PS* Repeat from * to* to last dc, dc in dc, turn.
Rows 4-18: Repeat Row 3.
*** NOTE: For Standard style add 8 rows here before going on ***
Shape Armholes
Row 1: Ch 3, sk next ch-1 and PS, * PS in ch-1 sp, ch 1, skip PS* Repeat from * to* to last dc, dc in dc, turn. 28 (31, 34, 37) PS remain.
Rows 2-7 (8, 9, 10): Ch 3, sk next ch-1 and PS, * PS in ch-1 sp, ch 1, skip PS* Repeat from * to* to beg ch-3, dc in top of ch 3, turn. 22 (25, 28, 31) PS remain
Row8 (9,10,11): Ch2(actsasdc),*PSinch-1sp,ch1,skipPS*Repeatfrom*to*tobegch-3,dcintopofch-3, turn.
Rows 9 (10, 11, 12)-10 (12, 12, 13): Ch 2 (acts as dc), * PS in ch-1 sp, ch 1, skip PS* Repeat from * to* to last dc, dc in dc, turn.

First Strap
Row 1: Ch 2, * PS in ch-1 sp, ch 1, skip PS* Repeat from * to* 3 (4, 4, 5) more times, dc into next ch-1 sp, turn. 4 (5, 5, 6) PS.
Rows 2-4 (4, 6, 6): Ch 2 (acts as dc), * PS in ch-1 sp, ch 1, skip PS* Repeat from * to* to last dc, dc in dc, turn.
Row 5 (5, 7, 7): Ch 1, sc in each st
Fasten off.
Second Strap
Re-attach yarn and Work Rows 1-5 (5, 7, 7) as for First Strap. At the end of last row, turn.
Then sc in each st across top of strap, 2 sc in corner st, sc down side of strap working approx 2 sc in the side of each row, sc across neckline and back up First Strap and across top of First Strap. Fasten off.

BLOCK BEFORE ASSEMBLY
ASSEMBLY: ***Same for ALL sizes***
Marry your two panels INSIDE OUT
Using your stitch marker or fastener, pin the panels together at Row 1 of Armhole Shaping beginning at bottom ribbing, connect the panels with sc up the seam
when you get to fastener, fasten off.
Whip stitch the straps together across the top sc row
TURN RIGHT SIDE OUT – weave in all ends
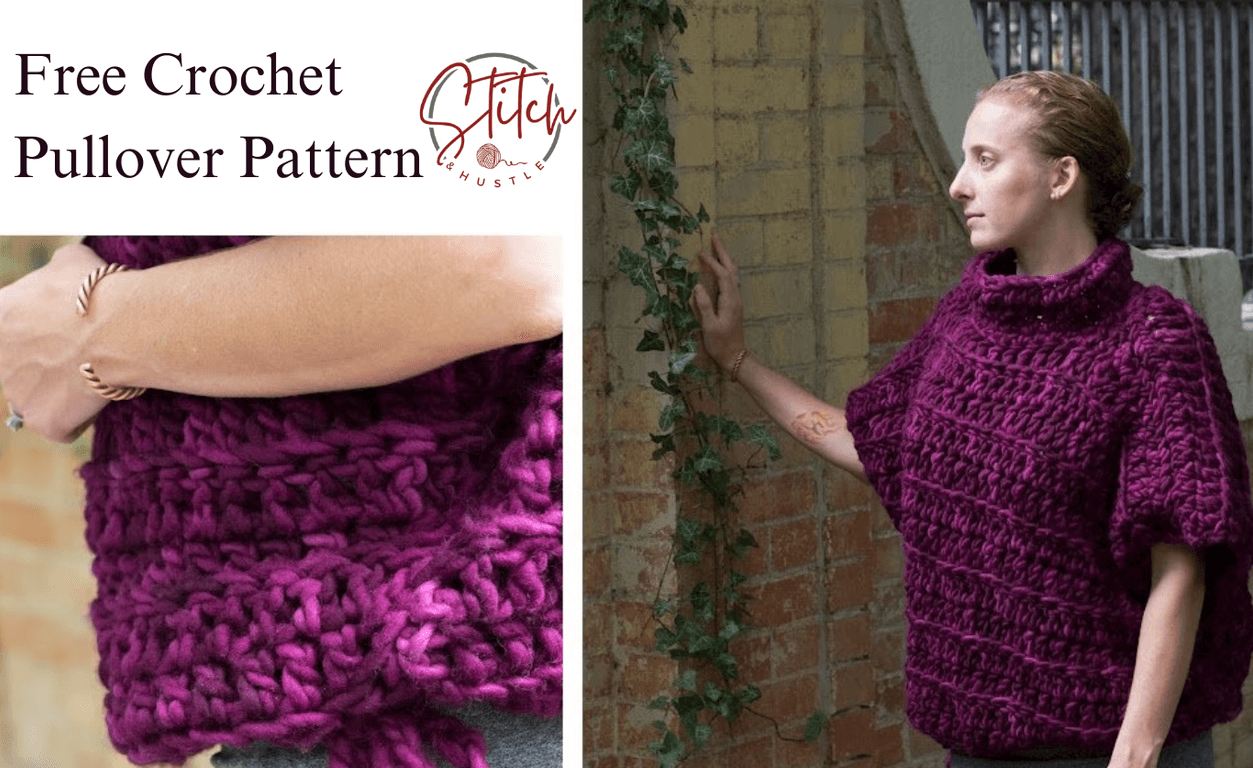
The Stunning Capelet is great for every level of crocheter. It has subtle shaping and beautiful flow. It is worked up in a single piece so there is no seaming! What is super fun is how you can customize this and add more rows to the body for a longer poncho or cape.
Read MorePlease give a sunny welcome to our newest warm-weather free crochet pattern, the Coastal Tee! This unique and stylish tee boasts a combination of a boat neckline and fun wide sleeves blended with a fitted torso.
Read MoreWelcome to the world of effortless style and cozy comfort! Seriously - that is what you get with the Stella Pullover Poncho Free Crochet Pattern.
Whether a seasoned pro or a complete beginner, this chunky poncho pattern is the perfect project for you as we hit cozy season.

This Stella Pullover Poncho Free Crochet Pattern is designed with simplicity in mind, making it an ideal project for beginners. The chunky yarn works up quickly, allowing you to see your progress in no time.
The oversized fit adds a bit of ease and coziness, making this poncho a perfect addition to your wardrobe. Whether you're lounging at home, heading out for a casual day, or even dressing it up for an evening out, this poncho has you covered—literally!
The Cinch bottom of the Stella Pullover Poncho Free Crochet Pattern keeps it from being boxy and bulky and allows you to have full movement while wearing it.

There's nothing quite like wrapping yourself in a handmade piece that not only looks stylish but also keeps you warm and snug on those chilly days. So let’s get started.
Supply List:
435 (522, 609, 696) yd Category #6 Super Bulky yarn. (Original yarn used for sample has been discontinued. I recommend KnitPicks Tuff Puff, Alla Prima, or Fluff of the Andes as replacements.)
Crochet Hook Size Q / 15mm
Tapestry needle to weave ends
Tape Measure
Fasteners or safety pins
Gauge: 4 inch sq = 5 dc stitches x 3 rows
Sizes: Extra Small (SM/ Med, L/XL, 2X/3X)
Finished Measurements: Across Chest 20.75 (24, 27.25, 30.5)" See Notes below.
Stitches Used / Abbreviations:
fsc-foundation single crochet
ch -chain
sc -single crochet
dc-double crochet
hdc –half double crochet
sl st –slip stitch
NOTES:
Be sure to measure and to check your gauge and adjust hook size as needed.
This oversized pullover is intended to fit with up to 10-12” of positive ease.
MAKE 2 IDENTICAL PANELS:
ROW 1: fsc x 26 (30, 34, 38)
This will give you a finished width of 20.75 (24, 27.25, 30.5)"-be sure to measure and to check your gauge Here is a link to tutorial http://www.designz.shibaguyz.com/blog/technique-tuesday-foundation-single-crochet
Alternatively if you do not know fsc:
-ch x 26 (30, 34, 38)then turn
-ch 1, x 25 (29, 33, 37)xscall the way across / Total for row is x 26 (30, 34, 38)sc (incl. ch 1)
For L/XL: Next row: ch 2 and turn, then 33x dc across in back loop only for total of 34dc (incl ch 2)then continue to pattern
For 2X/3X: Next two rows: ch 2 and turn, then 37x dc across in back loop only for total of 38dc (incl ch 2 )then continue to pattern
ROW 2: ch 2 & turn, then 25 (29, 33, 37)x dc across for total of 26(30, 34, 38) dc (incl ch 2)
ROW 3: ch 2 & turn, then 25 (29, 33, 37)x dc across in back loop only for total of 26 (30, 34, 38) dc (incl ch 2)
ROWS 4-5: Repeat Rows 2 & 3
ROW 6: ch 2 & turn, then 1 dc in same dc, 2 dc in next dc, 1 dc in each dc to last 2 dc, 2 dc in last 2 dc for a total of 30 (34, 38, 42)dc (incl ch 2)
ROW 7: ch 2 & turn, then dc across in back loop only for total of 30 (34, 38, 42)dc (incl ch 2)
ROW 8: ch 2 & turn, then 1 dc in same dc, 2 dc in next dc, 1 dc in each dc to last 2 dc, 2 dc in last 2 dc for a total of 34 (38, 42, 46)dc (incl ch 2)
ROW 9: ch 2 & turn, then dc across in back loop only for total of 34 (38, 42, 46)dc (incl ch 2)
ROW 10: ch 2 & turn, then 1 dc in same dc, 2 dc in next dc, 1 dc in each dc to last 2 dc, 2 dc in last 2 dc for a total of 38 (42, 46, 50)dc (incl ch 2)
ROW 11: ch 2 & turn, then 1 dc in same, then dc across in back loop only, 2x dc in last for total of 40 (44, 48, 52)dc (incl ch 2)
ROW 12: ch 2 & turn, then dc across for total of 40 (44, 48, 52) dc (incl ch 2)
ROW 13: ch 2 & turn, then dc across in back loop only for total of 40 (44, 48, 50) dc (incl ch 2)
ROWS 14–15: Repeat Rows 12-13 ***for L/XL & 2X/3X repeat rows 12 & 3 two times***
ROW 16: ch 2 & turn, hdc in next 14 (16, 18, 20) dc, sl st in next 10 dc, hdc in last 15 (17, 19, 21) dc (this creates the slight neck yoke)
Fasten off.

ASSEMBLY:
***Same for ALL sizes***
Marry your two panels INSIDE OUT (right sides facing each other).
Whip stitch the panels together starting at the corner to the neck yoke. Stop when you get to the slip stitches.
Repeat on other side & fasten off.
Whip stitch up the sides marrying your panels. Stop at the last increase row (Row 11) creating the “open arm.”
Repeat on other side & fasten off.
TURN RIGHT SIDE OUT
NECK:
Starting in the back (this is where you decide a front & back side of your garment), attach yarn at center point:
Round1: ch 1 (does not count as a stitch), sc around and create 2x sc at the point where the two panels come together on each side for a total of 22 (26, 30) sc, sl st to top of ch 1
Round 2: ch 2, (counts as hdc), hdc in each sc around, sl st to top of beg ch 2 for a total of 22 (26, 30) hdc
Rounds 3–6: ch 2, (counts as hdc), hdc in each hdc around, sl st to top of beg ch 2 for a total of 22 (26, 30) hdc
Fasten off
Fasten Off.
Weave in all ends

With texture for days, beautiful drape, and loads of versatility, you’ll love our new Hope Shrug free crochet pattern!
Read MoreI’m so happy to share my newest free crochet pattern with you - the Landscape Tee! This project is yet another pattern created in collaboration with Handspun Hope and features their beautiful Handspun Hope DK yarn. (You can read more about the collaboration here. Other patterns in the collection can be found here. There’s even a free knitting pattern here!)
The Landscape Tee free crochet pattern includes instructions for NINE sizes and features a fresh, modern silhouette. I love how much movement the wide sleeves allow. Talk about comfort! Short sleeves make it a warm-weather staple but a change in fiber choice would adapt it to be a fun wardrobe addition for cooler months as well.

The Landscape Tee has a few intermediate crochet techniques. Which makes it the perfect opportunity for beginners to stretch their skills! And short sleeves mean you are off Sleeve Island in a jiffy.
Let’s fill the world with more handmade beauty. Happy crocheting!

Skill Level: Intermediate
Materials:
Handspun Hope DK – Approx 173 Yards Per Skein (Shown in Onion Skin & Logwood)
Color A: 260 (290, 340, 400, 430, 490, 530, 590, 630) yards
Color B: 300 (345, 405, 470, 515, 585, 630, 705, 755) yards
US J / 6 mm crochet hook
Fasteners (for assembly)
Tapestry needle to weave ends
Fasteners or safety pins
Gauge:
11 sts x 7 rows in alternating hdc & dc rows = 4” sq.
Sizes:
XS (S, M, L, 1X, 2X, 3X, 4X, 5X), shown in S Size
Finished Bust:
33.5 (37.75, 42.25, 46.5, 51, 55.25, 59.75, 64, 68.25)”

Abbreviations:
fsc – foundation half double crochet
ch – chain loop
sc – single crochet
hdc – half double crochet
dc – double crochet
sl st – slip stitch
st(s) – stitch (es)
RS – Right Side
WS – Wrong Side
This pattern is written for Adult Woman size XS. Sizes (S, M, L, 1X, 2X, 3X, 4X, 5X) in parentheses
Block BEFORE assembly.
The two main panels are joined at the shoulders and sides, as shown on the schematic, using the mattress stitch method then sleeves are added.
Note: Handspun Hope yarn is hand-spun and hand dyed by skilled craftspeople in Rwanda. Like all handspun yarn, yardage and thickness may vary slightly from skein to skein. We recommend that you alternate skeins while working this project.

MAKE 2 PANELS
BEGIN WITH COLOR A
BAND:
Row 1: fsc x10 *** (alternate: ch 9, turn, ch 1, 9x sc across) ***
Row 2 and on: turn, ch 1 (does not act as a st), 10x sc in back loop only
Rows 3-46 (52, 58, 64, 70, 76, 82, 88, 94): Rep Row 2.
DO NOT CUT YARN – you will go directly to work the body
Row 1 (RS): Ch 1 (does not act as a st), 46 (52, 58, 64, 70, 76, 82, 88, 94) sc across
CHANGE TO COLOR B
Row 2 (WS): Ch 2 (acts as first st), 45 (51, 57, 63, 69, 75, 81, 87, 93) dc across, Turn.
Row 3 (RS): Ch 1 (does not act as a st), 46 (52, 58, 64, 70, 76, 82, 88, 94) hdc across, Turn. Rows 4-15 (15, 17, 17, 17, 19, 19, 19, 19): Repeat Rows 2 & 3.
CHANGE TO COLOR A
Row 16 (16, 18, 18, 18, 20, 20, 20, 20) (WS): Ch 2 (acts as first st), 45 (51, 57, 63, 69, 75, 81, 87, 93) dc across, Turn.
Row17(17,19,19,19,21,21,21,21)(RS): Ch1(doesnotactasast),46(52,58,64,70,76,82,88,94) hdc across, Turn.
Row 18 (18, 20, 20, 20, 22, 22, 22, 22) (WS): Ch 2 (acts as first st), 45 (51, 57, 63, 69, 75, 81, 87, 93) dc across, Turn.

CHANGE TO COLOR B
Rows 19 (19, 21, 21, 21, 23, 23, 23, 23)-30 (30, 32, 34, 34, 36, 36, 38, 38): Repeat Rows 2 & 3.
CHANGE TO COLOR A
Row 31 (31, 33, 35, 35, 37, 37, 39, 39) (RS): Ch 2 (acts as first st), 45 (51, 57, 63, 69, 75, 81, 87, 93) dc across, Turn.
Row 32 (32, 34, 36, 36, 38, 38, 40, 40) (WS): Ch 1 (does not act as a st), 12 (15, 18, 20, 23, 26, 28, 31, 34) hdc, 22 (22, 22, 24, 24, 24, 26, 26, 26) sc, 12 (15, 18, 20, 23, 26, 28, 31, 34) hdc across, Turn.
Row 33 (33, 35, 37, 37, 39, 39, 41, 41) (RS): Ch 2 (acts as first st), 11 (14, 17, 19, 22, 25, 27, 30, 33) dc, 22 (22, 22, 24, 24, 24, 26, 26, 26) sc, 12 (15, 18, 20, 23, 26, 28, 31, 34) dc across, Turn.
BLOCK BOTH PANELS BEFORE ASSEMBLY

ASSEMBLY – SAME FOR ALL SIZES
Marry the tops of your panels together with WS facing.
Shoulder Seams:
Using the Mattress Stitch Method, seam together approx. 12 (15, 18, 20, 23, 26, 28, 31, 34) sts beginning at outside corner of shoulder and working toward neck opening. Fasten off.
Repeat for other shoulder, leaving center 22 (22, 22, 24, 24, 24, 26, 26, 26) sts unworked for neck opening.
Side Seams / Creating Armholes:
Using the Mattress Stitch Method, seam together beg. at bottom edge and working toward shoulder, leaving approx. 8.5 (9, 9.5, 10, 10.5, 11, 11.5, 12, 12.5)” for armhole opening. Fasten off.
Repeat for other side seam.
TURN RIGHT SIDE OUT FOR SLEEVES.
Note: The Sleeves are worked sideways and joined to the body at the end of every other row. AND ADDED AFTER ASSEMBLY
SLEEVES - COLOR A
Set Up Round (RS): begin at underarm, work approx 46 (50, 52, 56, 58, 60, 64, 66, 68) Sc evenly all the way around around entire armhole opening.
When you get to the opposite bottom corner, sl st to join round, then:
Row 1: F sc 11, turn.
Row 2: Ch 1(does not act as a st), 11 sc in back loop only, sl st to the NEXT sc on the set up round
Row 3: Sl st to the NEXT sc on the set up round, Turn, 11 sc in back loop only, Turn.
Alternate Rows 2 & 3 until you reach all the way around to Row 1, fasten off leaving a 12” tail.
Use Tail to join sides of sleeve ribbing. Repeat on other side.
Weave in all ends.

Meet the Swiss Army knife of crochet top patterns! The Gulfport Tunic free crochet pattern can be made up as a tunic or lengthened to a full dress. It’ll be your sidekick for all your warm-weather adventures!
Read MoreIf you’re a knitting newbie or even an intermediate knitter looking for a quick and satisfying project, we’ve got the perfect free pattern for you. Today, we’ll introduce you to the Tower Tank; an exceptional beginner knitting tank top pattern that boasts a minimalistic design,
Read MoreDive into our beginner-friendly crochet Alaska Shrug pattern, perfect for cozy layering. Enjoy our free, easy crochet pattern complete with photo and diagram assembly details, and create a modern, stylish piece effortlessly.
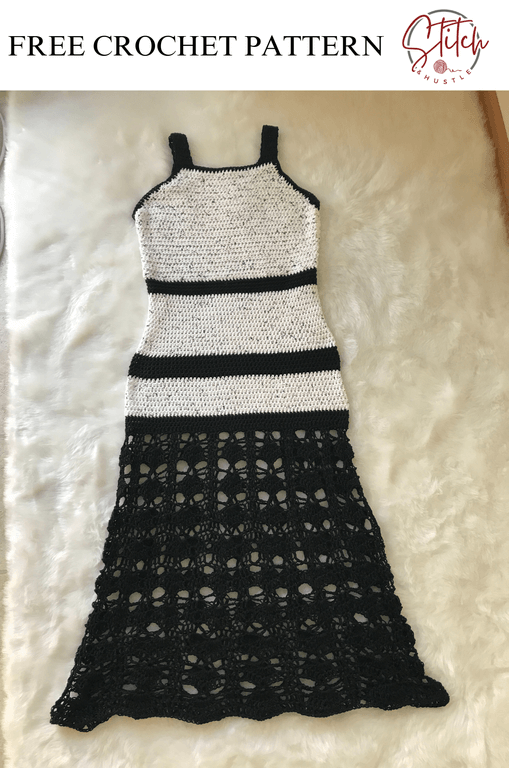
Read MoreI am so beyond excited to bring you the Havana Dress Free Crochet Pattern because of all my designs, this one is so so special. It is my go to dress for Spring into Summer and Summer into Fall. There are so many ways to wear and style the Havana Dress Free Crochet Pattern.

I designed the Havana Crochet Dress to have a simulated drop waist because I am petite (read: short) and this is very helpful for the illusion of length in the torso.
It is a simple magic trick in shaping and the placement of the stripes that give the drop waist effect.
And the great thing about the Havana Crochet Dress Free Crochet Pattern is that it works up in a modular way. You create the top then add the bottom skirting. This means you can go as long or as short as you may like and that is great for personalization!
Options for styling the Havana Dress Free Crochet Pattern are endless. Here are just a few ways I wear mine:
I wear my Havana Crochet Dress. over a swimsuit heading to the beach
I wear my Havana Crochet Dress. with flats out to dinner on summer evenings
I wear my Havana Crochet Dress. with a t-shirt underneath for running around town
I wear my Havana Crochet Dress. with a long sleeve or turtleneck going into Fall cool evenings
I wear my Havana Crochet Dress. with a jean jacket and sneakers
See what I mean… ENDLESS Styling options to wear your Havana Crochet Dress.
SUPPLY LIST:
DK weight Cotton. (the yarn I used for design is no longer available so I suggest any DK cotton)
Main Color (Space Dots): 470 (520, 570, 750, 820, 890, 960, 1035) yds
Contrast Color (Black): 570 (635, 700, 920, 1000, 1085, 1170, 1260) yds
Crochet Hook Size I-9 / 5.5 mm
Tapestry needle to weave ends
Tape Measure
Fasteners or safety pins
SIZES: Extra Small (Small, Medium, Large, 1X, 2X, 3X, 4X)
BUST: 32 (35, 39.5, 43.5, 46.5, 51, 54, 58)” Finished Measurement
GAUGE: 4” sq = 12 hdc sts x 9 rows
ABBREVIATIONS:
fhdc – foundation half double crochet
ch – chain loop
sc – single crochet
sl st – slip stitch
hdc – half double crochet
hdcblo – half double crochet back loop only
hdc2tog – hdc 2 together
sp - space
PATTERN NOTES:
READ THROUGH PATTERN BEFORE BEGINNING
This pattern is written for Adult Woman size Extra Small. (Sizes Small, Med & Large, 1X, 2X, 3X, 4X in parentheses).
This upper part of this dress is made in two panels. After joining the two panels, the lower part of the dress and skirt are worked downward in the round.
Assembly calls for Mattress Stitch Method, if you do not know this you can whip stitch instead.
Block BEFORE assembly.

Front & Back Bust Panels – Make 2 in MAIN COLOR:
Row 1: Leaving a long tail, fhdc x 44 (48, 54, 60, 64, 70, 74, 80) turn.
Rows 2-17: Ch 2 (acts as hdc), 43 (47, 53, 59, 63, 69, 73, 70) hdc in each hdc across; total 44 (48, 54, 60, 64, 70, 74, 80) hdc incl ch 2.
Begin Shaping armhole:
Row 18 - 20: Ch 2 (acts as first hdc), [hdc2tog] 2 times, hdc in each hdc across to last 5 stitches, [hdc2tog] 2 times, hdc in last, turn. 4 stitches decreased each row, 32 (36, 42, 48, 52, 58, 62, 68) stitches remain.
Rows 21 – 23 (24, 25, 26, 27, 28, 29, 30): Ch 2 (acts as first hdc), hdc2tog, hdc across to last 3 stitches then hdc2tog, hdc in last, turn. 2 stitches decreased each row, 26 (28, 32, 36, 38, 42, 44, 48) stitches remain.
Rows 24 (25, 26, 27, 28, 29, 30, 31) – 26 (27, 28, 29, 30, 31, 32, 33): Ch 2 (acts as first hdc), 25 (27, 31, 35, 37, 41, 43, 47) hdc across total 26 (28, 32, 36, 38, 42, 44, 48) incl ch 2.
Fasten off.
TOP ASSEMBLY :
Marry your two panels and this will now be INSIDE OUT.
Using your stitch marker or fastener, pin sides of panels together at Row 18.
Using your long tail from the bottom, and using mattress stitch method, attach the sides working from the bottom to the fastener on each side. TURN RIGHT SIDE OUT TO CONTINUE IN THE ROUND

LOWER SECTION:
With bust right side out, after assembled: Attach main color at center stitch of lower back, then:
MAIN COLOR:
Rounds 1 - 4: Ch 2 (acts as first hdc), 87 (95, 107, 119, 127, 139, 147, 159) hdc around, sl st to join to ch 2 for total 88 (96, 108, 120, 128, 140, 148, 160) hdc incl ch 2
CHANGE TO CONTRAST COLOR FOR WAIST SHAPING:
Round 1: Ch 2 (acts as first hdc), 87 (95, 107, 119, 127, 139, 147, 159) hdcblo around, sl st to join to ch 2 for total 88 (96, 108, 120, 128, 140, 148, 160) hdc incl ch 2
Round 2: Ch 2 (acts as first hdc), 20 (22, 25, 28, 30, 33, 35, 38) hdcblo, hdc2tog in next 2 hdc, 42 (46, 52, 58, 62, 68, 72, 78) hdcblo, hdc2tog in next 2 hdc, 21 (23, 26, 29, 31, 34, 36, 39) hdcblo, sl st to top of ch 2, total 86 (94, 106, 118, 126, 138, 146, 158) hdc incl ch 2.
Round 3: Ch 2 (acts as first hdc), 20 (22, 25, 28, 30, 33, 35, 38) hdcblo, hdc2tog in next 2 hdc, 41 (45, 51, 57, 61, 67, 71, 77) hdc blo, hdc2tog in next 2 hdc, 20 (22, 25, 28, 30, 33, 35, 38) hdcblo, sl st to top of ch 2, total 84 (92, 104, 116, 124, 136, 144, 156) hdc incl ch 2.

CHANGE TO MAIN COLOR:
Rounds 1 - 10: Ch 2 (acts as first hdc), 83 (91, 103, 115, 123, 135, 143, 155) hdc around, sl st to join to ch 2 for total 84 (92, 104, 116, 124, 136, 144, 156) hdc incl ch 2.
CONTINUE IN MAIN COLOR & BEGIN HIP INCREASE:
Round 1: Ch 2 (acts as first hdc), 83 (91, 103, 115, 123, 135, 143, 155) hdc around, sl st to join to ch 2 for total 84 (92, 104, 116, 124, 136, 144, 156) hdc incl ch 2.
Round 2: Ch 2 (acts as first hdc), 19 (21, 24, 27, 29, 32, 34, 37) hdc, 2 hdc in next 2 hdc, 40 (44, 50, 56, 60, 66, 70, 76) hdc, 2 hdc in next 2 hdc, 20 (22, 25, 28, 30, 33, 35, 38) hdc, sl st to top of ch 2, total 88 (96, 108, 120, 128, 140, 148, 160) hdc incl ch 2. (increase 4 stitches this round)
Round 3: Ch 2 (acts as first hdc), 20 (22, 25, 28, 30, 33, 35, 38) hdc, 2 hdc in next 2 hdc, 42 (46, 52, 58, 62, 68, 72, 78) hdc, 2 hdc in next 2 hdc, 21 (23, 26, 29, 31, 34, 36, 39) hdc, sl st to top of ch 2, total 92 (100, 112, 124, 132, 144, 152, 164) hdc incl ch 2. (increase 4 stitches this round)
Round 4: Ch 2 (acts as first hdc), 21 (23, 26, 29, 31, 34, 36, 39) hdc, 2 hdc in next 2 hdc, 44 (48, 54, 60, 64, 70, 74, 80) hdc, 2 hdc in next 2 hdc, 22 (24, 27, 30, 32, 35, 37, 40) hdc, sl st to top of ch 2, total 96 (104, 116, 128, 136, 148, 156, 168) hdc incl ch 2. (increase 4 stitches this round)
Round 5: Ch 2 (acts as first hdc), 22 (24, 27, 30, 32, 35, 37, 40) hdc, 2 hdc in next 2 hdc, 46 (50, 56, 62, 66, 72, 76, 82) hdc, 2 hdc in next 2 hdc, 23 (25, 28, 31, 33, 36, 38, 41) hdc, sl st to top of ch 2, total 100 (108, 120, 132, 140, 152, 160, 172) hdc incl ch 2. (increase 4 stitches this round)
Round 6: Ch 2 (acts as first hdc), 23 (25, 28, 31, 33, 36, 38, 41) hdc, 2 hdc in next 2 hdc, 48 (52, 58, 64, 68, 74, 78, 84) hdc, 2 hdc in next 2 hdc, 24 (26, 29, 32, 34, 37, 39, 42) hdc, sl st to top of ch 2, total 104 (112, 124, 136, 144, 156, 164, 176) hdc incl ch 2. (increase 4 stitches this round)

Large (2X, 4X) Sizes only:
Round 7: Ch 2 (acts as first hdc), 32 (37, 42) hdc, 2 hdc in next 2 hdc, 66 (76, 86) hdc, 2 hdc in next 2 hdc, 33 (38, 43) hdc, sl st to top of ch 2, total 140 (160, 180) hdc incl ch 2. (increase 4 stitches this round)
Extra Small (Medium, 1X, 3X) Sizes only:
Round 7: Ch 2 (acts as first hdc), 24 (29, 34, 39) hdc, 2 hdc in next 3 hdc, 49 (59, 69, 79) hdc, 2 hdc in next 3 hdc, 24 (29, 34, 39) hdc, sl st to top of ch 2, total 110 (130, 150, 170) hdc incl ch 2. (increase 6 stitches this round)
Small Size Only:
Round 7: Ch 2 (acts as first hdc), 25 hdc, 2 hdc in next 4 hdc, 52 hdc, 2 hdc in next 4 hdc, 26 hdc, sl st to top of ch 2, total 120 hdc incl ch 2. (increase 8 stitches this round)
All Sizes:
CHANGE TO CONTRAST COLOR
Rounds 8 - 11: Ch 2 (acts as first hdc), 109 (119, 129, 139, 149, 159, 169, 179) hdc around, sl st to join to ch 2 for total 110 (120, 130, 140, 150, 160, 170, 180) hdc incl ch 2.
CHANGE TO MAIN COLOR
Rounds 12 - 20: Ch 2 (acts as first hdc), 109 (119, 129, 139, 149, 159, 169, 179) hdc around, sl st to join to ch 2 for total 110 (120, 130, 140, 150, 160, 170, 180) hdc incl ch 2.

CHANGE TO CONTRAST COLOR & BEGIN SKIRT (PLEASE REFER TO CHART):
Rounds 1-4: Ch 2 (acts as first hdc), 109 (119, 129, 139, 149, 159, 169, 179) hdc around, sl st to join to ch 2 for total 110 (120, 130, 140, 150, 160, 170, 180) hdc incl ch 2.
Round 5: Ch 2 (acts as first dc), dc in next hdc, *ch 3, skip 3 hdc, [dc, ch 2, dc] in next hdc, ch 3, skip 3 hdc, dc in each of next 3 hdc *; repeat * to * around, ending last repeat with dc in last hdc, sl st to top of ch 2 that started round to complete. Pattern will be repeated 11 (12, 13, 14, 15, 16, 17, 18) times across round.
Round 6: Ch 2 (acts as first dc), dc in next dc, *ch 2, skip 3 ch and 1 dc, 7 dc in ch 2 sp, ch 2, skip dc and 3 ch, dc in each of next 3 dc*; repeat * to * around, ending last repeat with dc in last dc, sl st to top of ch 2 that started round to complete.
Round 7: Ch 2 (acts as first dc), dc in next dc, *ch 1, skip 2 ch, dc in each of next 3 dc, [dc, ch 1, dc] in next dc, dc in each of next 3 dc, ch 1, skip 2 ch, dc in each of next 3 dc; * repeat * to * around, ending last repeat with dc in last dc, sl st to top of ch 2 that started round to complete.
Round 8: Ch 2 (acts as first dc), dc in next dc, *ch 3, skip ch 1 and 4 dc, [dc, ch 2, dc] in ch 1 sp, ch 3, skip 4 dc and ch 1 sp, dc in each of next 3 dc *; repeat * to * around, ending last repeat with dc in last dc, sl st to top of ch 2 that started round to complete.
Rounds 9-10: Repeat Rounds 5-6.
Rounds 11 – 34: Repeat Rounds 8-10, 8 more times.
Round 35: Ch 2 (acts as first dc), dc in next dc, *ch 1, skip 1 ch, dc in each of next 4 dc, [dc, ch 2, dc] in next ch 1 sp, dc in each of next 4 dc, ch 1, skip ch 1, dc in each of next 3 sts * repeat * to * around, ending last repeat with dc in last dc, then sl st to top of ch 2 that started round to complete.
Fasten Off.
FINISHING & STRAPS USING CONTRAST COLOR B
Attach contrast color at left corner of back.
Row 1: SC evenly around armhole working 1 sc per row, sc in each sc across front, sc evenly around other armhole working 1 sc per row, sc in each sc across back, sl st to first sc to join. Do not cut yarn.
STRAPS:
Rows 1 - 20: Chain 2 (acts as hdc), 6 (6, 7, 8, 8, 9, 9, 10) hdc across, turn.
Fasten off. Rejoin yarn at other side back corner & repeat for second strap.
Weave in all ends.

The BoHo Chic Cascading Crochet Vest Free Pattern is great for beginners and works up in a single piece. It comes with a free sizing tutorial for your perfect fit.
Read MoreThe Hobart Shrug Free Crochet Pattern is like a textured blanket you can wear in public and look stylish while staying cozy! Beginner friendly and perfect for all seasons.
Read MoreInspired by and named for one of my favorite spots when I lived in Australia, Kirra Beach, the Kirra Tunic Free Crochet Pattern will quickly become your fave to make and to wear.
Read MoreSummer crochet is one of my favorite things in the world and I am so excited to share the The Laguna Crochet Dress Free Crochet Pattern to get you ready for summer style.
Easy to make in any size and custom each size, the Laguna Crochet Dress Free Crochet Pattern will give you that perfect summer style whether on the beach or out about the town.
Read MoreAH the joys of transitional weather are in the air. Layering season is officially here and so I could not help but to bring out the Shrug game. The Juno 'Lite' Crochet Shrug Free Crochet Pattern is a perfect layer as the weather varies in a single day.
One of my most popular patterns ever was my Juno Shrug that launched this little adventure so many years ago. So I thought it was time for a new lighter version for the Spring & Fall transitional weather I love so much. I teamed up with the fine folks at We Crochet to bring you this new updated Juno 'Lite' Crochet Shrug Free Crochet Pattern.

You can find the original Juno Shrug Free Crochet Pattern here and see why everyone loves the Juno so much.
The Juno 'Lite' Crochet Shrug Free Crochet Pattern brings you the same cozy comfort as the original Juno Shrug but in a lighter weight. The yarn I chose is the We Crochet Mighty Stitch.

The We Crochet Mighty Stitch. is a great bulky yarn because it is cozy but not overly dense in how it is spun. This allows for a great amount of breathability as you stitch along and is why it is a perfect fit for the Juno 'Lite' Crochet Shrug Free Crochet Pattern.
So grab some yarn and let’s get stitching!

SKILL LEVEL: Advanced Beginner
MATERIALS
Yarn: WeCrochet Mighty Stitch Bulky 600 (690, 730) yds.
Bulky weight; 80% Acrylic, 20% Superwash Wool; 136 yd / 124 m per ball
Size L-11 / 8 mm Crochet Hook
Darning Needle
Tape Measure
Fasteners or safety pins
SIZES: Small/Medium (Large/1X, 2X/3X)
GAUGE: 10 sts x 6 rows = 4” in hdc

ABBREVIATIONS:
fhdc - foundation half double crochet
ch = chain
sc = single crochet
hdc = half double crochet
sc2tog = 2 single crochet together
sts = stitches
RS = Right Side
WS = Wrong Side
PATTERN NOTES:
Shown in Small/Medium size
If you have trouble meeting gauge - you will need to add or remove stitches for your initial row to meet required width
You can then add rows to meet required length if needed.
The stitch counts given in the pattern are based on the listed gauge, but it is very easy to substitute other weights of yarn. For the foundation row, simply work to the listed measurement, adding stitches as needed to meet this width.

PATTERN:
ROW 1: Fhdc x 102 (110, 134) or to approx 43 (48, 53)”.
ROW 2: Ch 1 (does NOT act as stitch), 102 (110, 134) hdc across in back loop only, turn. (RS)
ROW 3: Ch 1 (does NOT act as stitch), 102 (110, 134) hdc across, turn. (WS)
ROWS 4 – 45 (48, 51): Repeat Rows 2 & 3 alternating, or to approx. 29 (31, 33)”.
ROW 46 (49, 52) : Ch 1 (does NOT act as stitch), 102 (110, 134) hdc
Fasten off leaving long tail of 12” or more.
ASSEMBLY
Fold your work in half with WS facing out, marrying the beginning fhdc & last hdc rows – this will be inside out now.
From the folded side: measure 6.5 (7.5, 8.5)” and place pin. This will be your armhole.
Begin working from where the folded corners of the fhdc & hdc rows meet and work sl st OR single crochet to marry the sides.
Work up to your pin for the armhole.
Fasten Off.
Repeat on the other side.
Turn right side out and lay your piece out in a diamond shape with armholes on either side.

CUFFS:
ROUND 1: Ch 1, sc evenly all the way around armhole opening (approx 3 sc for every 2 rows), working sc2tog at seam, sl st to top of ch 1 to join.
ROUND 2: Ch 1 (does NOT act as stitch) hdc around, sl st to top of first hdc to join.
Fasten Off.
Repeat on the other side.

COLLAR:
Rejoin your yarn at top center of diamond shape - which will become the Neck
Place stitch marker on each side approx. 7” below sleeve seams.
ROUND 1: Ch 1, sc evenly to marker below the sleeve seam, * [2 sc in next], 1 sc in next 5 sts *, repeat * to * to second marker approx. 7 inches below sleeve seam on other side, evenly sc around to end, sl st to top of ch 1 to join.
ROUND 2: Ch 1 (does NOT act as stitch) hdc around, sl st to top of first hdc to join.
Fasten Off.
Weave in all ends.

We are so excited to bring you the Lakefront Peplum Top Free Crochet Pattern just in time for warm weather and summer outing! The Lakefront Peplum Top Free Crochet Pattern is a wonderful pattern for adventurous beginners looking to make shapely garments. The Peplum bottom has a subtle flair and you can easily modify the straps to suit any length.
Like the In The Loop Top Free Crochet Pattern, Lakefront Peplum Top Pattern was originally part of the 2019 Knitcrate Bonanza of Patterns and I am so excited to now be bringing it to you for free. Make the Lakefront Peplum Top Free Crochet Pattern with your favorite DK weight yarn.

Sizes: Extra Small (Small, Medium, Large, 1X, 2X, 3X, 4X)
Finished Measurements
Bust: 32 (36.25, 40.5, 44.75, 49, 53.25, 57.5, 61.75)"
Supply List:
Category #3 DK yarn - 490 (580, 650, 730, 830, 910, 1150, 1270) yards
Crochet Hook Size H/ 5mm
Tapestry needle to weave ends
Tape Measure
Fasteners or safety pins
GAUGE: 4” sq = 15 sts x 11 rows in hdc stitch
Stitches Used / Abbreviations:
fhdc – foundation half double crochet
ch – chain loop
dc – double crochet
hdc – half double crochet
sl st – slip stitch
dc2tog – dc 2 together
sp – space
(RS) – Right Side
(WS) – Wrong Side
NOTES:
This pattern is written for Adult Woman Extra Small. (Sizes Small, Medium, Large, 1X, 2X, 3X, 4X in parentheses)
This top is intended to fit with up to two inches of positive ease.
This pattern is made in two panels, front & back.
Front and back pieces are worked from the bottom up.
Each panel has a Right Side & Wrong Side
Assembly calls for Mattress Stitch Method, if you do not know this you can whip stitch instead.
Block BEFORE assembly. See Stitch & Hustle Blog for my blocking tips

FRONT PANEL:
Row 1: Fhdc x 64 (72, 80, 88, 96, 104, 112, 120)) turn.
Row 2: Ch 2 (as first dc), 63 (71, 79, 87, 95, 103, 111, 119)x dc across for total 64 (72, 80, 88, 96, 104, 112, 120)) dc incl ch 2. (RS)
Row 3: Ch 1 (as first sc), 63 (71, 79, 87, 95, 103, 111, 119)x sc across for total 64 (72, 80, 88, 96, 104, 112, 120)) sc incl ch 1. (WS)
Rows 4 – 13: Repeat rows 2 & 3 alternating (ending with WS)
SHAPE WAIST:
Row 14: Ch 2 (as first dc), [dc2tog] 2 times, 54 (62, 70, 78, 86, 94, 102, 110) x dc across 2x dc2tog, dc in last for total 60 (68, 76, 84, 92, 100, 108, 116) dc incl ch 2. (RS)
Row 15: Ch 1 (as first sc), 59 (67, 75, 83, 91, 99, 107, 115)x sc across for total 60 (68, 76, 84, 92, 100, 108, 116) sc incl ch 1. (WS)
Row 16: Ch 2 (as first dc), [dc2tog] 2 times, 46 (58, 66, 74, 82, 90, 98, 106) x dc across 2x dc2tog, dc in last for total 56 (64, 72, 80, 88, 96, 104, 112) dc incl ch 2. (RS)

CONTINUE TO BODICE:
Row 17: Ch 1 (as first sc), 55 (63, 71, 79, 87, 95, 103, 111)x sc across for total 56 (64, 72, 80, 88, 96, 104, 112) sc incl ch 1. (WS)
Row 18: Ch 2 (as first dc), 55 (63, 71, 79, 87, 95, 103, 111)x dc across for total 56 (64, 72, 80, 88, 96, 104, 112)dc incl ch 2. (RS)
Row 19: Ch 1 (as first sc), 55 (63, 71, 79, 87, 95, 103, 111)x sc across for total 56 (64, 72, 80, 88, 96, 104, 112) sc incl ch 1. (WS)
Rows 20 – 43: Repeat rows 18 & 19 alternating (ending with WS).
SHAPE ARMHOLE:
Row 1: Ch 2 (as first dc), [dc2tog] 2 times, dc across to last 5 stitches then [dc2tog] 2 times, dc in last; 4 stitches decreased, 52 (60, 68, 76, 84, 92, 100, 108) stitches remain (RS)
Row 2: Ch 1 (does NOT act as first sc), 52 (60, 68, 76, 84, 92, 100, 108)x sc across for total , 52 (60, 68, 76, 84, 92, 100, 108) sc
Repeat Rows 1-2: 2 (3, 4, 5, 6, 7, 8, 9) more times for total of 44 (48, 52, 56, 60, 64, 68, 72) stitches remaining
SHAPE NECK / MAKE FIRST STRAP:
Rows 1-2: Ch 1 (does NOT act as first sc), 44 (48, 52, 56, 60, 64, 68, 72) x sc across for total 44 (48, 52, 56, 60, 64, 68, 72) sc
Row 3: Ch 2 (acts as first hdc), 6 (6, 7, 7, 8, 8, 9, 9) hdc, 30 (34, 36, 40, 42, 46, 48, 52) sc across, 7 (7, 8, 8, 9, 9, 10, 10) hdc, turn.
Row 4: Ch 2 (acts as first hdc), 5 (5, 6, 6, 7, 7, 8, 8) hdc, hdc2tog, hdc, TURN.
Row 5: Ch 2 (acts as first hdc), 4 (4, 5, 5, 6, 6, 7, 7) hdc, hdc2tog TURN.
Rows 6 - 12 (12, 14, 16, 18, 18, 21, 24) *** OR TO DESIRED LENGTH*** : Ch 2 (acts as first hdc), 5 (5, 6, 6, 7, 7, 8, 8)x hdc across, TURN.
Fasten, leaving long tail for assembly (approx. 6 inches)

CONTINUE SHAPING NECK / SECOND STRAP
Rejoin yarn at other side corner and work Rows 3-12 (12, 14, 16, 18, 18, 21, 24) *** OR TO DESIRED LENGTH***: as for First Strap.
BACK PANEL:
Work as for Front Panel through Row 2 of SHAPE NECK / MAKE STRAPS.
Fasten off back panel.
ASSEMBLY
Marry your two panels with RS facing each other. This is now inside out.
Using your stitch marker or fastener, pin sides of panels together at Row 1 beginning armhole shaping. Using mattress stitch method, attach the sides working from the bottom to the fastener on each side. After top is assembled
TURN RIGHT SIDE OUT then
Using mattress stitch method, connect the straps on each side.
Weave in all ends.

The Aplomb Peplum Top Free Crochet Pattern is brilliant in construction as it works up FLAT but you would never know it with Natalie’s magic seaming style and it is a great way to enter the world of making garments. Sized inclusively, the Aplomb Peplum Top Free Crochet Pattern literally flatters EVERY shape and figure style.
Read MoreDISCLOSURES: As an Amazon Associate I earn from qualifying purchases. Posts may includes affiliate links. Read full blog disclosure here.


All photos, designs, and patterns are copyright of Stitch & Hustle unless otherwise noted. Please do not repost or claim content as your own. This site displays third party ads and contains affiliate links. Stitch & Hustle is a participant in the Amazon Services LLC Associates Program, an affiliate advertising program designed to provide a means for sites to earn advertising fees by advertising & linking to amazon.com. Read policies & disclosures here.
Thank you for visiting!
TERMS of SERVICE | PRIVACY | ACCESSIBILITY | TARGETED ADS STATEMENT | PRIVACY RIGHTS |
DO NOT SELL MY INFO | COOKIE POLICY
Stitch & Hustle © 2017 - 2025 ALL RIGHTS RESERVED.


Get ready for summer fun with our newest free crochet pattern - the Nantucket Tank Top! With fun color details and a sweet lace panel, you’ll meet the season in style.