Turtleneck Colorblock Sweater free Knitting Pattern

Looking for a free knitting pattern that's oversized, cozy, and completely on-trend? I'm so excited to share this one. This batwing-inspired sweater pattern combines a dramatic dropped-sleeve silhouette with a bold three-color colorblock design, and I designed it specifically to be the perfect knit for football season, tailgates, and team-color game day fits.

Whether you're knitting it for yourself or coordinating a whole squad, this pattern delivers major style payoff for relatively simple construction, which is exactly the kind of win I love handing off to you.

I made mine in Category #3 DK weight yarn (I used Lion Brand Jeans in a three-color palette: Stovepipe, Classic, and Top Stitch), and this free sweater pattern knits up at a 20 st x 27 row gauge over stockinette stitch on US 8 needles. I sized it to fit a 46–70" finished bottom circumference, because I wanted this one to cover a wide range of sizes so everyone in your knit night can make one.

This one's not a classic batwing - think batwing-inspired: a modern, oversized silhouette with dramatic dropped sleeves that taper into a fitted cuff, giving you the drama without the bulk. And with the three-color colorblock design, it's basically begging to be knit in team colors.

Football season, tailgates, game day - this sweater was made for it.

Supply List:
Category #3 DK weight yarn
I used:
Main Color: Lion Brand Jeans Stovepipe 550 (650, 760, 880) yards Contrast Color: Lion Brand Jeans Classic 460 (540, 630, 730) yards
Trim Color: Lion Brand Jeans Top Stitch 80 (100, 130, 150) yards

Circular Needles: 16” US 8 / 5mm / 24” US 9 / 5.5mm; 32” US 10 m / 6mm Tapestry needle to weave ends
Tape Measure
Lifeline or extra needles to set aside stitches
Fasteners or safety pins

Stitches Used / Abbreviations:
CO – cast on
k- knit
p – purl
M1 – make 1
Kfb – knit front and back of stitch increase by 1
K2tog – knit 2 together
BO – bind off

Finished Measurements: Circumference at Bottom: 46 (54, 61.5, 70)”
GAUGE: 20 sts x 27 rows on US 8 / 5mm in stockinet stitch

NOTE:
This pattern is written for Adult Woman size Extra Small/Small. (Sizes Medium/Large, XL/XXL, 1X/2X in parentheses)
Shown in Extra Small / Small Size modeled on 5’6” model with 34” bust & 14” of positive ease
This sweater is poncho style and is worked from the top down.
First, the collar is crocheted sideways and seamed. The body of the poncho is worked down from the side of the collar

BEGIN WITH TRIM COLOR USING US 8 / 5mm 16” circular needles:

NECK:

CO 92 (98, 102, 106); join together being certain NOT to twist,

Round 1: *k2, p2*, Repeat * to * around

Repeat Round 1 until neck reaches approx. 6”


CHANGE TO MAIN COLOR USING US 9 / 5.5 mm 16” or 24’ circular needles:

SHOULDERS & UPPER BODY:

Round 1: k2tog, knit 44, (47, 49, 51), k2tog, knit 44, (47, 49, 51) – 2 sts decreased / 90 (96, 100, 104) sts. remain

Round 2: knit

Round 3: * knit 15 (12, 10, 9) sts, m1 *, repeat * to * around; 6 (8, 10, 12) sts increased, total for Round 96 (104, 110, 120) sts.

Round 4: * knit 16 (13, 11, 10) sts, m1 *, repeat * to * around; 6 (8, 10, 12) sts increased, total for Round 102 (112, 120, 132) sts.

Round 5: * knit  17 (14, 12, 11) sts, m1 *, repeat * to * around; 6 (8, 10, 12) sts increased, total for Round 108 (120, 130, 144) sts

Round 6: * knit 18 (15, 13, 12) sts, m1 *, repeat * to * around; 6 (8, 10, 12)) sts increased, total for Round 114 (128, 140, 156) sts

Round 7: * knit 19 (16, 14, 13) sts, m1 *, repeat * to * around; 6 (8, 10, 12) sts increased, total for Round 120 (136, 150, 168) sts

Round 8: * knit 20 (17, 15, 14) sts, m1 *, repeat * to * around; 6 (8, 10, 12) sts increased, total for Round 126 (144, 160, 180) sts.

Round 9: * knit 21 (18, 16, 15) sts, m1 *, repeat * to * around; 6 (8, 10, 12) sts increased, total for Round 132 (152, 170, 192) sts.

Round 10: * knit 22 (19, 17, 16) stsm1 *, repeat * to * around; 6 (8, 10, 12) sts increased, total for Round 138 (160, 180, 204) sts.

Round 11: * knit 23 (20, 18, 17) sts, m1 *, repeat * to * around; 6 (8, 10, 12) sts increased, total for Round 144 (168, 190, 216) sts.

Round 12: * knit 24 (21, 19, 18) sts, m1 *, repeat * to * around; 6 (8, 10, 12) sts increased, total for Round 150 (176, 200, 228) sts

CHANGE TO 32” CIRCULAR US 10 / 6mm needles

Rounds 13-15 (17, 19, 21): knit 150 (176, 200, 228) sts

SPLIT FOR ARMS WORKING FRONT AND BACK SEPERATELY

Place first 75 (88, 100, 114)  sts aside on lifeline, spare thread or other needle

NOTE: You will now begin working in Rows and turning your work after each Row.

CONTINUE BACK OF MAIN BODY / CREATE ARM HOLES:

Row 1: knit 75 (88, 100, 114)  sts, Turn.

Row 2: purl 75 (88, 100, 114)  sts, Turn.

Rows 3-30 (38, 46, 58): Repeat R 1-2

Break yarn.

Set sts aside on lifeline, spare thread or other needle & continue to front side.

CREATE FRONT OF MAIN BODY / FINISH ARM HOLES:

NOTE: You will still begin working in Rows and turning your work after each Row.

Rows 1-30 (38, 46, 58): work as for back.

Do not break yarn.

CLOSE ARMHOLES / COMPLETE BODY
NOTE:
You will now be working in the round again

Round 1: knit 75 (88, 100, 114)  sts then continue knitting Back knit 75 (88, 100, 114)  sts; for total 150 (176, 200, 228) sts

Rounds 2-36: knit 150 (176, 200, 228) sts.

Round 37: knit 73 sts, k2tog, knit 73 sts, k2tog, decrease 2 sts, 148 (174, 198, 226) remain

Round 38: knit 72 sts, k2tog, knit 72 sts, k2tog  decrease 2 sts, 146 (172, 196, 224) remain

Round 39: knit 71 sts, k2tog, knit 71 sts, k2tog  decrease 2 sts, 144 (170, 194, 222) remain


CHANGE TO TRIM COLOR USING US 8 / 5mm 16” circular needles:

Round 40: knit  144 (170, 194, 222) sts

Rounds 41-48: *k2, p2*, Repeat * to * around, 144 (170, 194, 222) sts


SLEEVES - USING TRIM COLOR USING US 8 / 5mm 16” circular needles:

CO 44 (44, 48, 48)

Row 1: *k2, p2*, Repeat * to * end, Turn

Repeat Row 1 until arm reaches approx. 12 (12, 16, 16)”

SIZE S/M, L/ XL ONLY: k1, kfb, k9, *kfb, k 10* Repeat * to * to end – increase 4 sts / 48 sts


CHANGE TO CONTRAST COLOR AND CHANGE TO US 10 / 6mm needles

Row 1: k1, kfb, *k5, kfb* repeat * to * to last 4 sts, k 4,  56 sts (all sizes)

Row 2: p all sts

Row 3:  k1, kfb, k to last 2 sts, kfb, k1  - increase 2 sts to 58 sts (all sizes)

Row 4: p all sts

Rows 5- 60  (60, 70, 70): Repeat Rows 3-4 / 168 (168, 188, 188) sts

BO
ASSEMBLY:
 

Line up center of sleeve to shoulder of armhole of main body and attach there

Attach sleeve to armhole. This will create an angle for the sleeve shape.

Then mattress stitch the under arm seam of the sleeve.

Repeat on other side

Block.

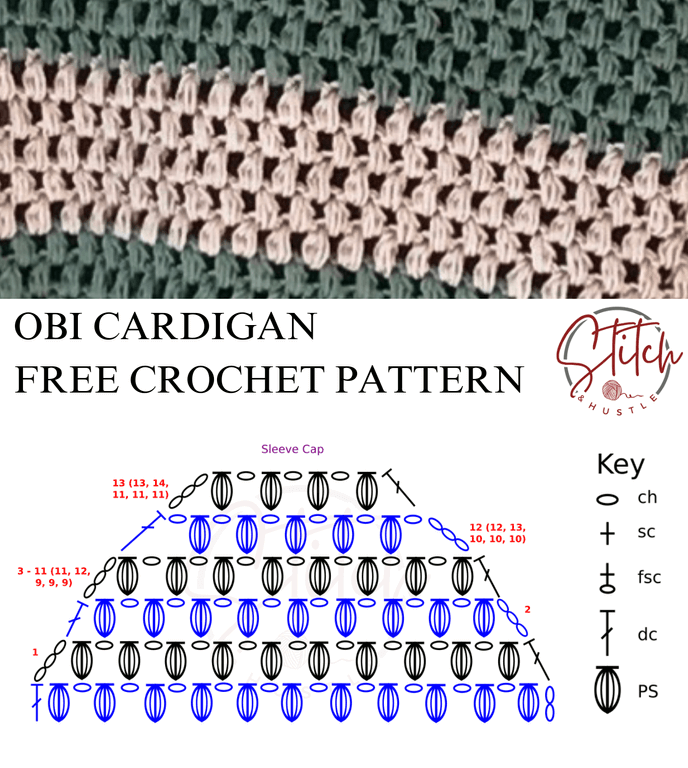
Obi Cardigan Free Crochet Pattern

It’s here - one of my favorite cotton patterns - the Obi Cardigan. It’s perfect for those in-between weather days when it’s not quite cold but still a little chilly. PLUS, it’s super quick and easy to make! It pairs with any tank top well.

Let me tell you all about it!

Why You’ll Love the Obi Cardigan
-It’s Fast & Easy: Whether you’re a crochet pro or just starting out, this cardigan comes together super quickly.
-Fits All Shapes & Sizes: The Obi Cardigan is written for SIX sizes, so there can be one for everyone. It’s got a relaxed, comfy fit that’s just perfect for layering, no matter your shape.
-Cotton Yarn Magic: I used soft cotton yarn for this pattern - it’s lightweight, breathable, and works great for transitional weather. Not too heavy, not too light, just right!
-Simple Yet Stylish: The design is straightforward, but the puff stitch gives it a little extra texture and charm. It’s a versatile piece you can wear on casual days or dress it up when you need to.

This cardigan is just what you need when the weather can’t make up its mind. It’s warm enough to take the chill off in the mornings, but light enough to wear when the sun starts shining. Trust me, it’ll quickly become your go-to layering piece!

AND, the Obi Cardigan has a fantastic texture - the puff stitch! The puff stitch is one of those little things that adds a lot of punch to a project. It’s textured, squishy, and just looks so pretty! I love this stitch so much (check out the Townsville Top, Gables Wrap, Manko Puff Stitch Infinity Scarf, Helix Puff Stitch Beanie) and am so excited to share it with you in a cardigan!

Supply List:
Category #4 light worsted weight yarn (Wool And The Gang Shiny Happy Cotton in sample.)
Main Color: 1100 (1200, 1330, 1490, 1600, 1880) yds / 1006 (1098, 1217, 1363, 1464, 1720) m
Contrast Color: 135 (150, 170, 190, 210, 235) yds / 124 (138, 156, 174, 193, 215) m
Crochet Hook Size I / 5.5 mm
Tapestry needle to weave ends
Tape Measure
Fasteners or safety pins
Button of Choice

GAUGE: 4” sq = 7 sts x 8 rows in *PS stitch, ch1*

Size: Extra Small (Small, Medium, Large, 1X, 2X)

Finished Measurements:
Bust: 31.5 (34.5, 37.5, 41, 44.5, 48.5)" / 80 (87.63, 95.25, 104.14, 113.03, 123.19) cm

Stitches Used / Abbreviations:
fsc – foundation single crochet
sc - single crochet
dc – double crochet
PS – Puff Stitch

Puff Stitch (PS):
Wrap yarn over hook; insert hook into ch sp, wrap yarn over hook & pull through leaving 3 loops on hook
Wrap yarn over hook; insert hook into same ch sp, wrap yarn over hook & pull through leaving 5 loops on hook
Wrap yarn over hook and pull through ALL 5 loops to create the “puff” stitch

NOTES:
This pattern is written for Adult Woman Extra Small (Sizes Small, Medium, Large, 1X & 2X in parenthesis)

I used a button that fits the spacing between stitches. You can use any size button you like and may need to add a button loop.

This pattern is made in two panels for front, 1 back panel and two sleeves. 5 separate pieces.

BLOCK ALL PIECES BEFORE ASSEMBLY.

PATTERN
BACK PANEL – BEGIN WITH MAIN COLOR:

Band
Row 1: Fsc x 10 (alternate: ch 9, turn, ch 1, 9 sc across), turn.
Row 2: Ch 1, 9 x sc in back loop only.
Rows 3- 55 (61, 67, 73, 79, 85): Repeat Row 2
Do not cut yarn – you will go directly to work the body.

Body
Row 1: Ch 1 (acts as first sc), sc across placing 1 sc in the side of each row of band for a total of 55 (61, 67, 73, 79, 85) sc, turn.
Row 2: Ch 2 (acts as dc), *PS in next sc, ch 1, sk next sc,* Repeat from * to * to last 2 sc, PS, in next sc, dc in last sc, turn. 27 (30, 33, 36, 39, 42) PS.
Row 3: Ch 3 (acts as dc + ch 1), * PS in ch-1 sp, ch 1, skip PS* Repeat from * to* to last dc, dc in dc, turn. 26 (29, 32, 35, 38, 41) PS.
Rows 4-11: Repeat Rows 2-3, alternating.

Change to Contrast Color
Rows 12-16:
Repeat Rows 2-3, alternating.

Change BACK to MAIN Color
Rows 17 - 22:
Repeat Rows 3-2, alternating.

Shape Armholes
Row 23:
Ch 3, skip next PS, * PS in ch-1 sp, ch 1, skip PS* Repeat from * to* to last ch 1 and PS, PS in ch-1, skip PS, dc in ch-3, turn. 26 (29, 32, 35, 38, 41) PS remain.
Rows 24-26 (26, 26, 28, 30, 30): Ch 3, skip next PS, * PS in ch-1 sp, ch 1, skip PS* Repeat from * to* to last ch 1 and PS, PS in ch-1, skip PS, dc in dc, turn. 23 (26, 29, 30, 31, 34) PS remain, 48 (54, 60, 62, 64, 70) total sts.
4 (4, 4, 6, 8, 8) sts decreased at each armhole.
Rows 27 (27, 27, 29, 31, 31)-36 (37, 38, 38, 39, 40): Repeat Rows 2-3 of Body (Work even in PS pattern)
Fasten off.

FRONT - MAKE TWO PANELS:

Band – Begin with Main Color
Row 1: Fsc x 10 (alternate: ch 9, turn, ch 1, 9 sc across), turn.
Row 2: Ch 1, 9 x sc in back loop only.
Rows 3 - 29 (31, 35, 37, 41, 43): Repeat Repeat Row 2
Do not cut yarn – you will go directly to work the body.

Body
Row 1:
Ch 1 (acts as first sc), sc across placing 1 sc in the side of each row of band for a total of 29 (31, 35, 37, 41, 43) sc, turn.
Row 2: Ch 2 (acts as dc), skip first sc, *PS in next sc, ch 1, sk next sc,* Repeat from * to * to last sc, dc in last sc, turn. 14 (15, 17, 18, 20, 21) PS.
Row 3: Ch 2 (acts as dc), * PS in ch-1 sp, ch 1, skip PS* Repeat from * to* to last dc, dc in dc, turn. 13 (14, 16, 17, 19, 20) PS.
Rows 4-11: Repeat Rows 2-3, alternating.

Change to Contrast Color
Rows 12-16:
Repeat Rows 2-3, alternating.

Change BACK to Main Color
Rows 17 - 22:
Repeat Rows 3-2, alternating.

Shape Armholes & Begin Shape Neck:
Row 23:
Ch 3, skip next PS, * PS in ch-1 sp, ch 1, skip PS* Repeat from * to* to last ch 1 and PS, PS in ch-1, skip PS, dc in ch-3, turn. 13 (14, 16, 17, 19, 20) PS
Rows 24-26 (26, 26, 28, 30, 30): Ch 3, skip next PS, * PS in ch-1 sp, ch 1, skip PS* Repeat from * to* to last ch 1 and PS, PS in ch-1, skip PS, dc in dc, turn. 4 (4, 4, 6, 8, 8) sts decreased at both armhole and neck edges.

Armhole Shaping is complete; continue Shaping Neck.
Row 27 (27, 27, 29, 31, 31):
Ch 3, sk next PS, * PS in ch-1 sp, ch 1, skip PS* Repeat from * to * to ch-3, dc in ch-3, turn. 1 st decreased at neck edge.
Row 28 (28, 28, 30, 32, 32): Ch 2, * PS in ch-1 sp, ch 1, skip PS * Repeat from * to * to last ch-1 and PS, PS in ch-1 sp, skip last PS, dc in ch-3, turn. 1 st decreased at neck edge.
Rows 29 (29, 29, 31, 33, 33) - 32 (32, 32, 34, 36, 36): Repeat last 2 rows, alternating.
Rows 33 (33, 33, 33, 37, 37) - 36 (37, 38, 38, 39, 40): Repeat Rows 2-3 of Body (Work even in PS pattern)
Fasten off.

SLEEVE – MAKE TWO

SLEEVE NOTES:
You will begin working in the round and NOT turning but joining your rows
At ROW 21 you will NOT join and begin to decrease and turn after each row. Pattern written for 3⁄4 sleeve length with note for full length.

Cuff
Row 1: Fsc x 10 (alternate: ch 9, turn, ch 1, 9 sc across), turn.
Row 2: Ch 1, 9 x sc in back loop only.
Rows 3-30 (30, 32, 34, 34, 36): Repeat Row 2.
Do not cut yarn – you will go directly to work the body.

Sleeve Body
Round 1: Ch 1 (acts as first sc), sc across placing 1 sc in the side of each row of band for a total of 30 (30, 32, 34, 34, 36) sc,
Round 2: Ch 2, PS in same, ch 1, skip first sc, *PS in next sc, ch 1, skip next sc,* Repeat from * to * to end sl st to top of first PS. 15 (15, 16, 17, 17, 18) PS.
Round 3: Sl St over to ch 1, [PS, ch 1, PS] in same * PS in ch-1 sp, ch 1, skip PS* Repeat from * to* to end then PS, ch in last. 17 (17, 18, 19, 19, 20) PS.
Rounds 4-5: Rep Round 2.
Round 6: Rep Round 3 increase. 19 (19, 20, 21, 21, 22) PS.
Rounds 7-8: Rep Round 2.
Round 9: Rep Round 3 increase. 21 (21, 22, 23, 23, 24) PS.

Large (1X, 2X) Sizes Only:
Rounds 10-12:
Repeat Rounds 4-6. 25 (25, 26) PS.
1X (2X) Size Only:
Rounds 13-15:
Repeat Rounds 4-6. 27 (28) PS.

All Sizes:
21 (21, 22, 25, 27, 28) PS.

Rounds 10 (10, 10, 13, 16, 16)-20: Repeat Round 2.

*NOTE: This pattern is written for 3⁄4 sleeves. For full sleeve, continue to repeat Round 2 here 8 more times or to desired length before shaping cap*

Shape Sleeve Cap
Row 1:
Ch 3, sk next PS, * PS in ch-1 sp, ch 1, skip PS* Repeat from * to* to last ch 1 and PS, PS in ch-1, sk PS, dc in last, turn. 20 (20, 21, 24, 26, 27) PS remain, 2 sts decreased.
Row 2: Ch 3, skip next PS, * PS in ch-1 sp, ch 1, skip PS* Repeat from * to* to last ch 1 and PS, PS in ch-1, skip PS, dc in dc, turn. 19 (19, 20, 23, 25, 26) PS remain, 2 sts decreased.
Rows 3-11 (11, 12, 9, 9, 9): Repeat row 22 (decreasing 1 PS/2 sts each row). 10 (10, 10, 16, 18, 19) PS remain.
Row 12 (12, 13, 10, 10, 10): Ch 4, skip [PS, ch 1, PS], * PS in ch-1 sp, ch 1, skip PS * Repeat from * to * to last 2 PS, skip [PS, ch 1, PS], dc in ch-3, turn. 7 (7, 7, 13, 15, 16) PS remain, 4 sts decreased.
Row 13 (13, 14, 11, 11, 11): Ch 3, skip ch 1 and PS, * PS in ch-1 sp, ch 1, skip PS * Repeat from * to * to last PS, skip last PS and ch 1 sp, dc in ch-3, turn. 4 sts decreased.
Rows 14 (14, 15, 12, 12, 12) – 14 (15, 16, 16, 17, 18): Repeat last 2 rounds until 5 sts remain.
Fasten off.

BLOCK ALL OF YOUR PIECES BEFORE ASSEMBLY

ASSEMBLY: ***Same for ALL sizes***

BODY ASSEMBLY:
Marry your back panel to front panels INSIDE OUT
Using your stitch marker or fastener, pin the panels together at Row 1 of Armhole Shaping Beginning at bottom ribbing, connect the panels with either mattress stitch or sc up the seam When you get to fastener, fasten off.

SLEEVES ASSEMBLY:

Using your fasteners, attach your sleeve on the RIGHT SIDE to the body.

Working on the inside of the garment, beginning at bottom center of armhole, attach sleeve by either whip stitch or sc around

Turn right side out and affix your button of choice to the top of the front panel just before the neck decrease.

Rockland Cotton Sweater Free Crochet Pattern

Rockland Cotton Sweater Free Crochet Pattern

The Rockland Sweater Free Crochet Pattern is great for beginners looking to start making garments or experienced crocheters looking for a new adventure in sweaters. Make the Rockland Sweater Free Crochet Pattern in your favorite cotton and wear it all through spring! It is a great transitional piece and perfect for layering too.

Read More

Sierra Oversized Cozy Cardigan Free Crochet Pattern

Sierra Oversized Cozy Cardigan Free Crochet Pattern

Surround yourself in cozy warmth with the Sierra Oversized Cozy Cardigan Free Crochet Pattern. This first appeared in Happily Hooked Magazine in 2018 and now i am so excited to bring it to you free to create your own cozy cardigan! The secret trick to this special cardigan is in the construction. The body is actually made in a single piece! Then you add your sleeves and trim. This is very beginner friendly and you can make it in your favorite chunky yarn.

Read More

Montgomery Jumper Free Crochet Sweater Pattern

Montgomery Jumper Free Crochet Sweater Pattern

The Montgomery Jumper Free Crochet Pattern works up in two identical panels and is great for beginner crocheters who are making their first garment. It is just as fun for experienced crocheters who want to explore texture. I used the wonderful Universal Yarn Cotton Batik which is a variegated yarn and contrasted it with a cotton solid. You can play around with how you change up the colors or add stripes throughout for a special twist of fun. The design allows for either cropped or full length giving you even more ways to customize as you go!

Read More

Unbirthday Statement Cardigan - Free Knitting Pattern

Unbirthday Statement Cardigan - Free Knitting Pattern

Get ready for a fringe party with this little ode to Wonderland collaboration that we are bringing you in the Unbirthday Statement Cardigan Free Knitting Pattern designed by Afifa Sayeed featuring yarn from Asylum Fibers and her Alice In Wonderland themed colors. While this is definitely an intermediate level pattern, do not fear the intricacy - YOU CAN MAKE THIS!!! Our testers did a wonderful job showing all the ways to make this your own with fun button choices and yarn colors too.

Read More