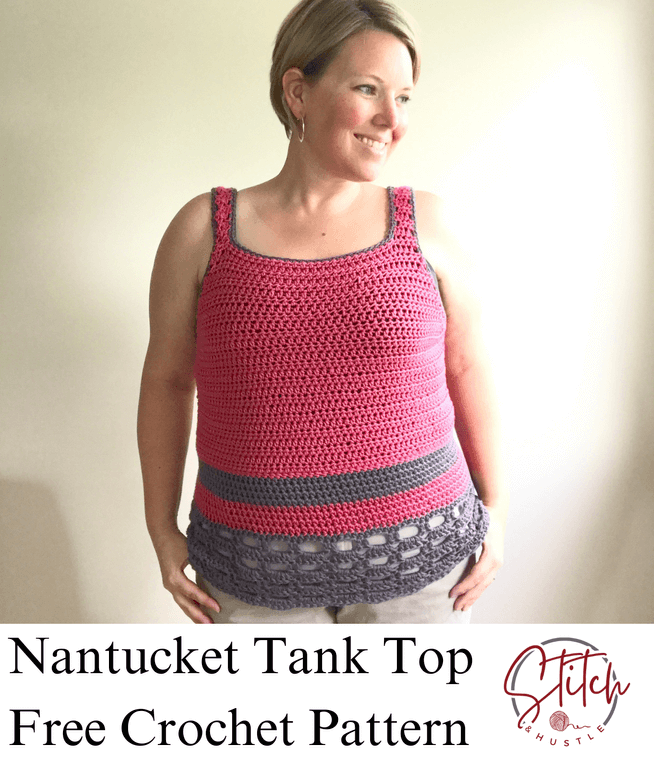
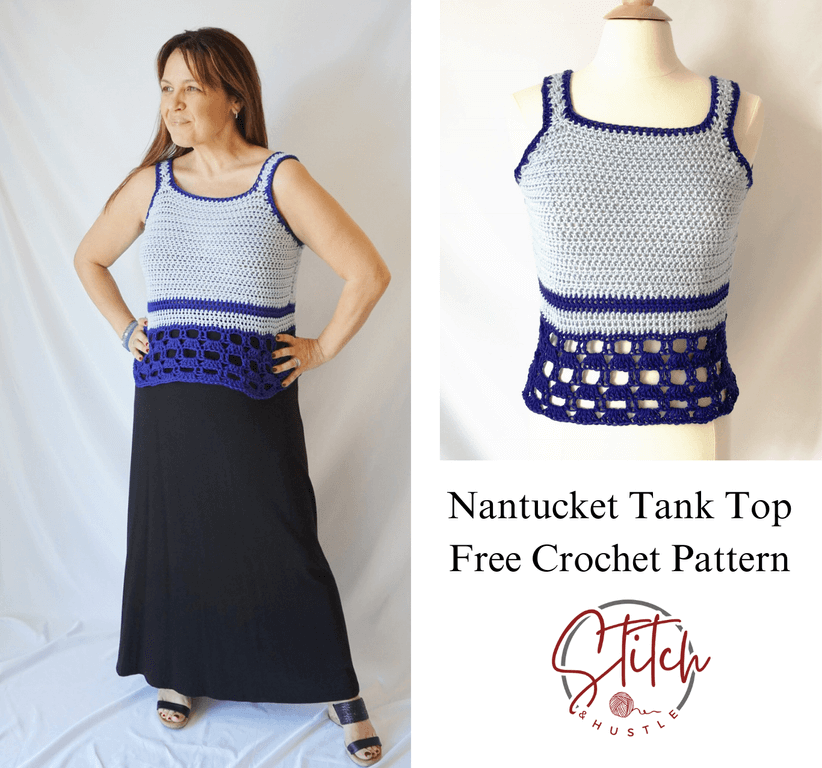
Nantucket Tank Top Free Crochet Pattern
/If you’re looking for your next easygoing summer make, I’ve got just the thing: the Nantucket Tank Top - and yep, it’s another free crochet pattern!
This top is such a fun little project to work on when the weather’s warm and you want something quick, cute, and wearable. It has just enough detail to keep things interesting (hello, pretty lace hem panel), but it’s still totally approachable-especially if you’re an advanced beginner looking for something a tiny bit more exciting than the usual.
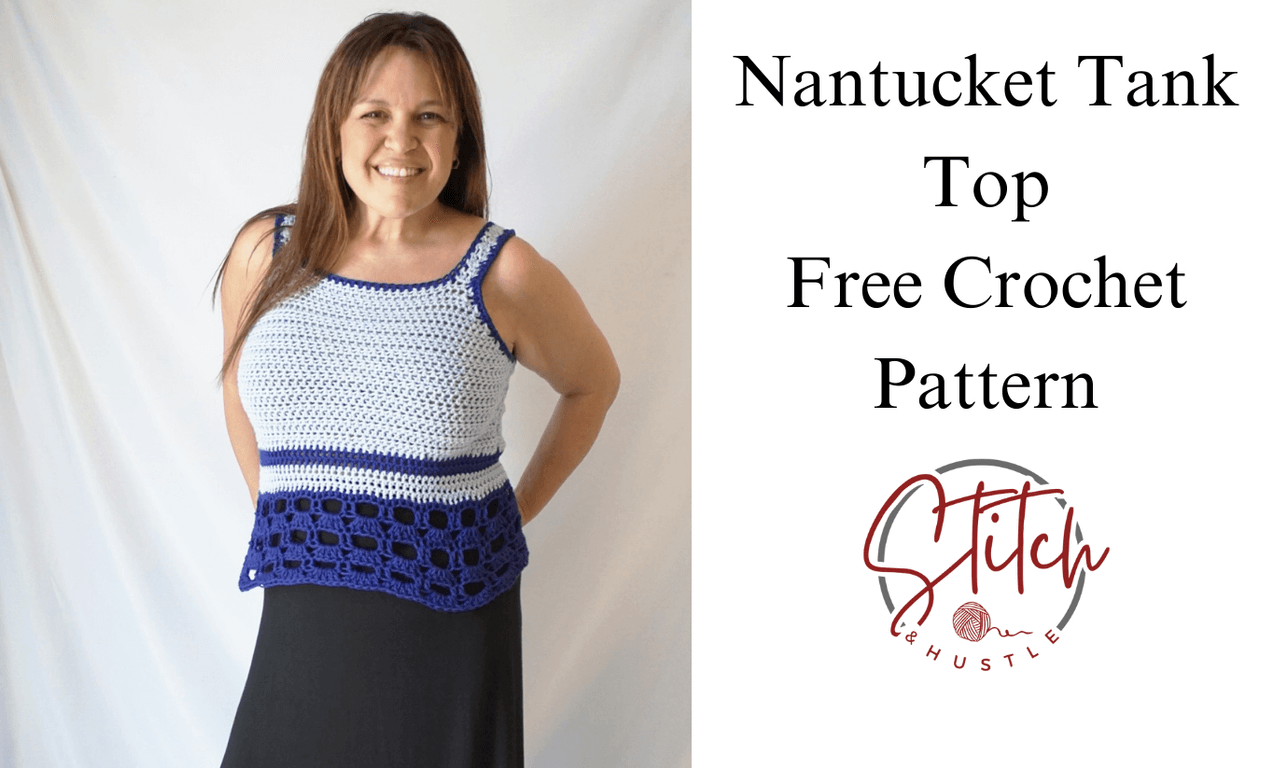
One of my favorite parts? It comes with two length options - you can go cropped for a casual, summery vibe or choose the tunic length if you want a bit more coverage. Plus, the standard-width straps means you can wear it with a regular bra without fussing over layers or strapless options (because who has time for that?).
So pick a fave color combo in some comfy cotton yarn, head out to that lounge chair in the sun, and you’ll have this beauty whipped up in no time!

Supply List:
Category #4 Light Worsted Cotton (Wool And The Gang Shiny Happy Cotton used in design. Crochet.com has a bunch of great options to check out too.)
Crop:
Main Color (Purple Haze): 260 (285, 310, 340, 370) yds
Contrast Color (Purple): 135 (150, 165, 180, 195) yds
Tunic:
Main Color (Purple Haze): 315 (345, 375, 340, 460) yds
Contrast Color (Purple): 160 (175, 195, 220, 235) yds
Crochet Hook Size I-9 / 5.5 mm
Tapestry needle to weave ends
Tape Measure
Fasteners or safety pins
Stitches Used / Abbreviations:
fhdc – foundation half double crochet
ch – chain loop
hdc – half double crochet
dc – double crochet
sc – single crochet
sl st – slip stitch
hdc2tog – hdc 2 together

GAUGE: 4”sq = 11 sts x 9 rows in hdc stitch
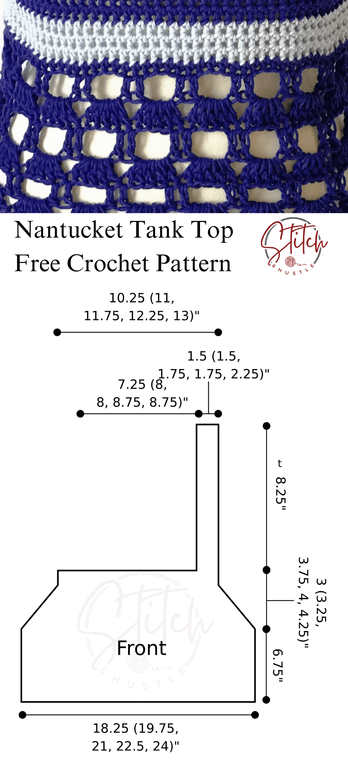
Sizes: Extra Small (Small, Medium, Large, 1X)
Finished Measurements: Bust: 36.5 (39.5, 42, 45, 48)”
NOTES:
This pattern is written for Adult Woman Extra Small. (Size Small, Medium, Large & 1X in parenthesis) This pattern is written for Crop or Tunic options. Cropped shown in samples.
This pattern is made in two panels, front & back and the “skirt” is added after assembly Assembly calls for Mattress Stitch Method, if you do not know this you can whip stitch instead.
READ THROUGH PATTERN BEFORE BEGINNING
Block BEFORE assembly
PATTERN
MAKE 2 PANELS IN MAIN COLOR:
Row 1: Fhdc x 50 (54, 58, 62, 66), TURN
Rows 2 - 15: Ch 2 (acts as first hdc), 49 (53, 57, 61, 65)x hdc across for total 50 (54, 58, 62, 66) hdc incl ch 2. TURN
Begin Shaping Armhole:
Row 16: Ch 2 (acts as first hdc), [hdc2tog] 2 times, hdc across to last 4 stitches then [hdc2tog] 2 times, 4 stitches decreased, 46 (50, 54, 58, 62) stitches remain. TURN
Rows 17-18: Repeat Row 16, 38 (42, 46, 50, 54) stitches remain
Rows 19-23 (24, 25, 26, 27): Ch 2 (acts as first hdc), hdc2tog, hdc across to last 2 stitches then hdc2tog, 2 stitches decreased, 28 (30, 32, 34, 36) stitches remain. TURN
Rows 24 (25, 26, 27, 28) – 25 (26, 27, 28, 29): Ch 2 (acts as first hdc), hdc across for total 28 (30, 32, 34, 36) hdc incl ch 2. TURN
Make Strap:
Row 26 (27, 28, 29, 30): Ch 2 (acts as first hdc), 3 (3, 4, 4, 5)x hdc, TURN
Rows 27 (28, 29, 30, 31) – 40 (41, 42, 44, 45): Repeat Row 27
Fasten off – leaving long tail (approx. 8 inches) for assembly.
BLOCK BEFORE ASSEMBLY
ASSEMBLY
Marry your two panels with one strap on each side and this will now be INSIDE OUT.
Using your stitch marker or fastener, pin sides of panels together at Row 16 beginning armhole shaping.
Using your long tail from the bottom, and using mattress stitch method, attach the sides working from the bottom to the fastener on each side.
Using mattress stitch, connect the straps one to the back and one to the front.
After top is assembled:
TURN RIGHT SIDE OUT TO CONTINUE IN THE ROUND
You will now be working in the round with joined rounds. Join each round with sl st to complete – BUT DO NOT TURN YOUR WORK.
CHANGE TO CONTRAST COLOR
Crop: Rounds 1 - 2: Ch 2 (acts as first hdc), 99 (104, 114, 124, 129)x hdc across for total 100 (105, 115, 125, 130) hdc incl ch 2. Note – stitch count must be a multiple of 5.
Tunic: Rounds 1 - 4: Ch 2 (acts as first hdc), 99 (104, 114, 124, 129)x hdc across for total 100 (105, 115, 125, 130) hdc incl ch 2. Note – stitch count must be a multiple of 5.
CHANGE TO MAIN COLOR
Crop Rounds 3 - 5: Ch 2 (acts as first hdc), 99 (104, 114, 124, 129)x hdc across for total 100 (105, 115, 125, 130) hdc incl ch 2.
Tunic Rounds 5 - 9: Ch 2 (acts as first hdc), 99 (104, 114, 124, 129)x hdc across for total 100 (105, 115, 125, 130) hdc incl ch 2.
SKIRT:
CHANGE TO CONTRAST COLOR:
Round 1: Ch 2 (acts as first hdc), 99 (104, 114, 124, 129)x hdc across for total 100 (105, 115, 125, 130) hdc incl ch 2.
Round 2: Ch 2 (acts as first dc), dc in next st, * ch 3, skip 3 hdc, dc in next, dc in next *; repeat * to * around, sl st to top of ch 2 that started round to complete.
Round 3: Ch 2 (acts as last dc of this round), skip 2 dc, * 5x dc in ch 3 space, skip 2 dc *; repeat * to * around, sl st to top of ch 2 that started round to complete (last group will only have 4 dc and ch 3).
Round 4: Ch 2 (acts as first dc), dc in next st, * ch 3, skip 3 dc, dc in next, dc in next *; repeat * to * around, sl st to top of ch 2 that started round to complete.
Round 5: Repeat Round 3.
Rounds 6-7 (9 for Tunic): Repeat Rounds 4-5, 1 (2) more time(s).
NOTE: For longer skirt, repeat Rounds 4-5 to desired length. More yarn will be required for this. Fasten off.

FINISHING & TRIM:
Neck Edging:
Attach MAIN color at back center of neckline , Then:
Ch 1, sc across working 1 sc in each hdc and 2 sc in each ch-2, sc in each hdc across the front neckline, sc in each hdc up the second strap and 2 sc in each ch-2, sc in each hdc across back neckline, sl st to beg ch 1.
CHANGE TO CONTRAST COLOR:
Ch 1, sc around neckline and sl st to ch 1 to join and complete. Fasten off.
Arm Edging:
Attach MAIN color at back where strap begins , Then:
Ch 1, sc up the strap and around each armhole placing 1 sc in each hdc and 2 sc in each ch-2.
CHANGE TO CONTRAST COLOR:
Ch 1, sc around armhole and sl st to ch 1 to join and complete. Fasten off.
Repeat on other side. Weave in all ends.