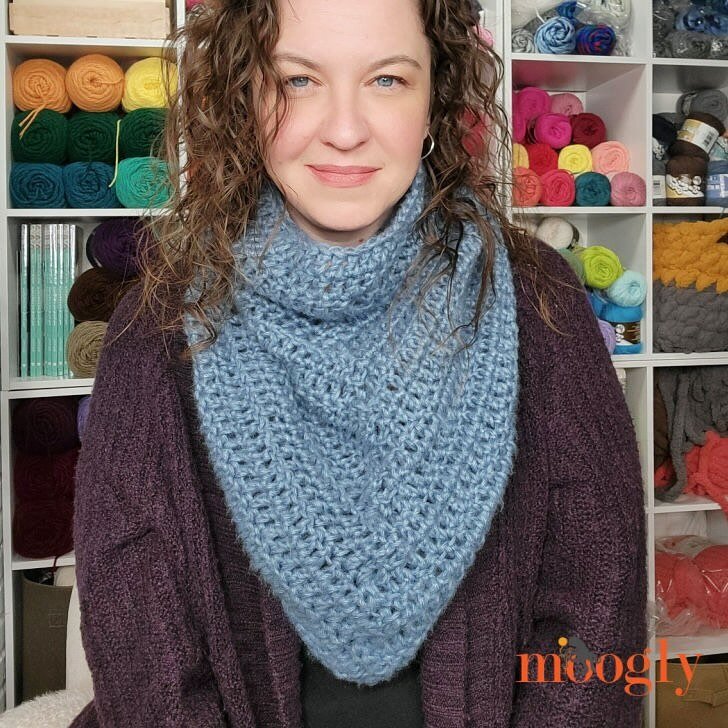
Juno 'Lite' Crochet Shrug Free Crochet Pattern
/AH the joys of transitional weather are in the air. Layering season is officially here and so I could not help but to bring out the Shrug game. The Juno 'Lite' Crochet Shrug Free Crochet Pattern is a perfect layer as the weather varies in a single day.
One of my most popular patterns ever was my Juno Shrug that launched this little adventure so many years ago. So I thought it was time for a new lighter version for the Spring & Fall transitional weather I love so much. I teamed up with the fine folks at We Crochet to bring you this new updated Juno 'Lite' Crochet Shrug Free Crochet Pattern.

You can find the original Juno Shrug Free Crochet Pattern here and see why everyone loves the Juno so much.
The Juno 'Lite' Crochet Shrug Free Crochet Pattern brings you the same cozy comfort as the original Juno Shrug but in a lighter weight. The yarn I chose is the We Crochet Mighty Stitch.

The We Crochet Mighty Stitch. is a great bulky yarn because it is cozy but not overly dense in how it is spun. This allows for a great amount of breathability as you stitch along and is why it is a perfect fit for the Juno 'Lite' Crochet Shrug Free Crochet Pattern.
So grab some yarn and let’s get stitching!

SKILL LEVEL: Advanced Beginner
MATERIALS
Yarn: WeCrochet Mighty Stitch Bulky 600 (690, 730) yds.
Bulky weight; 80% Acrylic, 20% Superwash Wool; 136 yd / 124 m per ball
Size L-11 / 8 mm Crochet Hook
Darning Needle
Tape Measure
Fasteners or safety pins
SIZES: Small/Medium (Large/1X, 2X/3X)
GAUGE: 10 sts x 6 rows = 4” in hdc

ABBREVIATIONS:
fhdc - foundation half double crochet
ch = chain
sc = single crochet
hdc = half double crochet
sc2tog = 2 single crochet together
sts = stitches
RS = Right Side
WS = Wrong Side
PATTERN NOTES:
Shown in Small/Medium size
If you have trouble meeting gauge - you will need to add or remove stitches for your initial row to meet required width
You can then add rows to meet required length if needed.
The stitch counts given in the pattern are based on the listed gauge, but it is very easy to substitute other weights of yarn. For the foundation row, simply work to the listed measurement, adding stitches as needed to meet this width.

PATTERN:
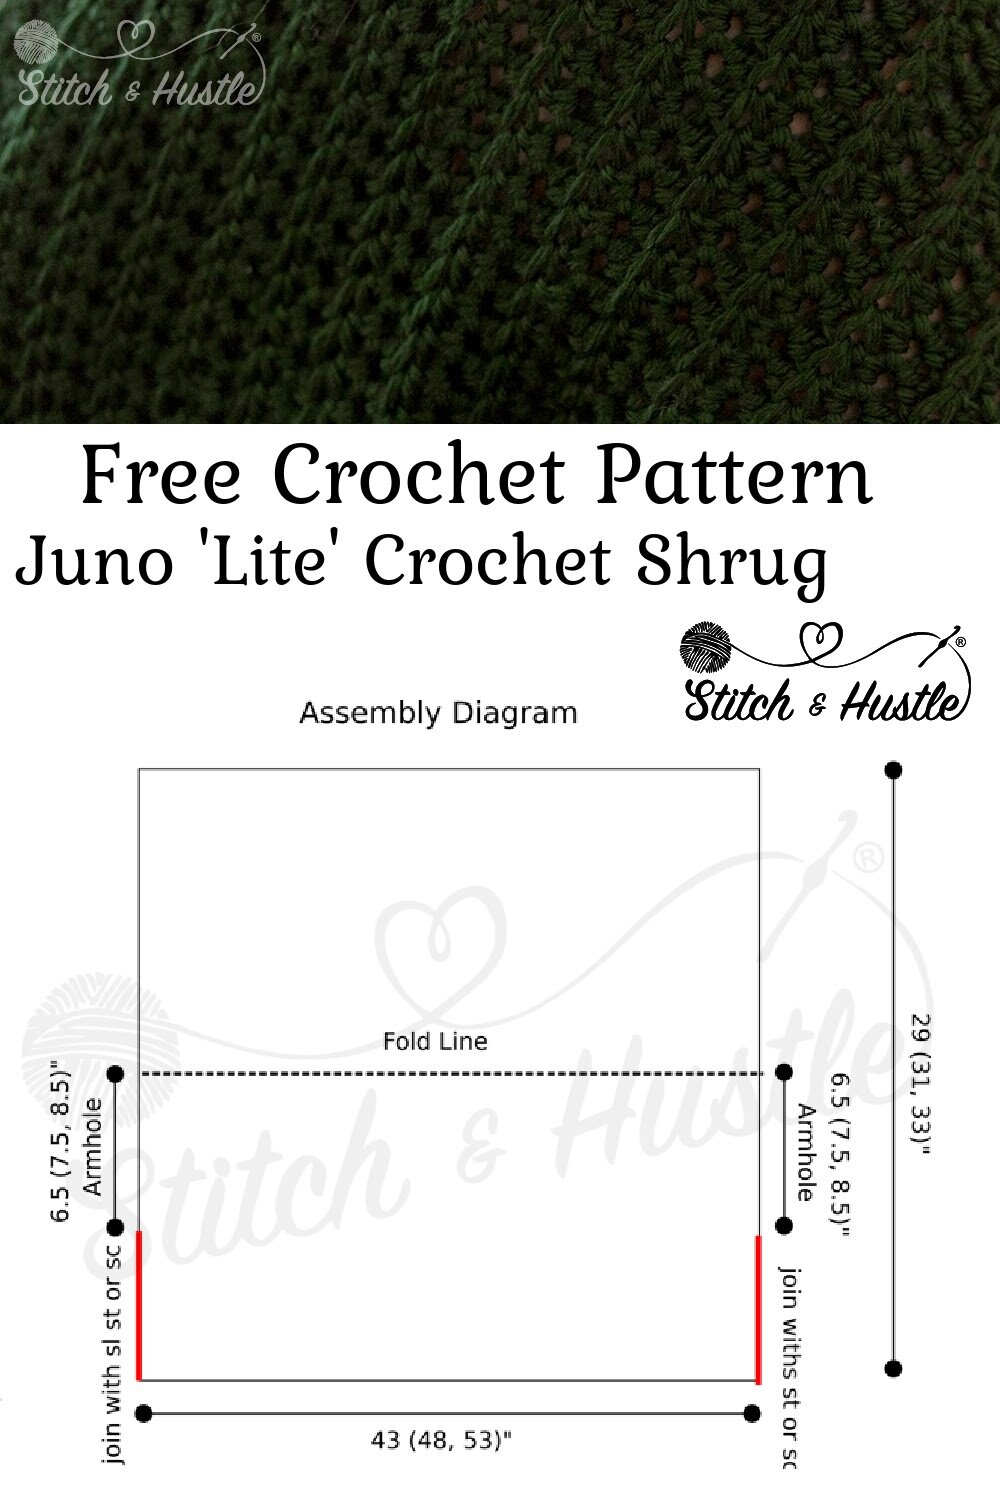
ROW 1: Fhdc x 102 (110, 134) or to approx 43 (48, 53)”.
ROW 2: Ch 1 (does NOT act as stitch), 102 (110, 134) hdc across in back loop only, turn. (RS)
ROW 3: Ch 1 (does NOT act as stitch), 102 (110, 134) hdc across, turn. (WS)
ROWS 4 – 45 (48, 51): Repeat Rows 2 & 3 alternating, or to approx. 29 (31, 33)”.
ROW 46 (49, 52) : Ch 1 (does NOT act as stitch), 102 (110, 134) hdc
Fasten off leaving long tail of 12” or more.
ASSEMBLY
Fold your work in half with WS facing out, marrying the beginning fhdc & last hdc rows – this will be inside out now.
From the folded side: measure 6.5 (7.5, 8.5)” and place pin. This will be your armhole.
Begin working from where the folded corners of the fhdc & hdc rows meet and work sl st OR single crochet to marry the sides.
Work up to your pin for the armhole.
Fasten Off.
Repeat on the other side.
Turn right side out and lay your piece out in a diamond shape with armholes on either side.
CUFFS:
ROUND 1: Ch 1, sc evenly all the way around armhole opening (approx 3 sc for every 2 rows), working sc2tog at seam, sl st to top of ch 1 to join.
ROUND 2: Ch 1 (does NOT act as stitch) hdc around, sl st to top of first hdc to join.
Fasten Off.
Repeat on the other side.

COLLAR:
Rejoin your yarn at top center of diamond shape - which will become the Neck
Place stitch marker on each side approx. 7” below sleeve seams.
ROUND 1: Ch 1, sc evenly to marker below the sleeve seam, * [2 sc in next], 1 sc in next 5 sts *, repeat * to * to second marker approx. 7 inches below sleeve seam on other side, evenly sc around to end, sl st to top of ch 1 to join.
ROUND 2: Ch 1 (does NOT act as stitch) hdc around, sl st to top of first hdc to join.
Fasten Off.
Weave in all ends.