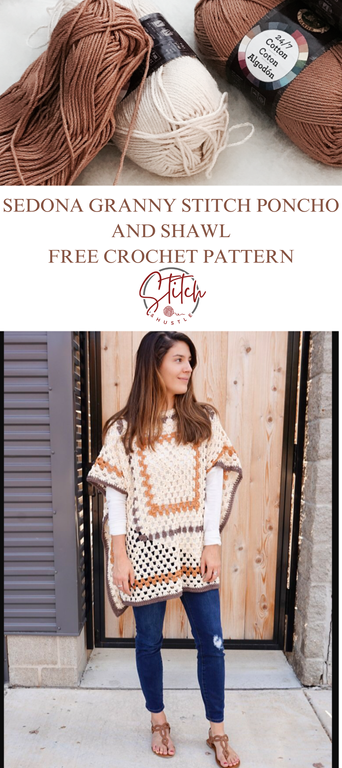
Sedona Granny Stitch Poncho Free Crochet Pattern
/Disclaimer: This post includes affiliate links. Read full blog disclosure here.
I am so excited about this poncho. Not just because it is part of the Great Granny Blog Hop of 2017, but because it is just so cozy and versatile for a poncho. Not the average granny for sure.

It works up super easy and you can even adjust it for any size. A few strategically placed buttons and you've got much more than a poncho. Its a shirt/cape. Its a shawl. A scarf. And yes, a Fab Poncho! I made it with Lion Brand 24/7 Cotton so it is the perfect transitional weather accessory too! You can also get an ad free printable version of this pattern with schematic in my etsy shop here.
I selected Lion Brand 24/7 Cotton for this project because it is super soft but also great for transitional weather. It also has some amazing fall colors to select from and it made me think of leaves changing colors and falling to the ground and jumping in leafy piles right away.
Oh fall :-)
The pattern is really easy to customize for any size. Just add or remove a few rows AFTER the assembly to meet your customization. It is written for size Extra Small/Small (Medium/Large, 1X/2X, 3X/4X in parentheses). It is intended to be super loose fitting so keep that in mind when selecting your size. And have fun. Make it your style! you can buy and download an ad free version of this pattern on my site or etsy shop here.
Supply List:
Lion Brand 24/7 Cotton
Color A: 3 (4, 5, 6) Skeins
Contrast Colors B & C: 1 (1, 2, 2) Skeins
Crochet Hook Size J-10 / 6 mm
Tapestry needle to weave ends
Tape Measure
Fasteners or safety pins
2 (4) Buttons of choice (at least 2” diameter)
Stitches Used / Abbreviations:
ch – chain loop
sc – single crochet
hdc – half double crochet
dc – double crochet
sl st – slip stitch
GAUGE: 3 granny clusters x 6 rows = 4”
MAKE TWO IDENTICAL PANELS:
Create Granny Square Using following scheme:
Color A (primary color): 5 (6, 6, 7) Pattern Rounds
Change to Color B: 2 (2, 3, 3) Pattern Rounds
Change to Color A: 2 (3, 3, 4) Pattern Rounds
Change to Color C: 1 (1, 2, 2) Pattern Rounds
Change to Color A: 2 (2, 2, 2) Pattern Rounds
Fasten off.


ASSEMBLY
Marry your two panels and this will now be INSIDE OUT.
Measure 3 (4.5, 5.75, 7)” in from the outer corner on each side, and using your stitch marker or fastener, pin the panels together to create the neck opening
Then, beginning from the outside , use mattress stitch method to marry the panels, creating the shoulders and neck opening.
TURN RIGHT SIDE OUT and continue.
Attach Color A at seam where you joined panels:
Round 1: Ch 2 (acts as first dc), dc in next st, ^^* ch 1, skip 3 dc, 3x dc into next ch 1 space * Repeat* to * to corner, ch 1, [3x dc ch 2, 3x dc] into last ch 1 space of row to create corner; * ch 1, skip 3 dc, 3x dc into next ch 1 space* Repeat* to * all way across, ch 1, [3x dc ch 2, 3x dc] into last ch 1 space of row to create corner; * ch 1, skip 3 dc, 3x dc into next ch 1 space* Repeat* to * all way across until you get to seam, ^^ ch 1, dc in each of the st on either side of seam and in seam, Repeat ^^ to ^^ 1 more time, dc in last st before beginning ch 2, sl st to ch 2 to complete round.

Rounds 2 - 4: (Pattern Rounds): Ch 2 (acts as first dc), 2 dc in same, ^^* ch 1, skip 3 dc, then 3x dc into next ch 1 space of previous row* Repeat* to * corner, ch 1, [3x dc ch 2, 3x dc] into corner ch 2 space; ^^ Repeat ^^ to ^^ 2 more times, ch 1, skip 3 dc, then 3x dc into next ch 1 space * Repeat* to * beginning ch 2, ch 1, sl st to ch 2 to complete round.
Change to Color B:
Rounds 5 – 6: Repeat Pattern Rounds
Change to Color A:
Rounds 7 – 8: Repeat Pattern Rounds
Change to Color C:
Round 9: Ch 2, act as first hdc, * hdc in each st and space to corner ch 2 space, [3x hdc, ch 2, 3x hdc] into ch 2 space* Repeat * to * 3 more times, hdc to beginning ch 2, sl st to ch 2 to complete round.
Round 10: Ch 1 (acts as first sc), * sc in each hdc to corner ch 2 space, [3x sc, ch 2, 3x sc] into ch 2* Repeat * to * 3 more times, sc in each hdc to beginning ch 1, sl st to ch 1 to complete round.

I added 4 buttons to the front to the front on each side as shown on the photo. This allows me to me to fasten the front and back for more of a shirt – cape look as well as join front and back and create “sleeves”. You can place buttons wherever you like – see the arrows on the photo for suggested placement.
The buttons should be at least large enough to use the granny clusters to capture them. I used 2” round buttons. And voila. You have a perfect fall poncho! It is so versailte and so cozy. Enjoy!

See the other Great Granny Blog Hop Free Patterns:
ChiWei - 1 Dog Woofwww.1dogwoof.com/love-triangles-granny-stripe-baby-blanket/
Nicole naturallynoracrochet.com
Jessmakeanddocrew.com/crochet-granny-stitch-shawl-free-pattern
Jessica http://www.mamainastitch.com
Krista http://rescuedpawdesigns.com/2017/09/25/simple-granny-scarf/